Canon 2MC Elura 2 and Elura 2MC Instruction Manual - Page 24
Playing Back a Cassette
 |
UPC - 013803606294
View all Canon 2MC manuals
Add to My Manuals
Save this manual to your list of manuals |
Page 24 highlights
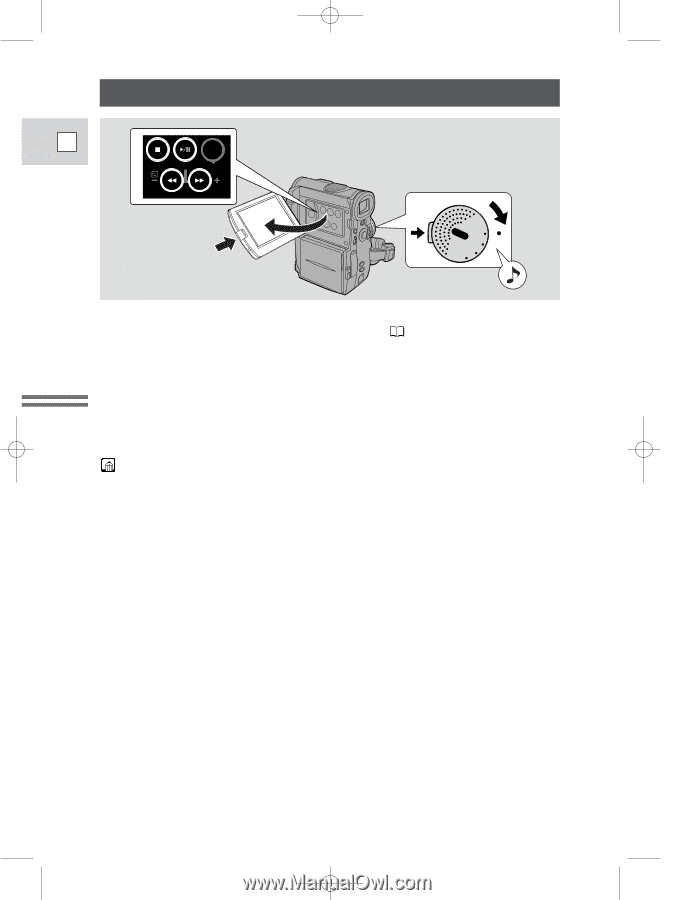
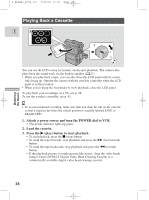
2_ELURA2_E(08-32) 7/25/00 17:03 Page 24 Playing Back a Cassette E 3 ON/ OFF REC SEARCH D.EFFECTS 1 POWER VCR OFF MPO.SVCIEAN Mastering the Basics You can use the LCD screen for instant, on-the-spot playback. The camera also plays back the sound track via the built-in speaker ( 27). • When you play back a tape, you can also close the LCD panel with its screen side facing up. Operate the camera with the wireless controller when the LCD panel is in this position. • When you're using the viewfinder to view playback, close the LCD panel. To play back your recordings on a TV, see p. 28. To use the wireless controller, see p. 42. • To avoid accidental recording, make sure that you slide the tab on the cassette so that it exposes the hole (the switch position is usually labeled SAVE or ERASE OFF). 1. Attach a power source and turn the POWER dial to VCR. • The power indicator lights up green. 2. Load the cassette. 3. Press the e (play) button to start playback. • To end playback, press the 3 (stop) button. • To wind the tape forwards, stop playback and press the 1 (fast forward) button. • To wind the tape backwards, stop playback and press the ` (rewind) button. • If the playback picture is rough (mosaic-like noise), clean the video heads using a Canon DVM-CL Digital Video Head Cleaning Cassette or a commercially available digital video head cleaning cassette. 24
-
 1
1 -
2
-
3
-
4
-
5
-
6
-
7
-
8
-
9
-
10
-
11
-
12
-
13
-
14
-
15
-
16
-
17
-
18
-
 19
19 -
 20
20 -
 21
21 -
 22
22 -
 23
23 -
 24
24 -
 25
25 -
 26
26 -
 27
27 -
 28
28 -
 29
29 -
30
-
31
-
32
-
33
-
34
-
35
-
36
-
37
-
38
-
39
-
40
-
41
-
42
-
43
-
44
-
45
-
46
-
47
-
48
-
49
-
50
-
51
-
52
-
53
-
54
-
55
-
56
-
57
-
58
-
59
-
60
-
61
-
62
-
63
-
64
-
65
-
66
-
67
-
68
-
69
-
70
-
71
-
72
-
73
-
74
-
75
-
76
-
77
-
78
-
79
-
80
-
81
-
82
-
83
-
84
-
85
-
86
-
87
-
88
-
89
-
90
-
91
-
92
-
93
-
94
-
95
-
96
-
97
-
98
-
99
-
100
-
101
-
102
-
103
-
104
-
105
-
106
-
107
-
108
-
109
-
110
-
111
-
112
-
113
-
114
-
115
-
116
-
117
-
118
-
119
-
120
-
121
-
122
-
123
-
124
-
125
-
126
-
127
-
128
-
129
-
130
-
131
-
132
-
133
-
134
-
135
-
136
-
137
-
138
-
139
-
140
-
141
-
142
-
143
-
144
-
145
-
146
-
147
 |
 |