Canon EOS-1Ds Mark III EOS-1Ds Mark III Instruction Manual - Page 30
Flip out the battery release, handle and turn it as shown by, the arrow., Pull out the battery.,
 |
UPC - 013803079265
View all Canon EOS-1Ds Mark III manuals
Add to My Manuals
Save this manual to your list of manuals |
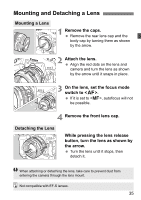
Page 30 highlights
Installing and Removing the Battery Battery Life Temperature Possible Shots At 23°C / 73°F Approx. 1800 At 0°C / 32°F Approx. 1400 The figures above are based on a fully-charged LP-E4, no Live View shooting, and CIPA (Camera & Imaging Products Association) testing standards. The actual number of shots may be fewer than indicated above depending on the shooting conditions. Pressing the shutter button halfway for long periods or operating only the autofocus can also reduce the number of possible shots. The number of possible shots will decrease with more frequent use of the LCD monitor. For battery life when Live View shooting is used, see page 114. Removing the Battery 1 Flip out the battery release handle and turn it as shown by the arrow. 2 Pull out the battery. To prevent shorting, be sure to attach the protective cover (p.22) to the battery. When not using the camera, attach the battery compartment cap. If the battery's rubber lining (to repel water) is not clean, use a moist cotton swab to wipe it clean. Rubber lining 30
-
 1
1 -
2
-
3
-
4
-
5
-
6
-
7
-
8
-
9
-
10
-
11
-
12
-
13
-
14
-
15
-
16
-
17
-
18
-
19
-
20
-
21
-
22
-
23
-
24
-
 25
25 -
 26
26 -
 27
27 -
 28
28 -
 29
29 -
 30
30 -
 31
31 -
 32
32 -
 33
33 -
 34
34 -
 35
35 -
36
-
37
-
38
-
39
-
40
-
41
-
42
-
43
-
44
-
45
-
46
-
47
-
48
-
49
-
50
-
51
-
52
-
53
-
54
-
55
-
56
-
57
-
58
-
59
-
60
-
61
-
62
-
63
-
64
-
65
-
66
-
67
-
68
-
69
-
70
-
71
-
72
-
73
-
74
-
75
-
76
-
77
-
78
-
79
-
80
-
81
-
82
-
83
-
84
-
85
-
86
-
87
-
88
-
89
-
90
-
91
-
92
-
93
-
94
-
95
-
96
-
97
-
98
-
99
-
100
-
101
-
102
-
103
-
104
-
105
-
106
-
107
-
108
-
109
-
110
-
111
-
112
-
113
-
114
-
115
-
116
-
117
-
118
-
119
-
120
-
121
-
122
-
123
-
124
-
125
-
126
-
127
-
128
-
129
-
130
-
131
-
132
-
133
-
134
-
135
-
136
-
137
-
138
-
139
-
140
-
141
-
142
-
143
-
144
-
145
-
146
-
147
-
148
-
149
-
150
-
151
-
152
-
153
-
154
-
155
-
156
-
157
-
158
-
159
-
160
-
161
-
162
-
163
-
164
-
165
-
166
-
167
-
168
-
169
-
170
-
171
-
172
-
173
-
174
-
175
-
176
-
177
-
178
-
179
-
180
-
181
-
182
-
183
-
184
-
185
-
186
-
187
-
188
-
189
-
190
-
191
-
192
-
193
-
194
-
195
-
196
-
197
-
198
-
199
-
200
-
201
-
202
-
203
-
204
-
205
-
206
-
207
-
208
-
209
-
210
-
211
-
212
 |
 |
