Canon EOS-1Ds Mark III EOS-1Ds Mark III Instruction Manual - Page 33
Set the power switch to <, >., Open the cover., Take out the memory card., Removing the Card
 |
UPC - 013803079265
View all Canon EOS-1Ds Mark III manuals
Add to My Manuals
Save this manual to your list of manuals |
Page 33 highlights
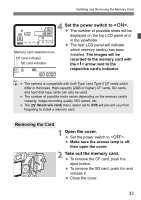
Installing and Removing the Memory Card 4 Set the power switch to . X The number of possible shots will be displayed on the top LCD panel and in the viewfinder. X The rear LCD panel will indicate Memory card selection icon CF card indicator which memory card(s) has been installed. The images will be recorded to the memory card with SD card indicator the < > arrow next to the respective card's indicator. The camera is compatible with both Type I and Type II CF cards which differ in thickness. High-capacity (2GB or higher) CF cards, SD cards, and hard disk-type cards can also be used. The number of possible shots varies depending on the memory card's capacity, image-recording quality, ISO speed, etc. The [2 Shoot w/o card] menu option set to [Off] will prevent you from forgetting to install a memory card. Removing the Card 1 Open the cover. Set the power switch to . Make sure the access lamp is off, then open the cover. 2 Take out the memory card. To remove the CF card, push the eject button. To remove the SD card, push it in and release it. Close the cover. 33
-
 1
1 -
2
-
3
-
4
-
5
-
6
-
7
-
8
-
9
-
10
-
11
-
12
-
13
-
14
-
15
-
16
-
17
-
18
-
19
-
20
-
21
-
22
-
23
-
24
-
25
-
26
-
27
-
 28
28 -
 29
29 -
 30
30 -
 31
31 -
 32
32 -
 33
33 -
 34
34 -
 35
35 -
 36
36 -
 37
37 -
 38
38 -
39
-
40
-
41
-
42
-
43
-
44
-
45
-
46
-
47
-
48
-
49
-
50
-
51
-
52
-
53
-
54
-
55
-
56
-
57
-
58
-
59
-
60
-
61
-
62
-
63
-
64
-
65
-
66
-
67
-
68
-
69
-
70
-
71
-
72
-
73
-
74
-
75
-
76
-
77
-
78
-
79
-
80
-
81
-
82
-
83
-
84
-
85
-
86
-
87
-
88
-
89
-
90
-
91
-
92
-
93
-
94
-
95
-
96
-
97
-
98
-
99
-
100
-
101
-
102
-
103
-
104
-
105
-
106
-
107
-
108
-
109
-
110
-
111
-
112
-
113
-
114
-
115
-
116
-
117
-
118
-
119
-
120
-
121
-
122
-
123
-
124
-
125
-
126
-
127
-
128
-
129
-
130
-
131
-
132
-
133
-
134
-
135
-
136
-
137
-
138
-
139
-
140
-
141
-
142
-
143
-
144
-
145
-
146
-
147
-
148
-
149
-
150
-
151
-
152
-
153
-
154
-
155
-
156
-
157
-
158
-
159
-
160
-
161
-
162
-
163
-
164
-
165
-
166
-
167
-
168
-
169
-
170
-
171
-
172
-
173
-
174
-
175
-
176
-
177
-
178
-
179
-
180
-
181
-
182
-
183
-
184
-
185
-
186
-
187
-
188
-
189
-
190
-
191
-
192
-
193
-
194
-
195
-
196
-
197
-
198
-
199
-
200
-
201
-
202
-
203
-
204
-
205
-
206
-
207
-
208
-
209
-
210
-
211
-
212
 |
 |
