Canon EOS-1Ds Mark III EOS-1Ds Mark III Instruction Manual - Page 37
Pressing completely, After pressing a button, turn the, > dial., Turn the <, > dial only., &
 |
UPC - 013803079265
View all Canon EOS-1Ds Mark III manuals
Add to My Manuals
Save this manual to your list of manuals |
Page 37 highlights
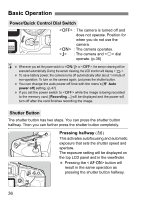
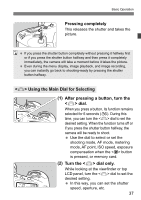
Basic Operation Pressing completely This releases the shutter and takes the picture. If you press the shutter button completely without pressing it halfway first or if you press the shutter button halfway and then press it completely immediately, the camera will take a moment before it takes the picture. Even during the menu display, image playback, and image recording, you can instantly go back to shooting-ready by pressing the shutter button halfway. Using the Main Dial for Selecting (1) After pressing a button, turn the dial. When you press a button, its function remains selected for 6 seconds (9). During this time, you can turn the dial to set the desired setting. When the function turns off or if you press the shutter button halfway, the camera will be ready to shoot. Use the dial to select or set the shooting mode, AF mode, metering mode, AF point, ISO speed, exposure compensation when the button is pressed, or memory card. (2) Turn the dial only. While looking at the viewfinder or top LCD panel, turn the dial to set the desired setting. In this way, you can set the shutter speed, aperture, etc. 37
-
 1
1 -
2
-
3
-
4
-
5
-
6
-
7
-
8
-
9
-
10
-
11
-
12
-
13
-
14
-
15
-
16
-
17
-
18
-
19
-
20
-
21
-
22
-
23
-
24
-
25
-
26
-
27
-
28
-
29
-
30
-
31
-
 32
32 -
 33
33 -
 34
34 -
 35
35 -
 36
36 -
 37
37 -
 38
38 -
 39
39 -
 40
40 -
 41
41 -
 42
42 -
43
-
44
-
45
-
46
-
47
-
48
-
49
-
50
-
51
-
52
-
53
-
54
-
55
-
56
-
57
-
58
-
59
-
60
-
61
-
62
-
63
-
64
-
65
-
66
-
67
-
68
-
69
-
70
-
71
-
72
-
73
-
74
-
75
-
76
-
77
-
78
-
79
-
80
-
81
-
82
-
83
-
84
-
85
-
86
-
87
-
88
-
89
-
90
-
91
-
92
-
93
-
94
-
95
-
96
-
97
-
98
-
99
-
100
-
101
-
102
-
103
-
104
-
105
-
106
-
107
-
108
-
109
-
110
-
111
-
112
-
113
-
114
-
115
-
116
-
117
-
118
-
119
-
120
-
121
-
122
-
123
-
124
-
125
-
126
-
127
-
128
-
129
-
130
-
131
-
132
-
133
-
134
-
135
-
136
-
137
-
138
-
139
-
140
-
141
-
142
-
143
-
144
-
145
-
146
-
147
-
148
-
149
-
150
-
151
-
152
-
153
-
154
-
155
-
156
-
157
-
158
-
159
-
160
-
161
-
162
-
163
-
164
-
165
-
166
-
167
-
168
-
169
-
170
-
171
-
172
-
173
-
174
-
175
-
176
-
177
-
178
-
179
-
180
-
181
-
182
-
183
-
184
-
185
-
186
-
187
-
188
-
189
-
190
-
191
-
192
-
193
-
194
-
195
-
196
-
197
-
198
-
199
-
200
-
201
-
202
-
203
-
204
-
205
-
206
-
207
-
208
-
209
-
210
-
211
-
212
 |
 |
