Canon EOS50D ImageBrowser 6.2 for Macintosh Instruction Manual (EOS 50D) - Page 50
Transferring Images to Other Image Editing Software, Edit with Registered
 |
View all Canon EOS50D manuals
Add to My Manuals
Save this manual to your list of manuals |
Page 50 highlights
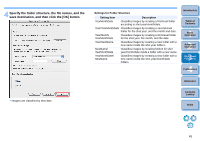
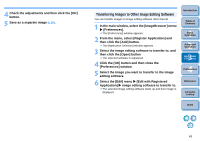
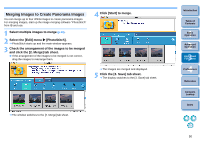
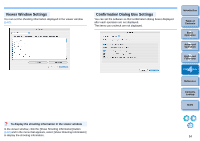
4 Check the adjustments and then click the [OK] button. 5 Save as a separate image (p.26). Transferring Images to Other Image Editing Software You can transfer images to image editing software other than IB. 1 In the main window, select the [ImageBrowser] menu X [Preferences]. The [Preferences] window appears. 2 From the menu, select [Register Application] and then click the [Add] button. The [Application Selection] window appears. 3 Select the image editing software to transfer to, and then click the [Open] button The selected software is registered. 4 Click the [OK] button and then close the [Preferences] window. 5 Select the image you want to transfer to the image editing software. 6 Select the [Edit] menu X [Edit with Registered Application] X image editing software to transfer to. The selected image editing software starts up and then image is displayed. Introduction Table of Contents 1Basic Operation 2Advanced Operation 3High-Level Functions 4 Preferences Reference Contents Lookup Index 49
-
 1
1 -
2
-
3
-
4
-
5
-
6
-
7
-
8
-
9
-
10
-
11
-
12
-
13
-
14
-
15
-
16
-
17
-
18
-
19
-
20
-
21
-
22
-
23
-
24
-
25
-
26
-
27
-
28
-
29
-
30
-
31
-
32
-
33
-
34
-
35
-
36
-
37
-
38
-
39
-
40
-
41
-
42
-
43
-
44
-
 45
45 -
 46
46 -
 47
47 -
 48
48 -
 49
49 -
 50
50 -
 51
51 -
 52
52 -
 53
53 -
 54
54 -
 55
55 -
56
-
57
-
58
-
59
-
60
-
61
-
62
-
63
-
64
-
65
-
66
-
67
-
68
-
69
-
70
 |
 |