Canon MP190 Quick Start Guide - Page 36
Place the Print Head Alignment Sheet face-down on the Platen Glass., is displayed on the LED - error 5
 |
UPC - 013803095166
View all Canon MP190 manuals
Add to My Manuals
Save this manual to your list of manuals |
Page 36 highlights
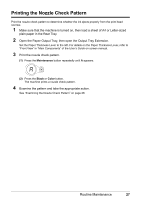
Note If it is difficult to pick the best pattern, pick the setting that produces the least noticeable white streaks. (A) (B) (C) (D) (A) Less noticeable vertical white streaks (B) More noticeable vertical white streaks (C) Less noticeable horizontal white streaks (D) More noticeable horizontal white streaks (2) Repeat the procedure until you finish selecting the pattern number for column L. (3) Place the Print Head Alignment Sheet face-down on the Platen Glass. When placing the Print Head Alignment Sheet, place the front side down and align the upper left corner of it with the alignment mark as shown in the figure below. (4) Make sure that U is displayed on the LED, then press the Black or Color button. The Print Head Alignment Sheet is scanned and the print head is aligned automatically. Note z If adjustment is not done successfully, the error code is displayed on the LED. In this case, start over from step 1 to print a new Print Head Alignment Sheet. For details, see "An Error Code Is Displayed on the LED" on page 44. z If the results of Print Head Alignment on the machine are not satisfactory, perform Print Head Alignment on the computer. For details, refer to "Aligning Print Head on the Computer" in the User's Guide on-screen manual. z To adjust columns M to R, you need to perform the print head alignment on your computer. For details, refer to "Aligning Print Head on the Computer" in the User's Guide on-screen manual. 32 Routine Maintenance
-
 1
1 -
2
-
3
-
4
-
5
-
6
-
7
-
8
-
9
-
10
-
11
-
12
-
13
-
14
-
15
-
16
-
17
-
18
-
19
-
20
-
21
-
22
-
23
-
24
-
25
-
26
-
27
-
28
-
29
-
30
-
 31
31 -
 32
32 -
 33
33 -
 34
34 -
 35
35 -
 36
36 -
 37
37 -
 38
38 -
 39
39 -
 40
40 -
 41
41 -
42
-
43
-
44
-
45
-
46
-
47
-
48
-
49
-
50
-
51
-
52
-
53
-
54
-
55
-
56
-
57
-
58
-
59
-
60
-
61
-
62
-
63
-
64
-
65
-
66
-
67
-
68
-
69
-
70
-
71
-
72
-
73
-
74
-
75
-
76
 |
 |
