Canon PIXMA MP640R MP640 series Getting Started - Page 30
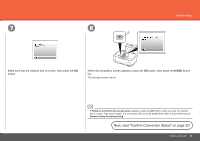
Next, read Confirm, Connection Status on,
 |
View all Canon PIXMA MP640R manuals
Add to My Manuals
Save this manual to your list of manuals |
Page 30 highlights
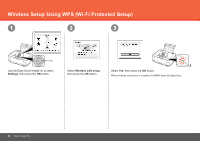
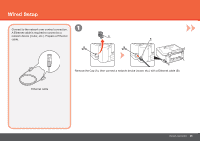
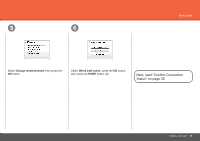
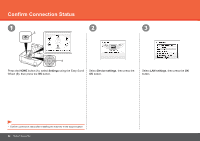
Wireless Setup Using WPS (Wi-Fi Protected Setup) 7 8 C Press and hold the WPS button on the access point (for about 5 seconds), then press the OK button on the machine within 2 minutes. For details on the WPS button pressing, refer to the manual of your access point. The Wi-Fi lamp (blue) flashes while searching for an access point. When the completion screen appears, press the OK button, then press the HOME button (C). The standby screen returns. Next, read "Confirm Connection Status" on page 32! • If the timeout error screen appeared repeatedly, or if another error appeared, refer to the printed manual: Network Setup Troubleshooting. 28 Network Connection
-
 1
1 -
2
-
3
-
4
-
5
-
6
-
7
-
8
-
9
-
10
-
11
-
12
-
13
-
14
-
15
-
16
-
17
-
18
-
19
-
20
-
21
-
22
-
23
-
24
-
 25
25 -
 26
26 -
 27
27 -
 28
28 -
 29
29 -
 30
30 -
 31
31 -
 32
32 -
 33
33 -
 34
34 -
 35
35 -
36
-
37
-
38
-
39
-
40
-
41
-
42
-
43
-
44
-
45
-
46
-
47
-
48
-
49
-
50
-
51
-
52
-
53
-
54
-
55
-
56
-
57
-
58
-
59
-
60
-
61
-
62
-
63
-
64
 |
 |

²¸
7
8
C
Network Connection
Wireless Setup Using WPS (Wi-Fi Protected Setup)
If the timeout error screen appeared repeatedly, or if another error appeared, refer to the printed manual:
Network Setup Troubleshooting
.
•
Press and hold the WPS button on the access point
(for about 5 seconds), then press the
OK
button on the
machine within 2 minutes.
For details on the WPS button pressing, refer to the manual of
your access point.
Next, read "Confirm
Connection Status" on
page 32!
When the completion screen appears, press the
OK
button, then press the
HOME
button (C).
The standby screen returns.
The
Wi-Fi
lamp (blue) flashes while searching for an access point.