Canon PowerShot A570IS ZoomBrowser EX 5.8 Software User Guide - Page 110
Sending Images by E-mail 2/2
 |
UPC - 013803078442
View all Canon PowerShot A570IS manuals
Add to My Manuals
Save this manual to your list of manuals |
Page 110 highlights
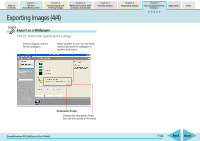
Table of Contents Chapter 1 What is ZoomBrowser EX? Chapter 2 Downloading and Printing Images Chapter 3 What You Can Do with a Camera Connected Chapter 4 Viewing Images Chapter 5 Organizing Images Chapter 6 Using Supplementary Features Appendices Index Sending Images by E-mail (2/2) 4. Click [3. Send or Save] and select whether to create a new e-mail or save the image. Start the e-mail program and send the e-mail immediately. 5. Click [4. Finish]. • If You Selected [Create a new email]: Your e-mail program will start and the selected images will appear as an attachment in the message window. Input the address, subject and your comments and send the message. Save the image on the disk first. If you selected [Save the images in a folder to send through an email program that does not support MAPI.], click [Browse] to specify a destination. • If You Selected [Save the images in a folder to send through an email program that does not support MAPI.]: The images will be saved to the specified destination. To send the images by e-mail, start your e-mail program and attach the saved image files to a message. REFERENCE • Some e-mail programs might not be able to start automatically (those without MAPI support). In this case, save the image to the disk, start the e-mail program and attach the image to an e-mail message. ZoomBrowser EX Software User Guide 110 Back Next
-
 1
1 -
2
-
3
-
4
-
5
-
6
-
7
-
8
-
9
-
10
-
11
-
12
-
13
-
14
-
15
-
16
-
17
-
18
-
19
-
20
-
21
-
22
-
23
-
24
-
25
-
26
-
27
-
28
-
29
-
30
-
31
-
32
-
33
-
34
-
35
-
36
-
37
-
38
-
39
-
40
-
41
-
42
-
43
-
44
-
45
-
46
-
47
-
48
-
49
-
50
-
51
-
52
-
53
-
54
-
55
-
56
-
57
-
58
-
59
-
60
-
61
-
62
-
63
-
64
-
65
-
66
-
67
-
68
-
69
-
70
-
71
-
72
-
73
-
74
-
75
-
76
-
77
-
78
-
79
-
80
-
81
-
82
-
83
-
84
-
85
-
86
-
87
-
88
-
89
-
90
-
91
-
92
-
93
-
94
-
95
-
96
-
97
-
98
-
99
-
100
-
101
-
102
-
103
-
104
-
 105
105 -
 106
106 -
 107
107 -
 108
108 -
 109
109 -
 110
110 -
 111
111 -
 112
112 -
 113
113 -
 114
114 -
 115
115 -
116
-
117
-
118
-
119
-
120
-
121
-
122
-
123
-
124
-
125
-
126
-
127
-
128
-
129
-
130
-
131
-
132
-
133
-
134
-
135
-
136
-
137
-
138
-
139
-
140
-
141
-
142
-
143
-
144
-
145
-
146
-
147
-
148
-
149
-
150
-
151
-
152
-
153
-
154
-
155
 |
 |
