Canon imageCLASS D1350 imageCLASS D1370/D1350/D1320 Basic Operation Guide - Page 118
Saving Scanned Documents to USB Memory Device, Specify the scan settings based on your purpose
 |
View all Canon imageCLASS D1350 manuals
Add to My Manuals
Save this manual to your list of manuals |
Page 118 highlights
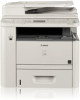
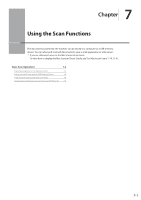
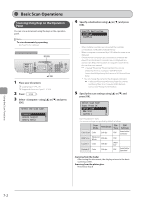
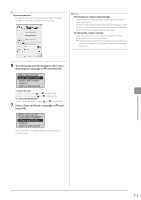
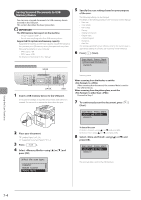
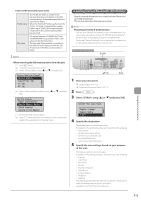
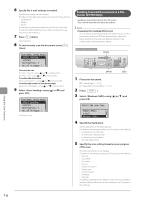
Saving Scanned Documents to USB Memory Device You can save scanned documents to USB memory device inserted in the USB port. This section describes the basic procedure. IMPORTANT The USB memory device port on the machine • The port supports USB 1.1. • Do not insert anything other than USB memory device. Supported file systems and memory capacity Supported file systems and memory capacity include the following. You can have your USB memory device formatted with one of the following file systems on your computer. • FAT16: up to 2 GB • FAT32: up to 32GB For details, see "Scanning" in the e-Manual. Keys to be used for this operation SCAN 5 Specify the scan settings based on your purpose of the scan. The following settings can be changed. For details on the setting procedure, see "Scanning" in the e-Manual. • Scan size • Color Mode • File Format • Density • Original orientation • Original Type • 2-Sided Original • Sharpness • Data Size The settings specified here are effective only for the current task. To apply these settings to all tasks, see "Scanning" in the e-Manual. 6 Press [ ] (Start). Scan Next: Press Start OK Start 1 Insert a USB memory device to the USB port. The machine will begin to read the device when USB memory is inserted. Do not touch or remove the device from the port. Scanning starts. When scanning from the feeder, or set the to After scanning the document, the scanned data is sent to the USB memory. When scanning from the platen glass, or set the to other than Proceed to Step 7 7 To continuously scan the document, press [ ] (Start). Scan Next: Press Start 2 Place your document. "Loading Paper" (→P. 2-9) "Supported Document Types" (→P. 2-2) 3 Press [ ]. 4 Select using [ ] or [ ] and press [OK]. Select the scan type. Computer Remote Scanner Memory Media To Cancel the scan (1) Select using [ ] or [ ] and press [OK]. (2) Select using [ ] or [ ] and press [OK]. 8 Select using [ ] or [ ] and press [OK]. Scan Next: Press Start The scanned data is sent to the USB memory. Using the Scan Functions 7-4
-
 1
1 -
2
-
3
-
4
-
5
-
6
-
7
-
8
-
9
-
10
-
11
-
12
-
13
-
14
-
15
-
16
-
17
-
18
-
19
-
20
-
21
-
22
-
23
-
24
-
25
-
26
-
27
-
28
-
29
-
30
-
31
-
32
-
33
-
34
-
35
-
36
-
37
-
38
-
39
-
40
-
41
-
42
-
43
-
44
-
45
-
46
-
47
-
48
-
49
-
50
-
51
-
52
-
53
-
54
-
55
-
56
-
57
-
58
-
59
-
60
-
61
-
62
-
63
-
64
-
65
-
66
-
67
-
68
-
69
-
70
-
71
-
72
-
73
-
74
-
75
-
76
-
77
-
78
-
79
-
80
-
81
-
82
-
83
-
84
-
85
-
86
-
87
-
88
-
89
-
90
-
91
-
92
-
93
-
94
-
95
-
96
-
97
-
98
-
99
-
100
-
101
-
102
-
103
-
104
-
105
-
106
-
107
-
108
-
109
-
110
-
111
-
112
-
 113
113 -
 114
114 -
 115
115 -
 116
116 -
 117
117 -
 118
118 -
 119
119 -
 120
120 -
 121
121 -
 122
122 -
 123
123 -
124
-
125
-
126
-
127
-
128
-
129
-
130
-
131
-
132
-
133
-
134
-
135
-
136
-
137
-
138
-
139
-
140
-
141
-
142
-
143
-
144
-
145
-
146
-
147
-
148
-
149
-
150
-
151
-
152
-
153
-
154
-
155
-
156
-
157
-
158
-
159
-
160
-
161
-
162
-
163
-
164
-
165
-
166
-
167
-
168
-
169
-
170
-
171
-
172
-
173
-
174
 |
 |