Canon imageCLASS D1350 imageCLASS D1370/D1350/D1320 Basic Operation Guide - Page 121
Press, Start., To continuously scan the document, Select <Start Sending> using, press [OK].
 |
View all Canon imageCLASS D1350 manuals
Add to My Manuals
Save this manual to your list of manuals |
Page 121 highlights
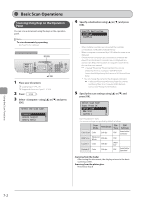
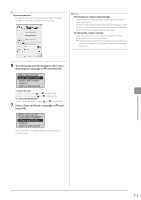
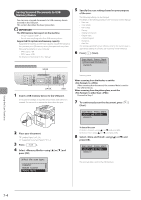
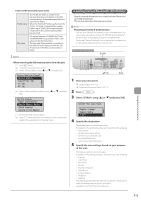
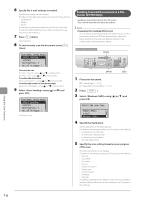
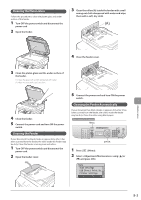
Using the Scan Functions 6 Press [ ] (Start). Scanning starts. When scanning from the feeder, or set the to After scanning the document, the scanned data is sent to the USB memory. When scanning from the platen glass, or set the to other than Proceed to Step 7. 7 To continuously scan the document, press [ ] (Start). Scan Next: Press Start Destinations: 1 No. of TX Pages: 1 To Cancel the scan (1) Select using [ ] or [ ] and press [OK]. (2) Select using [ ] or [ ] and press [OK]. To confirm the destination Select using [ ] or [ ] and press [OK]. To confirm the number of transferred pages Select using [ ] or [ ] and press [OK]. 8 Select using [ ] or [ ] and press [OK]. Scan Next: Press Start Destinations: 1 No. of TX Pages: 1 The scanned file is sent. 7-7
-
 1
1 -
2
-
3
-
4
-
5
-
6
-
7
-
8
-
9
-
10
-
11
-
12
-
13
-
14
-
15
-
16
-
17
-
18
-
19
-
20
-
21
-
22
-
23
-
24
-
25
-
26
-
27
-
28
-
29
-
30
-
31
-
32
-
33
-
34
-
35
-
36
-
37
-
38
-
39
-
40
-
41
-
42
-
43
-
44
-
45
-
46
-
47
-
48
-
49
-
50
-
51
-
52
-
53
-
54
-
55
-
56
-
57
-
58
-
59
-
60
-
61
-
62
-
63
-
64
-
65
-
66
-
67
-
68
-
69
-
70
-
71
-
72
-
73
-
74
-
75
-
76
-
77
-
78
-
79
-
80
-
81
-
82
-
83
-
84
-
85
-
86
-
87
-
88
-
89
-
90
-
91
-
92
-
93
-
94
-
95
-
96
-
97
-
98
-
99
-
100
-
101
-
102
-
103
-
104
-
105
-
106
-
107
-
108
-
109
-
110
-
111
-
112
-
113
-
114
-
115
-
 116
116 -
 117
117 -
 118
118 -
 119
119 -
 120
120 -
 121
121 -
 122
122 -
 123
123 -
 124
124 -
 125
125 -
 126
126 -
127
-
128
-
129
-
130
-
131
-
132
-
133
-
134
-
135
-
136
-
137
-
138
-
139
-
140
-
141
-
142
-
143
-
144
-
145
-
146
-
147
-
148
-
149
-
150
-
151
-
152
-
153
-
154
-
155
-
156
-
157
-
158
-
159
-
160
-
161
-
162
-
163
-
164
-
165
-
166
-
167
-
168
-
169
-
170
-
171
-
172
-
173
-
174
 |
 |
