Canon imageCLASS MF5950dw imageCLASS MF5960dn/MF5950dw Basic Operation Guide - Page 103
Forwarding Fax Documents, Setting Document Transfer (Automatic Forwarding)
 |
View all Canon imageCLASS MF5950dw manuals
Add to My Manuals
Save this manual to your list of manuals |
Page 103 highlights
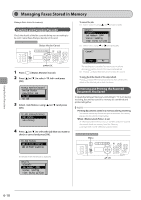
Using the Fax Functions Forwarding Fax Documents Received fax documents are transferred to a fax, E-mail or a file server. 4 Select or using [ ] or [ ] and press [OK]. NOTE Destinations that can be specified You can specify followings as destinations. • Fax • E-mail • File server • Group destination For forwarding to E-mail or a file server When a fax document is transferred to an E-mail or a file server, the document is converted to a PDF file. When the destination is deleted from an address book When you delete the destination from the address book from when forwarding is configured/executed to when it is received, an destination unknown forwarding error occurs. Setting Document Transfer (Automatic Forwarding) Specify whether a document is automatically transferred during receiving and where to be transferred. Keys to be used for this operation Menu Forwarding Settings Off On Starts to transfer received documents. Next, you need to configure transfer destinations. Transfer is not performed. When is selected You can specify where to forward. You can specify only by the following approaches: "Specifying destinations using one-touch keys" (→P. 6-4) "Specifying destinations using coded dial codes" (→P. 6-4) "Specifying destinations using the address book" (→P. 6-5) CANON01 01234567 CANON02 9876543... CANON03 0011223... All A-Z 0-9 5 Press [ ] (Menu) to close the menu screen. OK 1 Press [ ] (Menu). 2 Select using [ ] or [ ] and press [OK]. Menu USB Direct Print Se... Printer Settings Adjustment/Maintena... System Settings 3 Select using [ ] or [ ] and press [OK]. System Settings Security Settings Communication Manag... Select Country/Regi... Forwarding Settings Forwarding Received Faxes Stored in Memory to Other Destinations (Manual Forwarding) When a fax is stored in memory, you can manually forward it to a specified destination. Keys to be used for this operation Status Monitor OK 1 Press [ ] (Status Monitor/Cancel). 2 Select using [ ] or [ ] and press [OK]. Status Monitor/Cancel Device Status Copy/Print Job TX Job RX Job 6-15
-
 1
1 -
2
-
3
-
4
-
5
-
6
-
7
-
8
-
9
-
10
-
11
-
12
-
13
-
14
-
15
-
16
-
17
-
18
-
19
-
20
-
21
-
22
-
23
-
24
-
25
-
26
-
27
-
28
-
29
-
30
-
31
-
32
-
33
-
34
-
35
-
36
-
37
-
38
-
39
-
40
-
41
-
42
-
43
-
44
-
45
-
46
-
47
-
48
-
49
-
50
-
51
-
52
-
53
-
54
-
55
-
56
-
57
-
58
-
59
-
60
-
61
-
62
-
63
-
64
-
65
-
66
-
67
-
68
-
69
-
70
-
71
-
72
-
73
-
74
-
75
-
76
-
77
-
78
-
79
-
80
-
81
-
82
-
83
-
84
-
85
-
86
-
87
-
88
-
89
-
90
-
91
-
92
-
93
-
94
-
95
-
96
-
97
-
 98
98 -
 99
99 -
 100
100 -
 101
101 -
 102
102 -
 103
103 -
 104
104 -
 105
105 -
 106
106 -
 107
107 -
 108
108 -
109
-
110
-
111
-
112
-
113
-
114
-
115
-
116
-
117
-
118
-
119
-
120
-
121
-
122
-
123
-
124
-
125
-
126
-
127
-
128
-
129
-
130
-
131
-
132
-
133
-
134
-
135
-
136
-
137
-
138
-
139
-
140
-
141
-
142
-
143
-
144
-
145
-
146
-
147
-
148
-
149
-
150
-
151
-
152
-
153
-
154
-
155
-
156
-
157
-
158
-
159
-
160
-
161
-
162
-
163
-
164
-
165
-
166
-
167
-
168
-
169
-
170
-
171
-
172
-
173
-
174
-
175
-
176
 |
 |
