Canon imageCLASS MF5950dw imageCLASS MF5960dn/MF5950dw Basic Operation Guide - Page 31
Navigating the Menu, Entering the Menu Screen, Scrolling Through Menu Items, Selecting a Menu Item
 |
View all Canon imageCLASS MF5950dw manuals
Add to My Manuals
Save this manual to your list of manuals |
Page 31 highlights
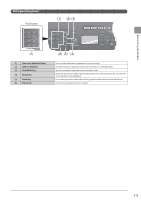
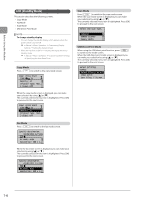
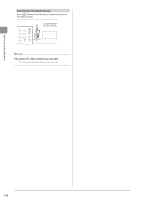
Before Using the Machine Navigating the Menu This section describes how to navigate the menu and specify values on the menu screen. Keys to be used for this operation Menu Back OK Entering the Menu Screen Press [ ] (Menu) to enter the menu screen. Scrolling Through Menu Items The scrollbar at the right side of the screen indicates that more items are available in the menu. To select an item that is not shown on the screen, press [ ] or [ ] to scroll up and down the menu. The currently selected item is highlighted. Menu Preferences Timer Settings Common Settings Copy Settings Selecting a Menu Item Press [OK] to select the highlighted menu. When the menu has a submenu, you can press [ ] to select the item and proceed to the next screen. You can return to the previous screen by pressing [ ] (Back) or [ ]. Menu Preferences Timer Settings Common Settings Copy Settings [OK] or [►] [Back] or [◄] Timer Settings Time & Date Settings Sleep Timer Auto Reset Timer Screen After Auto R... Configuring menus using the navigation keys How to configure menus What you want to do Screen example Adjust levels such as density on the scale Density - + Background: Default Procedure Press [ ] or [ ] to adjust the level. Set the timer Numeric key icon Auto Reset Timer 2 min. (0=Off, 1-9) Press [ ] or [ ] to specify the value. NOTE Values that you can specify You can specify any value shown in the parentheses at the bottom of the screen. When the numeric key icon is displayed on the screen You can enter it using the numeric keys. "Text Input Method" (→P. 1-9) Enter numbers or characters such as a PIN. System Manager PIN ******* (Apply: Press OK) You can enter numbers or characters using the numeric keys. "Text Input Method" (→P. 1-9) Confirming the entry To confirm the entered number or character: • Press [OK]. • Select displayed on the screen using [ ] or [ ] and press [OK]. 1-7
-
 1
1 -
2
-
3
-
4
-
5
-
6
-
7
-
8
-
9
-
10
-
11
-
12
-
13
-
14
-
15
-
16
-
17
-
18
-
19
-
20
-
21
-
22
-
23
-
24
-
25
-
 26
26 -
 27
27 -
 28
28 -
 29
29 -
 30
30 -
 31
31 -
 32
32 -
 33
33 -
 34
34 -
 35
35 -
 36
36 -
37
-
38
-
39
-
40
-
41
-
42
-
43
-
44
-
45
-
46
-
47
-
48
-
49
-
50
-
51
-
52
-
53
-
54
-
55
-
56
-
57
-
58
-
59
-
60
-
61
-
62
-
63
-
64
-
65
-
66
-
67
-
68
-
69
-
70
-
71
-
72
-
73
-
74
-
75
-
76
-
77
-
78
-
79
-
80
-
81
-
82
-
83
-
84
-
85
-
86
-
87
-
88
-
89
-
90
-
91
-
92
-
93
-
94
-
95
-
96
-
97
-
98
-
99
-
100
-
101
-
102
-
103
-
104
-
105
-
106
-
107
-
108
-
109
-
110
-
111
-
112
-
113
-
114
-
115
-
116
-
117
-
118
-
119
-
120
-
121
-
122
-
123
-
124
-
125
-
126
-
127
-
128
-
129
-
130
-
131
-
132
-
133
-
134
-
135
-
136
-
137
-
138
-
139
-
140
-
141
-
142
-
143
-
144
-
145
-
146
-
147
-
148
-
149
-
150
-
151
-
152
-
153
-
154
-
155
-
156
-
157
-
158
-
159
-
160
-
161
-
162
-
163
-
164
-
165
-
166
-
167
-
168
-
169
-
170
-
171
-
172
-
173
-
174
-
175
-
176
 |
 |
