Canon imageCLASS MF5950dw imageCLASS MF5960dn/MF5950dw Basic Operation Guide - Page 132
Before Replacing the Toner Cartridge, Gently shake the toner cartridge five or six times
 |
View all Canon imageCLASS MF5950dw manuals
Add to My Manuals
Save this manual to your list of manuals |
Page 132 highlights
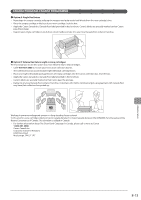
Before Replacing the Toner Cartridge Before replacing the toner cartridge, see "Replacing the Toner Cartridge" (→P. 8-8) When the toner nearly runs out, follow the steps in the procedure below before replacing the toner cartridge. The machine continues printing until the toner runs out completely. 1 Open the front cover while holding down the open button. 4 Insert the toner cartridge. Fit (A) on both sides of the toner cartridge into the guides located on both sides of the machine and slide the toner cartridge into the machine until the toner cartridge comes to rest and is held against the back of the machine. (A) (A) 5 Close the front cover. If you cannot close the front cover Make sure that the toner cartridge is installed correctly. Do not try to forcefully close the toner cover, as this may damage the machine. 2 Remove the toner cartridge. If there are white lines in the print result or it is blurred or distorted even though the above operations have been performed, replace the toner cartridge with a new one. "Replacing the Toner Cartridge" (→P. 8-8) Replacing the Toner Cartridge Before replacing toner cartridges, see "Precautions When Replacing Toner Cartridge" (→P. 8-9) 1 Open the front cover while holding down the open button. 3 Gently shake the toner cartridge five or six times to evenly distribute the toner inside the cartridge. Maintenance 8-8
-
 1
1 -
2
-
3
-
4
-
5
-
6
-
7
-
8
-
9
-
10
-
11
-
12
-
13
-
14
-
15
-
16
-
17
-
18
-
19
-
20
-
21
-
22
-
23
-
24
-
25
-
26
-
27
-
28
-
29
-
30
-
31
-
32
-
33
-
34
-
35
-
36
-
37
-
38
-
39
-
40
-
41
-
42
-
43
-
44
-
45
-
46
-
47
-
48
-
49
-
50
-
51
-
52
-
53
-
54
-
55
-
56
-
57
-
58
-
59
-
60
-
61
-
62
-
63
-
64
-
65
-
66
-
67
-
68
-
69
-
70
-
71
-
72
-
73
-
74
-
75
-
76
-
77
-
78
-
79
-
80
-
81
-
82
-
83
-
84
-
85
-
86
-
87
-
88
-
89
-
90
-
91
-
92
-
93
-
94
-
95
-
96
-
97
-
98
-
99
-
100
-
101
-
102
-
103
-
104
-
105
-
106
-
107
-
108
-
109
-
110
-
111
-
112
-
113
-
114
-
115
-
116
-
117
-
118
-
119
-
120
-
121
-
122
-
123
-
124
-
125
-
126
-
 127
127 -
 128
128 -
 129
129 -
 130
130 -
 131
131 -
 132
132 -
 133
133 -
 134
134 -
 135
135 -
 136
136 -
 137
137 -
138
-
139
-
140
-
141
-
142
-
143
-
144
-
145
-
146
-
147
-
148
-
149
-
150
-
151
-
152
-
153
-
154
-
155
-
156
-
157
-
158
-
159
-
160
-
161
-
162
-
163
-
164
-
165
-
166
-
167
-
168
-
169
-
170
-
171
-
172
-
173
-
174
-
175
-
176
 |
 |
