Canon imageCLASS MF5950dw imageCLASS MF5960dn/MF5950dw Basic Operation Guide - Page 157
Vertical Streaks Appear on the Output, Solution 1
 |
View all Canon imageCLASS MF5950dw manuals
Add to My Manuals
Save this manual to your list of manuals |
Page 157 highlights
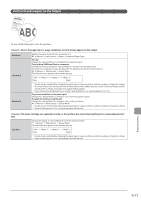
Vertical Streaks Appear on the Output Try one of the following to solve the problem. Due to the paper type or usage conditions, vertical streaks appear on the output. Solution 1 Solution 2 Replace the paper stack with new unopened one. e-Manual → Specifications → Paper → Supported Paper Types To copy Change the setting from the operation panel. To print from USB Direct Print or a computer For USB Direct Print, change the setting in the operation panel. To print from a computer, change the [Special Print Adjustment] setting in the print driver. e-Manual → Maintenance → Special Mode The effect becomes greater as the number goes up. → → → (low) (high) Solution 3 * Streaks can be minimized by changing the paper type or usage conditions, without needing to change the setting. * The more effective the setting, the lower the density becomes. Additionally, the outline of text and images may be reproduced less clearly, and images may appear slightly jagged. * If you cannot solve the problem even setting , set to . To print received faxes or the print report Change the setting to from the operation panel. To apply the solutions to all the jobs Change the setting to in the print driver. e-Manual → Maintenance → Special Mode * Streaks can be minimized by changing the paper type or usage conditions, without needing to change the setting. * If you set this option to , the printing speed will be slow. The toner cartridge was replaced recently, or the machine has not printed anything for an extended period of time. Change the setting of from the operation panel. e-Manual → Maintenance → Special Mode The effect becomes greater as the number goes up. Solution → → → (low) (high) * Streaks can be minimized by changing the paper type or usage conditions, without needing to change the setting. * If you set this option to , the printing speed will be slow. Troubleshooting 9-17
-
 1
1 -
2
-
3
-
4
-
5
-
6
-
7
-
8
-
9
-
10
-
11
-
12
-
13
-
14
-
15
-
16
-
17
-
18
-
19
-
20
-
21
-
22
-
23
-
24
-
25
-
26
-
27
-
28
-
29
-
30
-
31
-
32
-
33
-
34
-
35
-
36
-
37
-
38
-
39
-
40
-
41
-
42
-
43
-
44
-
45
-
46
-
47
-
48
-
49
-
50
-
51
-
52
-
53
-
54
-
55
-
56
-
57
-
58
-
59
-
60
-
61
-
62
-
63
-
64
-
65
-
66
-
67
-
68
-
69
-
70
-
71
-
72
-
73
-
74
-
75
-
76
-
77
-
78
-
79
-
80
-
81
-
82
-
83
-
84
-
85
-
86
-
87
-
88
-
89
-
90
-
91
-
92
-
93
-
94
-
95
-
96
-
97
-
98
-
99
-
100
-
101
-
102
-
103
-
104
-
105
-
106
-
107
-
108
-
109
-
110
-
111
-
112
-
113
-
114
-
115
-
116
-
117
-
118
-
119
-
120
-
121
-
122
-
123
-
124
-
125
-
126
-
127
-
128
-
129
-
130
-
131
-
132
-
133
-
134
-
135
-
136
-
137
-
138
-
139
-
140
-
141
-
142
-
143
-
144
-
145
-
146
-
147
-
148
-
149
-
150
-
151
-
 152
152 -
 153
153 -
 154
154 -
 155
155 -
 156
156 -
 157
157 -
 158
158 -
 159
159 -
 160
160 -
 161
161 -
 162
162 -
163
-
164
-
165
-
166
-
167
-
168
-
169
-
170
-
171
-
172
-
173
-
174
-
175
-
176
 |
 |
