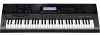
Casio CTK7000 User Guide
Casio CTK7000 Manual
 |
View all Casio CTK7000 manuals
Add to My Manuals
Save this manual to your list of manuals |
Casio CTK7000 manual content summary:
- Casio CTK7000 | User Guide - Page 1
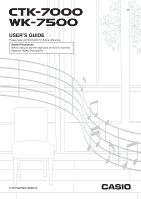
E USER'S GUIDE Please keep all information for future reference. Safety Precautions Before trying to use the keyboard, be sure to read the separate "Safety Precautions". CTK7000/WK7500E1B - Casio CTK7000 | User Guide - Page 2
and, if not installed and used in accordance with the instructions, may cause harmful interference to radio communications. However, there user's authority to operate the equipment. Declaration of Conformity Model Number: CTK-7000/WK-7500 Trade Name: CASIO COMPUTER CO., LTD. Responsible party: CASIO - Casio CTK7000 | User Guide - Page 3
note recommended batteries or equivalent types. • Always make CASIO HAS BEEN ADVISED OF THE POSSIBILITY OF SUCH DAMAGES. ● The contents of this manual are subject to change without notice. ● The actual appearance of the product may be different from that shown in the illustrations in this User's Guide - Casio CTK7000 | User Guide - Page 4
Creating a User Tone E-46 Tone Parameter Settings E-48 Using Drawbar Organ Tones ... E-50 Playing with a Drawbar Organ Tone E-50 Editing Drawbar Organ Tones E-52 Music Presets E-54 Using Music Presets E-54 Creating a User Preset E-58 Editing a Chord Progression E-62 Saving Keyboard Setups to - Casio CTK7000 | User Guide - Page 5
E-147 Contents Reference E-148 Error Messages E-148 Troubleshooting E-150 Specifications E-152 Operating Precautions E-154 DSP Effect List E-155 Fingering Guide E-160 Supported Input Characters E-160 Chord Example List E-161 Assigning a MIDI Channel to Each Part E-162 Parameter List - Casio CTK7000 | User Guide - Page 6
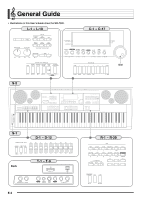
General Guide • Illustrations in this User's Guide show the WK-7500. L-1 - L-18 C-1 - C-17 Dial S-2 S-1 D-1 - D-12 T-1 - T-9 Back E-4 R-1 - R-20 - Casio CTK7000 | User Guide - Page 7
General Guide • In this manual, the term "Digital Keyboard" refers to the CTK-7000/WK-7500. • This manual uses the numbers button 24 L-7 [D] WORLD/VARIOUS, MUSIC PRESET button 24, 54 L-8 [E] PIANO RHYTHMS, ONE TOUCH PRESET button 24, 27, 54 L-9 [F] USER RHYTHMS button 24, 27 L-10 METRONOME, - Casio CTK7000 | User Guide - Page 8
notes that are sounded when you play something on the keyboard types of indicators: text type indicators such as :, and pointer (K) type indicators. In the case of pointer type RHYTHM" is selected because it is enclosed by thick brackets. This indicates that the rhythm music preset (page E-54) - Casio CTK7000 | User Guide - Page 9
If this happens, refer to "Troubleshooting" (page E-150). • After entering any mode besides the rhythm mode and performing the operations you want, be sure to return to the rhythm mode. • Unless otherwise specifically noted, all of the operations described in this user's guide are performed in the - Casio CTK7000 | User Guide - Page 10
Guide Saving Settings Your Digital Keyboard is equipped with a song sequencer and other features that you can use to store data you create. This stored data is retained even when the Digital Keyboard is turned off.* However, the tone, rhythm, and other settings you configure on the Digital Keyboard - Casio CTK7000 | User Guide - Page 11
Getting Ready to Play Preparing the Music Stand Music stand Power Supply Prepare a household power outlet and does not indicate malfunction. • To prevent breaking of the wire, take care to avoid putting any type of load on the power cord. No bending! No winding! • Never insert metal, pencils, or - Casio CTK7000 | User Guide - Page 12
or zinc-carbon batteries. Never use oxyride or any other nickel based batteries. 1. Open the battery cover on the bottom of the Digital Keyboard. ■ Low Battery Indication The following shows the approximate battery life. 4 hours* on alkaline batteries * The above values are standard battery life at - Casio CTK7000 | User Guide - Page 13
your keyboard play. For information about the types of Keyboard Notes to a Musical Instrument Amplifier 2 Use a commercially available connecting cord to connect the amplifier to either of the Digital Keyboard's T-9 (LINE OUT) jacks as shown in Figure 2. LINE OUT R jack output is right channel sound - Casio CTK7000 | User Guide - Page 14
Keyboard's Speakers You can use the Digital Keyboard's speakers to output sound from a CD player, another digital keyboard you connect any device to the Digital Keyboard, be sure to read the user documentation that comes with the device. • Digital Keyboard built-in effects (reverb, chorus, DSP - Casio CTK7000 | User Guide - Page 15
piano tone (using initial power on default settings). • To turn off the Digital Keyboard, press the L-1 (POWER) button again. • Under its initial configuration, the Digital Keyboard this happens, refer to "Troubleshooting" (page E-150). Auto Power Off This Digital Keyboard is designed to turn off - Casio CTK7000 | User Guide - Page 16
on the keyboard with demo tune play. Note, however, that you cannot change the tone assigned to the keyboard. Only the key operations described above are supported during demo tune playback. 2. To stop demo tune playback, press the L-17 (PLAY/STOP) button. • The R-11 ([K] USER TONES) button selects - Casio CTK7000 | User Guide - Page 17
14) This configuration uses the UPPER 1 part only (Layer: Off, Split: Off). Selecting and Playing a Tone • Three tones, two layered tones for the right range and one tone for the left range of the keyboard (page E-17) This configuration uses the UPPER 1 part, UPPER 2 part, and LOWER part (Layer: On - Casio CTK7000 | User Guide - Page 18
on the display. This indicates that the tone you select will become the UPPER 2 part tone. 5. Use the TONE buttons and dial to select the UPPER 2 part tone. 6. Play something on the keyboard to check how the tones sound layered together. 7. To cancel tone layering, press the R-20 (LAYER) button - Casio CTK7000 | User Guide - Page 19
• During Auto Accompaniment play (page E-24), the keyboard to the left of the split point becomes the chord keyboard. Selecting and Playing a Tone To use layer and split together 1. Perform steps 1 through 6 of the procedure under "To layer two tones" (page E-16). 2. Refer to the separate "Appendix - Casio CTK7000 | User Guide - Page 20
and Playing a Tone Raising and Lowering Keyboard Tuning (Transpose) The transpose feature lets you raise or lower the overall tuning of the keyboard in semitone steps. You can use this feature to adjust keyboard tuning to a key that better matches a vocalist, another musical instrument, etc - Casio CTK7000 | User Guide - Page 21
and beats since you started the metronome. Selecting and Playing a Tone To change the tempo setting There are two different methods you can Specifying 0 for this setting will cause each beat to be indicated by the same sound (no chime at the beginning of each measure). 3. Press the L-10 (BEAT) or - Casio CTK7000 | User Guide - Page 22
specific part. For details, see "BendRange (Bend Range)" (page E-131) and "Part Parameters" (page E-43). Applying Vibrato to Notes You can apply vibrato to notes you play on the keyboard (all UPPER 1, UPPER 2, LOWER part notes Settings" (page E-35) and "Tone Parameter Settings" (page E-48). - - Casio CTK7000 | User Guide - Page 23
Digital Keyboard is tone 08 Rast Rast 09 Bayati Bayati 10 Hijaz Hijaz 11 Saba Saba 12 Dashti Dashti 13 Chahargah Chahargah 14 Segah Segah 15 Gurjari Todi Gurjari Todi 16 Chandrakauns Chandrakauns 17 Charukeshi Charukeshi 4. Perform the following steps to specify the root note - Casio CTK7000 | User Guide - Page 24
the scale. (1) Use the R-17 (t) button to move the 0 to "Note", and then use the dial or R-14 (-, +) buttons to select the name of the note you want to fine tune. • You can also press a keyboard key to specify a note. (2) Use the R-17 (y) button to move the 0 to "Cent", and then use the dial - Casio CTK7000 | User Guide - Page 25
select one of the arpeggiator types (013 through 162). Refer to the separate "Appendix" for detailed information about supported arpeggiator types. • When selecting the arpeggiator type, you can assign the recommended tone for the currently displayed type as the keyboard tone, by holding down the - Casio CTK7000 | User Guide - Page 26
Keyboard has 250 built-in Auto Accompaniment patterns, which are divided into five groups. You can edit built-in rhythms to create your own original rhythms (called "user rhythms not displayed). • All accompaniment instrument parts sound while accompaniment is on (D indicator displayed), while only - Casio CTK7000 | User Guide - Page 27
split point make up the chord keyboard. • The chord root and type that corresponds to the keys you press appear in the chord area of the display. 9. Play other chords with your left hand as you play the melody with your right hand. • You can use "CASIO Chord" or other simplified chord fingering - Casio CTK7000 | User Guide - Page 28
to specify the chord root and type. The area of the keyboard to the left of the split point (page E-17) is the chord keyboard. The illustration below shows the chord keyboard range under WK-7500 initial default settings. Chord keyboard Melody Keyboard You can select from among the following - Casio CTK7000 | User Guide - Page 29
Accompaniment pattern is standing by. 4. Start playing something on the keyboard. • Perform the procedure starting from step 7 under "Playing an Auto Accompaniment" (page E-24). • One-Touch Presets are not supported for user rhythms (F:001 through F:100). • You can recall one-touch preset settings - Casio CTK7000 | User Guide - Page 30
is optimal for strings. Lit 5. Play chords and the melody on the keyboard. • Harmony will be added to your melody notes based on the chords you play. 6. To turn off auto harmonize, press the R-18 (AUTO HARMONIZE/ARPEGGIATOR) button again. • This causes the pointer indicator next to AUTO HARMONIZE - Casio CTK7000 | User Guide - Page 31
sounds produced by the Digital Keyboard. The built-in effects include a wide variety of variations that give you access to a selection of general digital effects. • The Digital Keyboard Part A01-A16, B01-B16 Part Volume/Pan Output Tone Generator Reverb Send Chorus Send Reverb Master Volume/Pan - Casio CTK7000 | User Guide - Page 32
type of effect is inserted between the sound source and output. There are a total of 100 different DSP effects, including distortion and modulation. You also can transfer DSP effects from a computer or create DSP data on the Digital Keyboard, and store up to 100 user DSP effects in Digital Keyboard - Casio CTK7000 | User Guide - Page 33
the tone of each keyboard or Auto Accompaniment part. For details, see "Using the Mixer" (page E-36). To add the chorus effect to sounds 1. +) buttons to select the reverb type you want to use. • Refer to the separate "Appendix" for information about supported reverb types. • To turn off reverb, - Casio CTK7000 | User Guide - Page 34
"Important!" note below. • If you turning on the "DSP Disable" setting, you should skip steps 3 and type you want to use. • Refer to the separate "Appendix" for information about supported chorus types. adjust how chorus is applied to the tone of each keyboard or Auto Accompaniment part. The initial - Casio CTK7000 | User Guide - Page 35
type you want to edit in order to create your user DSP. 2. Use the R-17 (y) button to move the 0 to "DSP Edit". • A pointer indicator is displayed next to DSP when "DSP" is selected for the "Chorus/DSP" setting. • Maximum polyphony is reduced by a maximum of two notes when playing on the keyboard - Casio CTK7000 | User Guide - Page 36
time returns a parameter to its initial default setting. • Changing the DSP parameter while a note is being output from the Digital Keyboard may cause noise to be generated. This does not indicate malfunction. 7. Repeat steps 5 and 6 as required to configure other parameters. 8. Press the R-15 (EXIT - Casio CTK7000 | User Guide - Page 37
depends on the DSP type. For details, see "DSP Parameter List" (page E-157). Specifies how much of the post-DSP sound should be sent to reverb. - 0 - 40* - 127 Specifies the function assigned to the S-2 (MODULATION) button when "DSP" is selected for the "Mod Setting" tone - Casio CTK7000 | User Guide - Page 38
R-14 R-16 R-17 Mixer Overview The sound source of this Digital Keyboard is capable of sounding up to 32 individual parts simultaneously. Each part can be controlled individually, and each part can be configured to sound a different musical instrument. Different tones can be assigned to each part - Casio CTK7000 | User Guide - Page 39
, and Auto Accompaniment). • While an individual part (A01 through A16, B01 through B16) is selected in step 2 above for setting, pressing a keyboard key will sound only notes of the selected part. All other types of performance operations (layer, split, Auto Accompaniment, etc.) are disabled. E-37 - Casio CTK7000 | User Guide - Page 40
Using the Mixer Using the Sliders to Change Parameter Settings While the mixer screen is displayed, use sliders D-4 (1/9/EXT) to D-12 (MASTER) to change the displayed parameter settings. The D-1 (PART/COMMON), D-2 (GROUP A/B) and D-3 (1-8/9-16) buttons are used to specify the parts that correspond - Casio CTK7000 | User Guide - Page 41
● Sliders D-4 (1/9/EXT) through D-11 (8/16): Allow configuration of the following parameter settings in accordance with the currently displayed mixer setting. When this setting These parameter settings can be screen is displayed: configured: MASTER parameters (page E-41), MIC/INST parameters (page - Casio CTK7000 | User Guide - Page 42
Using the Mixer To initialize all mixer parameters • For details about how initial default settings are configured when you perform the following procedure, see "Parameter List" (page E-163). 1. While the mixer screen is displayed, hold down the R-13 (FUNCTION) button as you press the C-17 (MENU) - Casio CTK7000 | User Guide - Page 43
Rev.Send (DSP Output Reverb Send) Description Specifies whether the Digital Keyboard's sound source should go through the chorus or DSP.*1 This setting item value shifts to the right. Specifies how much reverb is applied to the post-DSP send note. -64 to 0* to +63 0 to 40* to 127 *1 See the block - Casio CTK7000 | User Guide - Page 44
input should be output (on) or not output (oFF). Setting Range oFF, on* Specifies the volume level of sound input. 0 to 80* to 127 Specifies the stereo pan position of sound input. 0 indicates the center, while a smaller values shifts to the left and a larger value shifts to the right. Specifies - Casio CTK7000 | User Guide - Page 45
tone for each part. When configuring this parameter, you can use the buttons R-1 ([A] PIANO) through R-12 ([L] DRAWBAR ORGAN) to select a tone group. Specifies if the notes When playing back a MIDI file or song sequencer song, a "Sol" (Solo) option can be specified to play a specific part only. To - Casio CTK7000 | User Guide - Page 46
E-52). C-17 Tone Creation Overview The preset tones built into this Digital Keyboard consist of a number of parameters. To create a user tone, you first recall a preset tone (A:001 to J:128) and then modify its parameters to change it to your own original tone. Note that drum set sounds (J:129 to - Casio CTK7000 | User Guide - Page 47
to fall to zero after a keyboard key is released. You can specify a release that ranges from a sudden fall to zero, to one that gradually falls to zero. Note ends Envelope Using the Tone Editor (3) Tone Pitch Parameters • Vibrato Type, Vibrato Delay, Vibrato Rate, Vibrato Depth These parameters - Casio CTK7000 | User Guide - Page 48
the Tone Editor Creating a User Tone User Tone Numbers Tone areas numbered K:001 through K:100 are for storage of user tones. You can have up to 100 user tones stored in memory at one time. You can recall a stored user tone by pressing the R-11 ([K] USER TONES) button. See "To select a tone" (page - Casio CTK7000 | User Guide - Page 49
or become corrupted. It also can cause the Digital Keyboard to fail to turn on when the L-1 (POWER) button is pressed. If this happens, refer to "Troubleshooting" (page E-150). • Pressing the R-15 (EXIT) button in place of step 6 displays the confirmation screen shown below. Pressing the R-14 - Casio CTK7000 | User Guide - Page 50
.Type (Vibrato Type) Description Specifies the time until a note starts to sound steps. -2 to 0* to +2 Specifies the volume level of all tones. A larger value sets a higher volume level. Specifies how much the volume changes in accordance with the relative amount of pressure applied to keyboard - Casio CTK7000 | User Guide - Page 51
Using the Tone Editor Parameter Name Description Setting Range DSP Parameters 1 Shows up to eight parameters for "DSP Type". *2 *2 through 8 DSP RevSend (DSP Reverb Send) Adjusts how much reverb is applied to the post-DSP note. 0 to 40* to 127 Mod Setting (Modulation Setting) Assigns - Casio CTK7000 | User Guide - Page 52
by adding percussion and click sounds in real time as you play. A button is also provided to switch the rotary effect between fast and slow. You also can edit parameters that are unique to drawbar organ tones to create and store your own original user drawbar organ tones. ■ About the drawbars The - Casio CTK7000 | User Guide - Page 53
below. *2 This operation is supported only when DSP is being used as the effect and the DSP type is "Rotary". For details about effects, see "Applying Effects to a Sound" (page E-29). For details about DSP types, see "DSP Effect List" (page E-155). Using Drawbar Organ Tones To configure the level - Casio CTK7000 | User Guide - Page 54
TONE EDITOR) button. • This displays the drawbar editor screen. 5. Repeat steps 3 and 4 as required to configure other parameters. 6. To store a rhythm can cause the Digital Keyboard to fail to turn on when the L-1 (POWER) button is pressed. If this happens, refer to "Troubleshooting" (page E-150). - Casio CTK7000 | User Guide - Page 55
sustained tones more lively. A percussion sound is sounded at its strongest immediately after a keyboard key is pressed, and then gradually decays in accordance with the "Perc.Decay" setting. Though keeping keyboard keys depressed will continue to sound organ notes, only the percussion sound decays - Casio CTK7000 | User Guide - Page 56
Group [F] is the user preset group. C-17 R-13 To perform using a music preset 1. Refer to the separate "Appendix" to find the music preset you want to use, and note its group and number. 2. While holding down the L-7 ([D] WORLD/ VARIOUS) button, press the L-8 ([E] PIANO RHYTHMS) button. • This - Casio CTK7000 | User Guide - Page 57
you also can use the chord keyboard (page E-26) to play Auto Accompaniment chords, and you also can play with the rhythm only. For details, see "To change music preset Auto Accompaniment settings" (page E-57). • During play using a music preset, you can change tone, rhythm, tempo, mixer, effect, and - Casio CTK7000 | User Guide - Page 58
on/off and type To add reverb to sounds (page E-31) Auto harmonize tones Using the Mixer Arpeggiator) (page E-23) Arpeggiator hold, arpeggiator speed, arpeggiator part Function Menu Settings (page E-131) Rhythm To change the rhythm while using a music preset (page E-57) Synchro start type - Casio CTK7000 | User Guide - Page 59
press the R-17 (t) button twice. • This exits the rhythm selection screen. • Pressing a button from R-1 ([A] PIANO) through R-12 ([L] DRAWBAR ORGAN) while a music preset is in use will display the tone selection screen. While the tone selection screen is displayed, pressing the R-17 (y) button once - Casio CTK7000 | User Guide - Page 60
stored user preset after pressing the L-9 ([F] USER RHYTHMS) button. See "To perform using a music preset" (page E-54) for more information. To create and save a user preset 1. Perform steps 1 through 4 under "To perform using a music (Synchro type) Accompaniment synchro start standby type. oFF, - Casio CTK7000 | User Guide - Page 61
button to move the 0 to "Store" and then press the R-16 (ENTER) button. • This displays a screen for specifying the destination user preset number and name. Save destination user preset number Music Presets • Pressing the R-15 (EXIT) button in place of step 6 displays the confirmation screen shown - Casio CTK7000 | User Guide - Page 62
Music Presets Timing Setting and Chord Progression Playback This section explains how chord progressions are played in accordance with the "Timing" (Timing set) settings in step 5 under "To create and save a user preset" (page E-58). Note that this setting affects playback only. It does not change - Casio CTK7000 | User Guide - Page 63
Music Presets • 3/4 Plays chords measure-by-measure at a timing that is 3/4 times that of the recording. This setting is best for use with a 6/8 time rhythm rhythm is assigned to the user rhythm is assigned to the user rhythm is assigned to the user preset time rhythm is assigned to the user - Casio CTK7000 | User Guide - Page 64
it. Chord Progression Editing Flow 1. Perform steps 1 through 4 under "To perform using a music preset" (page E-54) and select the music preset you want to edit in order to create your user music preset. 2. Configure tone and other settings referring to "Music Preset Settings" (page E-56). 3. While - Casio CTK7000 | User Guide - Page 65
note (2) is 12 ticks and an eighth note (6) is 6 ticks. Chord progression Measure 1 Measure 2 Beat 1 Beat 2 Beat 3 Beat 4 Beat 1 Beat 2 Music Presets To delete recorded chord data 1. Perform steps the first chord of the user preset data. To insert a new chord 1. Perform steps 1 through 4 of the - Casio CTK7000 | User Guide - Page 66
Music the type setting. • When the cursor is located at "ROOT" or "TYPE", you can use the chord keyboard to specify the chord root or type. 8. step. Also note that you cannot specify a dotted 16th note. 5. Press the keyboard keys that correspond to the chord you want to input. • Press keyboard - Casio CTK7000 | User Guide - Page 67
Music Presets *1 Deletes all existing chords, and replaces it with four measures of data with a C-chord at the first beat of the first measure (user in step 4 or music preset numbers until the one you want is displayed, and then press the R-16 (ENTER) button. Delete existing chords in a specific - Casio CTK7000 | User Guide - Page 68
Setups to Registration Memory L-1 R-14 C-11 C-13 C-15 C-17 C-10 C-12 C-14 C-16 Registration memory lets you store Digital Keyboard setups (tone, rhythm, etc.) for instant recall whenever you need them. • For information about items that can be part of a registration setup, see "Parameter - Casio CTK7000 | User Guide - Page 69
area. • This will save the settings you configured in step 1 into the applicable setup. • If there is anything already stored in the setup, it will be replaced (deleted) with the new setup. Setup 6-1 recalled • Notes currently being sounded by the keyboard may stop if you recall a setup that causes - Casio CTK7000 | User Guide - Page 70
edit each individual note (event). You can have up to five recorded songs (approximately 30,000 notes total) stored in memory at the music preset" (page E-70). To use EASY REC to record 1. Configure Digital Keyboard settings for your performance. • Configure the following settings: tone and rhythm - Casio CTK7000 | User Guide - Page 71
step 4. (5) Press the R-15 (EXIT) button to exit the menu. 4. Start playing something on the keyboard a point where there is less than 100 notes of remaining memory capacity, the current measure or off. Turning on the metronome causes it to sound a count during recording, but not during playback. • - Casio CTK7000 | User Guide - Page 72
uses multiple parts simultaneously to sound Auto Accompaniment, a keyboard layer tone, and keyboard split tone at the same time. The system track is used to record the notes of these parts in a single location. • Tracks 01 through 16 each correspond to a single musical instrument part. Each track is - Casio CTK7000 | User Guide - Page 73
menu item settings below (page E-131) - Arpeggiator hold, arpeggiator speed, arpeggiator part • Auto harmonize or arpeggiator on/off and type • Synchro standby (Normal, Variation, Intro) • Music preset (Only when using EASY REC.) ■ During Recording • Rhythm selection • Tempo setting • All of the - Casio CTK7000 | User Guide - Page 74
keyboard. Up to step 7, take care that you do not accidentally press a keyboard key and unintentionally start recording. 5. Configure panel settings as required for your performance. • Configure the following settings: tone and rhythm on the metronome causes it to sound a count during recording, but - Casio CTK7000 | User Guide - Page 75
reaches a point where there is less than 100 notes of remaining memory capacity, the current measure (MEASURE) Keyboard will enter record standby, which means recording will start whenever you play something on the keyboard. Up to step 7, take care that you do not accidentally press a keyboard - Casio CTK7000 | User Guide - Page 76
following settings: tone selection, tempo rhythm selection and accomp volume. 6. Perform the following steps When you want to perform this type Select this of recording: RecType start recording, and then start keyboard play at the point you want is less than 100 notes of remaining memory capacity, - Casio CTK7000 | User Guide - Page 77
To clear the content of a single track immediately after recording it 1. While the song sequencer mode initial screen is on the display after track recording is complete, hold down the R-13 (FUNCTION) button as you press the C-17 (MENU) button. • This displays the song sequencer menu with the 0 - Casio CTK7000 | User Guide - Page 78
supported, depending on the track being recorded to. Settings are recorded to the header settings (page E-71), the same way settings are stored and then play the new notes when playback reaches the location recording from a particular location during playback (Manual Punch-in) 1. Press the C-5 (SONG - Casio CTK7000 | User Guide - Page 79
are supported keyboard. • Any one of the following also will start punch-in recording: a pedal or pitch bender operation; changing the tone setting; changing the rhythm L-17 (START/ STOP) button in step 8. • If you want to cancel E-79). • You can specify a specific measure, beat, and tick* for the - Casio CTK7000 | User Guide - Page 80
in step 6 under "To start re-recording from a particular location during playback (Manual Punch- you specified, start playing something on the keyboard. • Punch-in recording will start rhythm, track tone selection, etc. • To change the system track UPPER 1, UPPER 2, and LOWER part tones or - Casio CTK7000 | User Guide - Page 81
repeat playback Perform steps 3 through 5 under "To repeat play a specific section of a select the track you want. Playing keyboard keys sounds the parts that correspond to the currently the system track UPPER 1, UPPER 2, and LOWER part tones or mixer settings, use the mixer to change the settings - Casio CTK7000 | User Guide - Page 82
) button. • This starts playback only of the part you selected in step 4. • Playback stops automatically when it reaches the end of a song. To stop playback part way through, press the L-17 (START/STOP) button. To repeat play a specific phrase 1. Hold down the L-13 (REPEAT) button until the locator - Casio CTK7000 | User Guide - Page 83
the R-15 (EXIT) button without pressing the R-16 (ENTER) button in step 4 above will cancel the phrase setting operation and close the locator screen. • are supported during song editing. • Deleting a specific song or all songs • Copying a song from one area to another • Deleting specific measures - Casio CTK7000 | User Guide - Page 84
Using the Song Sequencer To clear a song 1. Perform the procedure under "To start a song editor operation" on page E-81 to display the song editor menu, with the 0 located at "Clear". 2. Press the R-16 (ENTER) button. • This displays the "Clear Song" screen. 3. Use the dial or R-14 (-, +) buttons to - Casio CTK7000 | User Guide - Page 85
To delete one or more measures from a song 1. Perform the procedure under "To start a song editor operation" on page E-81 to display the song editor menu. 2. Use the R-17 (t, y) buttons to move the 0 to "DeleteMeas." and then press the R-16 (ENTER) button. • This causes "Delete Measure" screen to - Casio CTK7000 | User Guide - Page 86
E-70), the system track is an individual track, while the keyboard play and Auto Accompaniment data are recorded individually to multiple parts ( or R-14 (-, +) buttons to select the character you want. • See "Supported Input Characters" (page E-160) for information about the characters you can input - Casio CTK7000 | User Guide - Page 87
Editing a Track The following operations are supported during track (system track, Tracks 01 through 16) editing. • Clearing a single track • Copying one track to another track (Tracks 01 through 16 only) • Combining two - Casio CTK7000 | User Guide - Page 88
Track 03 and Track 05 into Track 06. Here, select Track 03. 2. Perform steps 2 and 3 of the procedure under "To start a track editor operation" on page BC A: One of the tracks to be combined (The track you selected in step 1 is the initial default selection). B: Other track to be combined. C: - Casio CTK7000 | User Guide - Page 89
a single note on the keyboard, for example, stores the following events: note start measure, beat, and track, note pitch, note length, and note intensity. The following operations are supported during event editing. • Deleting events • Inserting events • Copying events within a specific range to - Casio CTK7000 | User Guide - Page 90
a setting value indicates that the cursor can be moved to that value. ■ Reading Event Data Here we will use two types of event displays to explain how to read event data. • Example 1: Note event 1 24 The following explains the meaning of each screen position. Number Description For all event - Casio CTK7000 | User Guide - Page 91
name enclosed in thick brackets (%) when step 3 of insert event procedure under "To insert an event" (page E-94). System Track and Track 01 to 16 Common Events Event Type 2 display Event Name TOP (song start point) 2 display during insert - *1 Note [Note] Bend Mod Sus Soft Sost ModB RotB - Casio CTK7000 | User Guide - Page 92
Harmonize/ Arpeggiator Arpeggiator Hold Arpeggiator Speed Arpeggiator Part Reverb Chorus DSP Scale [Rhythm] NOTE Cent PART VALU PART VALU PART VALU PART VALU PART VALU Parameter Name Setting Range Tone Number Tone Number Tone Number Tone Number Root Chord type Chord velocity Rhythm Number Rhythm - Casio CTK7000 | User Guide - Page 93
Line Accomp volume Accomp Scale Part Feet Level Part Type On/Off UPP1, UPP2, LOWR, HARM 000 as the chord root (C, etc.) *2 See "Fingering Guide" on (page E-160). *3 Intro: intro pattern, song from the event editor screen (Quick Play) 1. Perform steps 1 to 3 of the procedure under "To start an - Casio CTK7000 | User Guide - Page 94
Chord Tempo Tone Mixer Others Corresponding Event Note event Pitch Bend event Sustain, soft, sostenute events Rhythm event Chord event Tempo event Tone event Mixer event (excluding Tone event) All other events besides those above. • For information about each event, see "Event Types and Screen - Casio CTK7000 | User Guide - Page 95
to the "Sure?" message that appears, press the R-14 (YES) button to delete or the R-14 (NO) button to cancel. To delete all events in a specific range of a track 1. Display the event editor screen of the track that includes the events you want to delete. • See "To select a track for editing - Casio CTK7000 | User Guide - Page 96
Screen Content" (page E-88). • When a note event is specified as the event type, specify the note type (note length) using the buttons shown in the table below. You specify the pitch of the note in step 6 of this procedure. To specify this type of note: Whole Half Quarter Eighth Sixteenth Thirty - Casio CTK7000 | User Guide - Page 97
the range specification screen. Using the Song Sequencer To quantize an individual note event copying the same copy source range to another location, repeat steps 5 and 6 again. 7. To return to the event the note you want to use as the quantize reference note. To specify this type of note: Quarter - Casio CTK7000 | User Guide - Page 98
setting in the thick brackets (%) to "All". 4. Perform step 5 under "To quantize an individual note event" (page E-95). 5. Press the L-17 (START/ quantize or the R-14 (NO) button to cancel. To quantize all note events within specific range of a track 1. Display the event editor screen of the track - Casio CTK7000 | User Guide - Page 99
page E-73), and select "OVDB" (Overdub) for the "RecType" setting in step 6-(5). • Since "OVDB" cannot be selected for "RecType" when recording to the locator screen (page E-80), that range will be displayed on the range specification screen. 4. Use the dial or R-14 (-, +) buttons to change the - Casio CTK7000 | User Guide - Page 100
See "To select a track for editing" (page E-91). 2. Depending on the type of adjustment you want make, perform one of the operations below. To adjust this: Individual note event All note events in a track Note events within a specific range in a track Do this: On the event editor screen, move the - Casio CTK7000 | User Guide - Page 101
To adjust the gate time value of a note event 1. Perform steps 1 through 5 under "To adjust the velocity value of a note event" (page E-98). In step 4, select "GatetimeMod." instead of "VelocityMod.". 2. Press the R-16 (ENTER) button. • This will display the setting screen like the one shown below. - Casio CTK7000 | User Guide - Page 102
flashing. 5. To return to the event editor screen, press the R-15 (EXIT) button. Directly Inputting Note Events (Step Input) Step input is an event editor function. You can use step input to specify the length and pitch of each individual note (note event). In the system track, you also can perform - Casio CTK7000 | User Guide - Page 103
Current cursor position C C Cursor position after process 6. Press the keyboard key that corresponds to the note you want to input. • The note is input as soon as you press the keyboard key, and the cursor will move by the length you specified in step 5 to the next measure:beat:tick. From there you - Casio CTK7000 | User Guide - Page 104
sequencer to create accompaniment patterns that sound while using the Digital Keyboard's Auto Accompaniment function and store them as user rhythms. Rhythms, Accompaniment Patterns, and Instrument Parts Each of the Digital Keyboard's rhythms provides six different accompaniment patterns named - Casio CTK7000 | User Guide - Page 105
recording of keyboard notes, and event editing are allowed for an instrument part with this status. User Rhythm Numbers Rhythm areas numbered F:001 through F:100 are for storage of user rhythms. You can have up to 100 user rhythms stored in memory at one time. You can recall a stored user rhythm by - Casio CTK7000 | User Guide - Page 106
with New Recordings With this procedure, you re-record one or more of the accompaniment patterns of an existing preset rhythm or previously stored user rhythm to create a new rhythm. In this case, you clear all of the rec areas included in an accompaniment pattern and then create new recordings - Casio CTK7000 | User Guide - Page 107
in a loop. To sound bass and chord notes, play a chord on the chord keyboard. • Each press of either of the R-17 (u, i) buttons. 6. Repeat steps 3 through 5 as required to determine which accompaniment patterns perform the procedure under "To edit an existing rhythm" (page E-107). If you do, you - Casio CTK7000 | User Guide - Page 108
keyboard (oFF) or automatic alignment of notes with a base note (setting other than oFF). Selecting a value specifies the length of each note. "4" specifies quarter notes, while a "T" setting specifies triplets. oFF*, 4, 8, 8T, 16, 16T Specifies whether a precount should sound chord type to be - Casio CTK7000 | User Guide - Page 109
tones. Only drum set sounds (tone numbers J:129 through J:146) can be selected for drum parts and percussion parts. Drum set sounds cannot be selected for the bass and the Chord 1 through Chord 5 parts. *2 You can temporarily sound the notes of individual parts, if you want. For details, see step - Casio CTK7000 | User Guide - Page 110
keyboard, pitch bend or modulation operation. • To delete specific recorded notes, hold down the C-10 (DELETE) button. When playback reaches the note you want to delete, press the keyboard that corresponds to the note perform step (4) below, you can layer keyboard notes and delete recorded notes as - Casio CTK7000 | User Guide - Page 111
recommended that you save the rhythm as a user rhythm each time you finish editing each accompaniment pattern. For details about how to do this, see "To store an edited or newly created rhythm" (page E-111). 9. Repeat steps 3 through 8 to edit all of the rhythm's accompaniment patterns you want. 10 - Casio CTK7000 | User Guide - Page 112
played on the keyboard and add new notes, if you want. For details, see "Editing Individual Events (Event Editor)" (page E-113). 10. Repeat steps 5 through 9 for all of the parts you want to record. 11. After completing all of the editing you want, adjust the tempo of the rhythm as desired. • The - Casio CTK7000 | User Guide - Page 113
you can input, see "Supported Input Characters" (page E-160). • To input a space, press both of the R-14 (-, +) buttons at the same time. 5. Press the R-16 (ENTER) button. • This stores the data. • If the user rhythm number where you are storing the data already has data stored to it, a message - Casio CTK7000 | User Guide - Page 114
below. Pressing the R-14 (YES) button at this time will display the user rhythm store screen in step 2. To cancel the editor operation without saving the edited results, press the R-14 (NO) button. To clear user rhythm data 1. Press the C-4 (PATTERN SEQUENCER) button to display the pattern sequencer - Casio CTK7000 | User Guide - Page 115
a note on the keyboard, for example, stores the following as events: note start measure, beat, and track, note pitch, note length, and note intensity. The following editing operations are supported for individual events. • Deleting events • Inserting events • Copying events within a specific range - Casio CTK7000 | User Guide - Page 116
one beat. Pattern sequencer data uses 96 ticks per beat (for 2/4 to 8/4) or 48 ticks per beat (for 2/8 to 16/8). Pattern sequencer records three types of events: notes (keyboard play), pitch bender operations, and modulation operations. These events are represented on the screen as described below - Casio CTK7000 | User Guide - Page 117
types of preset or user rhythm instrument note events in a "To quantize all note events specific range of the part being within specific range of a track" edited (page E-96) Delete pitch bender events "Deleting Pitch Bender Events" (page E-97) Step input of note events "To perform step - Casio CTK7000 | User Guide - Page 118
Parameters) The settings in this section control how instruments parts you are currently editing or creating are sounding when played back as Auto Accompaniment after being saved as a user rhythm. These settings are configured using the "PartPara" (Part Parameter) item on the edit menu. • You can - Casio CTK7000 | User Guide - Page 119
to suit the instrument parts and the type of music being played in order to ensure musically natural accompaniment. * Depending on the 06 Chord Var2 *1 Bass Variation of number 03. Always makes the first note the root note when changing chords. *1 Chord Normally used for a chord part. *1 - Casio CTK7000 | User Guide - Page 120
and an F chord is fingered on the chord keyboard. If "oFF" is selected for this setting sounding note to be cut off, and the next note of the pattern of the newly fingered chord to be played. ■ BendRange (Bend Range) This parameter specifies the bend range for pitch bender operation in semitone steps - Casio CTK7000 | User Guide - Page 121
To copy preset or user rhythm instrument part data to a rec area • This procedure copies note events only. • You • This displays the "Part Copy" screen. 1 Using the Pattern Sequencer 5. Specify a rhythm number, accompaniment pattern, and instrument part as the copy destination. • Use the R-17 (t, - Casio CTK7000 | User Guide - Page 122
of all the instrument parts of the accompaniment pattern you specified in step 4 to "Empty". To configure the accompaniment pattern number of measure sequencer screen. To clear all rec areas included in the currently selected rhythm 1. While the pattern sequencer screen is displayed, hold down the - Casio CTK7000 | User Guide - Page 123
details, see "Storing and Loading Digital Keyboard Memory Data" (page E-146). Audio Recording and Playback Precautions Limitations during Recording and Playback The following operations are not possible during audio recording and playback. • User rhythm editing (page E-103) • User tone editing (page - Casio CTK7000 | User Guide - Page 124
and Playing Audio Performing Audio Recording Modes that Support Audio Recording You can record keyboard play while in the rhythm mode or song sequencer mode. • Recording is actually performed in the audio record mode, but you can switch between the rhythm mode screen and song sequencer mode screen - Casio CTK7000 | User Guide - Page 125
Formatting a Memory Card" (page E-137). 5. Press the R-15 (EXIT) button to return to the rhythm mode from the card mode. • If you have a memory card that you previous formatted on the Digital Keyboard, skip steps 4 and 5, and simply insert the card into the card slot (T-1). For details, see "Loading - Casio CTK7000 | User Guide - Page 126
) button. • If you switch from the time counter to tempo, measure, beat in step 4 of the procedure above, the count up operation will begin when song (when in the song sequencer mode) or rhythm (when in the rhythm mode) playback is started. • The time counter (or tempo, measure, beat display) will - Casio CTK7000 | User Guide - Page 127
recording" (page E-123). • This enters the rhythm mode. 2. Perform steps 1 through 4 under "To perform using a music preset" (page E-54). • This enters music preset record standby. 3. Perform steps 3 through 6 under "To record play in the rhythm mode" (page E-123) to start recording. 4. Perform - Casio CTK7000 | User Guide - Page 128
as audio files that you converted on a computer to a format supported by the Digital Keyboard.* * Special application software (Data Manager) is required in order to convert audio files. For details, see "Storing and Loading Digital Keyboard Memory Data" (page E-146). To play back a recorded audio - Casio CTK7000 | User Guide - Page 129
SELECT) button. * Dial operation is supported only while the audio play screen is mode screen (rhythm mode or song sequencer mode) that was displayed before you performed step 1 of initial default value), center cancel is applied to all sound recorded from an external device connected to the T-8 - Casio CTK7000 | User Guide - Page 130
Recording and Playing Audio To repeat play a specific phrase 1. Perform steps 1 through 4 under "To play back a recorded can perform during repeat playback are the same as those that are supported during normal playback. For details, see step 4 under "To play back a recorded audio file" (page E-126 - Casio CTK7000 | User Guide - Page 131
you saved to the memory card using Data Manager* on a computer) will make this an audio file delete operation. * For details, see "Storing and Loading Digital Keyboard Memory Data" (page E-146). 3. While holding down the R-13 (FUNCTION) button, press the C-17 (MENU) button to display the audio play - Casio CTK7000 | User Guide - Page 132
. It also includes some memory card operations (format, etc.). Using the Function Menu This section explains function menu operations. For details about specific function menu items, see "Function Menu Settings" (page E-131). To change the setting of a function menu item 1. Press the R-13 (FUNCTION - Casio CTK7000 | User Guide - Page 133
Fine tunes the overall keyboar tuning in 0.1 Hz steps. A4=415.5 - 440.0* - 465.9Hz note volume. oFF : Constant note volume regardless of keyboard pressure 1* : Normal 2 : Strong sound (Arpeggiator Hold) Specifies the how arpeggio is played in accordance with pressed keyboard keys when the arpeggiator - Casio CTK7000 | User Guide - Page 134
on the arpeggiator type. Refer to the separate "Appendix" for details. ArpegPart (Arpeggiator Part) Specifies whether arpeggiator play should be used for the UPPER part keyboard or LOWER part keyboard when the arpeggiator (page E-23) is used while the keyboard is split between two tones (page E-15 - Casio CTK7000 | User Guide - Page 135
- 16 LocalCtrl (Local Control) Specifies whether pressing a key sounds the internal sound source (on*) or whether the keyboard and internal sound source should be disconnected (oFF). AccompOut (Accompaniment MIDI Out) Specifies if Auto Accompaniment MIDI data should be sent to an external device (on - Casio CTK7000 | User Guide - Page 136
settings). Rewrite the power on default settings Store with the Digital Keyboard's current setup (registering default settings). • and the display returns to the screen before you pressed the R-16 (ENTER) button in step 3. 6. To exit the function menu, press the R-13 (FUNCTION) button. • If - Casio CTK7000 | User Guide - Page 137
■ To initialize all data and settings (or parameter settings only) 1. Press the R-13 (FUNCTION) button to display the function menu. 2. Use the R-17 (i, y) buttons to move the 0 to "General" and then press the R-16 (ENTER) button. 3. Use the R-17 (i, y) buttons to move the 0 to "Initialize" and then - Casio CTK7000 | User Guide - Page 138
above is not supported. Supported Data Types ■ Data that can be saved to and exported from a memory card Data Type Description (File Name Extension) User rhythm data (page E-103) Auto Accompaniment data edited with this Digital Keyboard (AC7) User tone data (page E-44) Tone data edited with - Casio CTK7000 | User Guide - Page 139
Keyboard to fail to turn on when the L-1 (POWER) button is pressed. If this happens, refer to "Troubleshooting • While in the rhythm mode (page E-7) press card is loaded, see "Playing a Music File from a Memory Card" ( stored on it. • The memory card format operation performed by this Digital Keyboard - Casio CTK7000 | User Guide - Page 140
user DSP 1. Perform steps 1 through 4 under "To use a DSP" (page E-32). 2. Use the dial or R-14 (-, +) buttons to specify the user DSP number (101 through 200). One user preset 1. While holding down the L-7 ([D] WORLD/ VARIOUS) button, press the L-8 ([E] PIANO RHYTHMS) button to display the music - Casio CTK7000 | User Guide - Page 141
when it is stored. Change the initial type of data you are saving. *2 The " note events of tracks that are turned off using the mixer are not saved. To batch save all Digital Keyboard steps are the same as those from step 6 under "To save Digital Keyboard data to a memory card" (page E- - Casio CTK7000 | User Guide - Page 142
, press the C-9 (CARD) button to exit the card mode. 3. Referring to the table in step 3 of the procedure under "To save Digital Keyboard data to a memory card" (page E-138), perform the procedure required for the type of data you want to load from the card. • All setup registration banks are loaded - Casio CTK7000 | User Guide - Page 143
To delete a file from a memory card 1. Insert the memory card into the card slot. 2. Press the C-9 (CARD) button to enter the card mode. 3. While holding down the R-13 (FUNCTION) button, press the C-17 (MENU) button. • This displays the function menu "Play/CardUtl" screen. 4. Use the R-17 (t, y) - Casio CTK7000 | User Guide - Page 144
in the memory card root directory. 2. Use your computer to copy the music file you want to play to the MUSICDAT folder that was created in step 1. • See the "Important!" note above for information about supported file types. 3. Insert the memory card into the card slot. 4. Press the C-9 (CARD - Casio CTK7000 | User Guide - Page 145
Keyboard (Part Off) When playing a music file of a piano piece that has the left hand and the right hand parts recorded in separate MIDI channels, you can turn off playback of one of the parts and play it on the keyboard playback of the part you turned on in step 3. 8. To stop playback, press the L- - Casio CTK7000 | User Guide - Page 146
part you want to play on the keyboard. • This step is not required if you want to play along on the keyboard while playing back both hand parts. 2. While holding down the L-8 ([E] PIANO RHYTHMS) button, press the L-9 ([F] USER RHYTHMS) button. • This assigns the tone of the part that is turned off - Casio CTK7000 | User Guide - Page 147
page E-162). • This Digital Keyboard conforms to General MIDI Level 1 (GM). • For detailed specifications and connections that apply to MIDI data send and receive by this Digital Keyboard, see the latest support information provided by the website at the following URL. http://world.casio.com/ E-145 - Casio CTK7000 | User Guide - Page 148
and used after it is converted with Rhythm Converter to compatible data (described in 2 above). Rhythm Converter can be downloaded from the CASIO MUSIC SITE (http://music.casio.com/). CTK-731/CTK-738/CT-K811/WK-1800 Rhythm data from this Digital Keyboard cannot be used on these models. E-146 - Casio CTK7000 | User Guide - Page 149
. • For details about Data Manager, see "Storing and Loading Digital Keyboard Memory Data" (page E-146). • For information about the types of memory cards supported by the Digital Keyboard, see "Using a Memory Card" (page E-136). To load rhythm data into Digital Keyboard memory Perform one of the - Casio CTK7000 | User Guide - Page 150
progress. You tried to save a Digital Keyboard user area (user Select a user area that contains data. rhythm, user rhythm song, etc.) that does not contain is not supported by this Digital Keyboard. You tried to perform an operation during song sequencer song editing or user music preset editing - Casio CTK7000 | User Guide - Page 151
operations. 2. Remaining memory capacity became too low during music preset editing. 3. There is not enough memory capacity required a different rhythm from the one that was selected when the error message appeared. 2. Referring to "To clear user preset data" (page E-59), delete user presets you - Casio CTK7000 | User Guide - Page 152
when I start an Auto Accompaniment. • With rhythms E:030 to E:039, nothing will sound until you play a chord on the keyboard. Try playing a chord (page E-26). • Check and adjust the accompaniment volume setting (page E-133). • If there is no user rhythm stored in memory, Auto Accompaniment will not - Casio CTK7000 | User Guide - Page 153
to initialize all Digital Keyboard settings (page E-13). The reverb of notes seems to change suddenly. • Check and adjust the reverb setting (page E-31). • Turn power off and then back on to initialize all Digital Keyboard settings (page E-13). Operation Tone, rhythm, and other settings revert - Casio CTK7000 | User Guide - Page 154
Octave Shift Tuning Scale Tuning Music Preset One Touch Preset Auto Harmonize Arpeggiator MIDI CTK-7000 / WK-7500 CTK-7000: 61 standard-size keys WK-7500: 76 standard-size keys 2 types, Off 64 notes (32 for certain tones, 21 for drawbar organ tones) 800 Up to 100 (Tone Editor), up to 50 (Drawbar - Casio CTK7000 | User Guide - Page 155
13.2 cm (37 1/4 × 14 7/8 × 5 3/16 inch) WK-7500: 118.7 × 39.9 × 14.9 cm (46 3/4 × 15 3/4 × 5 7/8 inch) CTK-7000: Approximately 6.8kg (15.0 lbs) (without batteries) WK-7500: Approximately 8.9kg (19.6 lbs) (without batteries) • Design and specifications are subject to change without notice. B E-153 - Casio CTK7000 | User Guide - Page 156
User Maintenance • Never use benzine, alcohol, thinner, or other chemical agents to clean the product. • To clean the product or its keyboard , that contains liquid on the AC adaptor. • Store the AC adaptor in a dry place. • Use not cracks or scratches. ■ Musical Instrument Etiquette Always be aware - Casio CTK7000 | User Guide - Page 157
Keyboard consist of the 46 "types" shown in the "DSP Type List" (page E-156). A preset DSP is a variation that is derived from one of these 46 types TrmFln 1 TrmFln 2 TrmDst 1 TrmDst 2 AutoPan CmpPan ChoPan 1 ChoPan 2 FlnPan 1 FlnPan 2 Type Number 02 02 04 04 07 07 07 09 09 09 09 09 24 24 41 08 08 - Casio CTK7000 | User Guide - Page 158
All of the Digital Keyboard's preset DSPs belong to one of the DSP types shown in the table below. When creating a user DSP (page E-33) or when using the tone editor (page E-44) to edit the DSP applied to a tone, you need to select one of the DSP types in the table. • Type numbers 01 through 14 - Casio CTK7000 | User Guide - Page 159
Type DSP Parameters 01: Wah This is a "wah" effect that can automatically affect the frequency using an LFO. Parameters and Value Ranges: 1 :Resonance (0 to 127) Adjusts the strength of resonance. 2 :Manual is desired (no compression at the onset of sound), set this parameter to as low a value as - Casio CTK7000 | User Guide - Page 160
. 3 :LFO Waveform (sin, tri, random) Selects the LFO waveform. 4 :Feedback (0 to 127) Adjusts the strength of feedback. 09: Chorus Gives sounds depth and breadth. Chorus type is selectable. Parameters and Value Ranges: 1 :LFO Rate (0 to 127) Adjusts the LFO rate. 2 :LFO Depth (0 to 127) Adjusts the - Casio CTK7000 | User Guide - Page 161
note is not sounding will cause noise to sound, even if there is no input signal. Reference ■ Dual Type DSP Parameters Dual type DSPs are configured by combining two different single type E-157. 4. Next, repeat steps 2 and 3 above for the right side part of the dual type DSP parameter name. • The - Casio CTK7000 | User Guide - Page 162
F7 Fm7 Gm7 Abadd9 CCC C C • With Fingered 3, the lowest note fingered is interpreted as the base note. Inverted forms are not supported. • With Full Range Chord, when the lowest note fingered is a certain distance from the neighboring note, the chord is interpreted as a fraction chord. • Unlike - Casio CTK7000 | User Guide - Page 163
Example List Root Chord C C#/(Db) D (D#)/Eb E Type M F F#/(Gb) G (G#)/Ab A (A#)/Bb B m dim aug sus4 sus2 7 m7 M7 m7b5 7b5 7sus4 add9 madd9 mM7 dim7 69 6 m6 • Since the chord input range is limited, this model may not support some of the chords shown above. Reference - Casio CTK7000 | User Guide - Page 164
09 SEQUENCER TRACK/MIDI 10 SEQUENCER TRACK/MIDI 11 SEQUENCER TRACK/MIDI 12 SEQUENCER TRACK/MIDI 13 SEQUENCER TRACK/MIDI 14 SEQUENCER TRACK/MIDI 15 SEQUENCER TRACK/MIDI 16 * The A01 part MIDI OUT channel depends on the keybaord channel setting. For details, see "KeyboardCh (Keyboard Channel)" (page - Casio CTK7000 | User Guide - Page 165
/Scale) Song Pre-count Sound Song Repeat Play Auto Accompaniment Volume Song Volume Metronome Volume Audio Volume Keyboard Channel Local Control Accompaniment MIDI Out Speaker ON/OFF LCD Contrast Auto Power Off Auto Recover Other Items Tone Number*1 Rhythm Number Music Preset Number Transpose Split - Casio CTK7000 | User Guide - Page 166
Models: CTK-7000 / WK-7500 MIDI Implementation Chart Version : 1.0 Function Basic Channel Default Changed Mode Default Messages Altered Note Number True voice Velocity Note ON Note OFF After Touch Key's Ch's Pitch Bender 0 1 6, 38 7 10 11 16 17 Control 18 19 Change 64 66 67 - Casio CTK7000 | User Guide - Page 167
: Commands : All sound off : Reset all controller : Local ON/OFF : All notes OFF : Active Sense : Reset O X O X X O O O X X O O X O X X *1: Depends on tone. *2: For details about NRPN, RPN, and system exclusive messages, see MIDI Implementation at http://world.casio.com/. *3: In - Casio CTK7000 | User Guide - Page 168
This recycle mark indicates that the packaging conforms to the environmental protection legislation in Germany. K MA1011-B Printed in China CTK7000/WK7500E1B
-
 1
1 -
 2
2 -
 3
3 -
 4
4 -
 5
5 -
 6
6 -
 7
7 -
8
-
9
-
10
-
11
-
12
-
13
-
14
-
15
-
16
-
17
-
18
-
19
-
20
-
21
-
22
-
23
-
24
-
25
-
26
-
27
-
28
-
29
-
30
-
31
-
32
-
33
-
34
-
35
-
36
-
37
-
38
-
39
-
40
-
41
-
42
-
43
-
44
-
45
-
46
-
47
-
48
-
49
-
50
-
51
-
52
-
53
-
54
-
55
-
56
-
57
-
58
-
59
-
60
-
61
-
62
-
63
-
64
-
65
-
66
-
67
-
68
-
69
-
70
-
71
-
72
-
73
-
74
-
75
-
76
-
77
-
78
-
79
-
80
-
81
-
82
-
83
-
84
-
85
-
86
-
87
-
88
-
89
-
90
-
91
-
92
-
93
-
94
-
95
-
96
-
97
-
98
-
99
-
100
-
101
-
102
-
103
-
104
-
105
-
106
-
107
-
108
-
109
-
110
-
111
-
112
-
113
-
114
-
115
-
116
-
117
-
118
-
119
-
120
-
121
-
122
-
123
-
124
-
125
-
126
-
127
-
128
-
129
-
130
-
131
-
132
-
133
-
134
-
135
-
136
-
137
-
138
-
139
-
140
-
141
-
142
-
143
-
144
-
145
-
146
-
147
-
148
-
149
-
150
-
151
-
152
-
153
-
154
-
155
-
156
-
157
-
158
-
159
-
160
-
161
-
162
-
163
-
164
-
165
-
166
-
167
-
168
 |
 |
E
CTK7000/WK7500E1B
USER’S GUIDE
Please keep all information for future reference.
Safety Precautions
Before trying to use the keyboard, be sure to read the
separate “Safety Precautions”.