Casio CTK7000 User Guide - Page 125
E-123, To get ready for audio recording, To record play in the rhythm mode
 |
View all Casio CTK7000 manuals
Add to My Manuals
Save this manual to your list of manuals |
Page 125 highlights
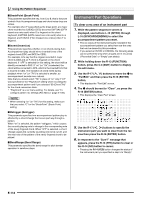
C-2 C-3 C-5 C-9 Recording and Playing Audio R-13 R-15 R-14 R-16 R-17 L-13 L-14 L-16 L-18 L-15 L-17 To get ready for audio recording 1. Referring to "Audio Recording" (page E-121), determine what type of performance you want to record. 2. If you plan to use a microphone, CD player or some other external device as a sound source during recording, turn off both the external device and the Digital Keyboard and then connect them. • For details about connections, see "Outputting Input from an External Device or a Microphone through the Digital Keyboard's Speakers" (page E-12). 3. Turn on the keyboard. 4. On the Digital Keyboard, format a memory card. • For details, see "Formatting a Memory Card" (page E-137). 5. Press the R-15 (EXIT) button to return to the rhythm mode from the card mode. • If you have a memory card that you previous formatted on the Digital Keyboard, skip steps 4 and 5, and simply insert the card into the card slot (T-1). For details, see "Loading and Removing a Memory Card" (page E-137). This completes preparation for recording. Next, perform the "To record play in the rhythm mode" below or the "To record play in the song sequencer mode" procedure (page E-125). C-17 To record play in the rhythm mode 1. Perform the procedure under "To get ready for audio recording" (page E-123). • This enters the rhythm mode. 2. Select a tone and rhythm, and configure other settings for the song you plan to record. 3. Press the C-3 (AUDIO RECORD) button. • This cause the > indicator to flash, which indicates the audio record mode. • The C-3 (AUDIO RECORD) button will also start flashing, which indicates audio record standby. • The audio record screen like the one shown below will appear on the display. Audio file number Audio file name Time counter (minutes:seconds) • The time counter shows how much time (minutes:seconds) has elapsed since the start of recording. You also can switch display contents to show the tempo, measure, and beat, if you want as described below. • If there is an asterisk (*) in front of the audio file number, it means the file already includes recorded data. Starting recording while a file that already contains recorded data is selected will cause the old data to be overwritten by the new recording. E-123
-
 1
1 -
2
-
3
-
4
-
5
-
6
-
7
-
8
-
9
-
10
-
11
-
12
-
13
-
14
-
15
-
16
-
17
-
18
-
19
-
20
-
21
-
22
-
23
-
24
-
25
-
26
-
27
-
28
-
29
-
30
-
31
-
32
-
33
-
34
-
35
-
36
-
37
-
38
-
39
-
40
-
41
-
42
-
43
-
44
-
45
-
46
-
47
-
48
-
49
-
50
-
51
-
52
-
53
-
54
-
55
-
56
-
57
-
58
-
59
-
60
-
61
-
62
-
63
-
64
-
65
-
66
-
67
-
68
-
69
-
70
-
71
-
72
-
73
-
74
-
75
-
76
-
77
-
78
-
79
-
80
-
81
-
82
-
83
-
84
-
85
-
86
-
87
-
88
-
89
-
90
-
91
-
92
-
93
-
94
-
95
-
96
-
97
-
98
-
99
-
100
-
101
-
102
-
103
-
104
-
105
-
106
-
107
-
108
-
109
-
110
-
111
-
112
-
113
-
114
-
115
-
116
-
117
-
118
-
119
-
 120
120 -
 121
121 -
 122
122 -
 123
123 -
 124
124 -
 125
125 -
 126
126 -
 127
127 -
 128
128 -
 129
129 -
 130
130 -
131
-
132
-
133
-
134
-
135
-
136
-
137
-
138
-
139
-
140
-
141
-
142
-
143
-
144
-
145
-
146
-
147
-
148
-
149
-
150
-
151
-
152
-
153
-
154
-
155
-
156
-
157
-
158
-
159
-
160
-
161
-
162
-
163
-
164
-
165
-
166
-
167
-
168
 |
 |
