Casio CTK7000 User Guide - Page 111
E-109, To create a new accompaniment pattern
 |
View all Casio CTK7000 manuals
Add to My Manuals
Save this manual to your list of manuals |
Page 111 highlights
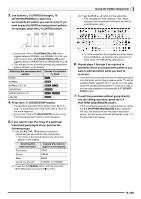
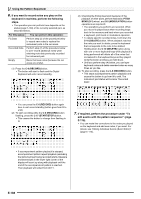
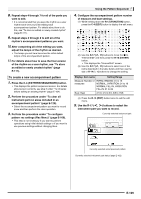
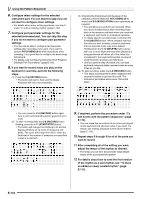
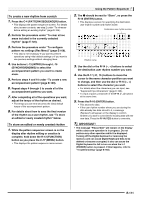
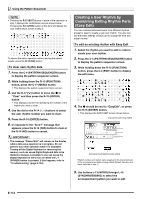
8. Repeat steps 4 through 7 for all of the parts you want to edit. • It is recommended that you save the rhythm as a user rhythm each time you finish editing each accompaniment pattern. For details about how to do this, see "To store an edited or newly created rhythm" (page E-111). 9. Repeat steps 3 through 8 to edit all of the rhythm's accompaniment patterns you want. 10. After completing all of the editing you want, adjust the tempo of the rhythm as desired. • The tempo you set here becomes the initial default tempo of the accompaniment pattern. 11. For details about how to save the final version of the rhythm as a user rhythm, see "To store an edited or newly created rhythm" (page E-111). To create a new accompaniment pattern 1. Press the C-4 (PATTERN SEQUENCER) button. • This displays the pattern sequencer screen. For details about screen contents, see step 2 under "To rehearse before editing an existing rhythm" (page E-104). 2. Perform the procedure under "To clear all instrument part rec areas included in an accompaniment pattern" (page E-120). • Select the accompaniment pattern you want to record anew and then perform the clear operation. 3. Perform the procedure under "To configure pattern rec settings (Rec Menu)" (page E-106). • This step is not necessary if you want to perform operations using initial default settings or if you want to use previous settings without changing them. Using the Pattern Sequencer 4. Configure the accompaniment pattern number of measure and beat settings. (1) While holding down the R-13 (FUNCTION) button, press the C-4 (EDIT) button to display the edit menu. (2) Use the R-17 (t, y) buttons to move the 0 to "ElementEdit" and then press the R-16 (ENTER) button. • This displays the "ElementEdit" screen. (3) Use the R-17 (t, y) buttons to select one of the items described in the table below and then use the dial or R-14 (-, +) buttons to change the setting. Display: Item name Setting Range Measure: Number of measures INTRO, ENDING: 01 to 16 NORMAL, VARIATION: 01 to 16 NORMAL FILL-IN, VARIATION FILL-IN: 01 to 02 Beat: Beat 2/4 to 4/4 to 8/4, 2/8 to 16/8 (4) Press the R-15 (EXIT) button twice to exit the edit menu. 5. Use the R-17 (u, i) buttons to select the instrument part you want to record. Currently selected instrument part Currently selected accompaniment pattern Currently selected instrument part status (page E-102) E-109
-
 1
1 -
2
-
3
-
4
-
5
-
6
-
7
-
8
-
9
-
10
-
11
-
12
-
13
-
14
-
15
-
16
-
17
-
18
-
19
-
20
-
21
-
22
-
23
-
24
-
25
-
26
-
27
-
28
-
29
-
30
-
31
-
32
-
33
-
34
-
35
-
36
-
37
-
38
-
39
-
40
-
41
-
42
-
43
-
44
-
45
-
46
-
47
-
48
-
49
-
50
-
51
-
52
-
53
-
54
-
55
-
56
-
57
-
58
-
59
-
60
-
61
-
62
-
63
-
64
-
65
-
66
-
67
-
68
-
69
-
70
-
71
-
72
-
73
-
74
-
75
-
76
-
77
-
78
-
79
-
80
-
81
-
82
-
83
-
84
-
85
-
86
-
87
-
88
-
89
-
90
-
91
-
92
-
93
-
94
-
95
-
96
-
97
-
98
-
99
-
100
-
101
-
102
-
103
-
104
-
105
-
 106
106 -
 107
107 -
 108
108 -
 109
109 -
 110
110 -
 111
111 -
 112
112 -
 113
113 -
 114
114 -
 115
115 -
 116
116 -
117
-
118
-
119
-
120
-
121
-
122
-
123
-
124
-
125
-
126
-
127
-
128
-
129
-
130
-
131
-
132
-
133
-
134
-
135
-
136
-
137
-
138
-
139
-
140
-
141
-
142
-
143
-
144
-
145
-
146
-
147
-
148
-
149
-
150
-
151
-
152
-
153
-
154
-
155
-
156
-
157
-
158
-
159
-
160
-
161
-
162
-
163
-
164
-
165
-
166
-
167
-
168
 |
 |
