Casio CTK7000 User Guide - Page 121
E-119, To copy preset or user rhythm instrument, part data to a rec area
 |
View all Casio CTK7000 manuals
Add to My Manuals
Save this manual to your list of manuals |
Page 121 highlights
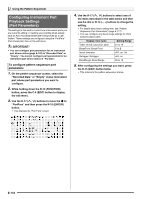
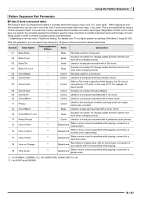
To copy preset or user rhythm instrument part data to a rec area • This procedure copies note events only. • You will not be able to perform this procedure if an INTRO or ENDING is selected as the accompaniment pattern. • When a percussion part or drum part is specified as the copy destination instrument part, you can specify a percussion part or drum part as the copy source. When a bass part or a chord part (chord 1 through chord 5) is specified as the copy destination, you can specify a bass part or a chord part (chord 1 through chord 5) as the copy source. No other part combinations are allowed. 1. While the pattern sequencer screen is displayed, use the L-14 (NORMAL/FILL-IN) or L-15 (VARIATION/FILL-IN) button to select an accompaniment pattern, and the R-17 (u, i) buttons to select an instrument part. • The rec area of the accompaniment pattern/instrument part included in the accompaniment pattern is the copy destinations. 2. While holding down the R-13 (FUNCTION) button, press the C-4 (EDIT) button to display the edit menu. 3. Use the R-17 (t, y) buttons to move the 0 to "PartEdit" and then press the R-16 (ENTER) button. • This displays the "Part Edit" screen. 4. Use the R-17 (y) button to move the 0 to "Copy" and then press the R-16 (ENTER) button. • This displays the "Part Copy" screen. 1 Using the Pattern Sequencer 5. Specify a rhythm number, accompaniment pattern, and instrument part as the copy destination. • Use the R-17 (t, y, u, i) buttons to select one of the items described in the table below and then use the dial or R-14 (-, +) buttons to change the setting. Display: Item name Setting Range 1Copy source rhythm A:001 to F:100 number 2Copy source accompaniment pattern normal (NORMAL), nrmFil (NORMAL FILL-IN), Variat (VARIATION), VarFil (VARIATION FILL-IN) 3Copy source part Percus (Percussion), Drum (Drums), Bass (Bass), Chord1 to Chord5 (Chord 1 to Chord 5) 6. After the settings are the way you want, press the R-16 (ENTER) button. 7. In response to the "Sure?" message that appears, press the R-14 (YES) button to copy or the R-14 (NO) button to cancel. • The copied instrument part status will become "Recorded Data". 2 3 E-119
-
 1
1 -
2
-
3
-
4
-
5
-
6
-
7
-
8
-
9
-
10
-
11
-
12
-
13
-
14
-
15
-
16
-
17
-
18
-
19
-
20
-
21
-
22
-
23
-
24
-
25
-
26
-
27
-
28
-
29
-
30
-
31
-
32
-
33
-
34
-
35
-
36
-
37
-
38
-
39
-
40
-
41
-
42
-
43
-
44
-
45
-
46
-
47
-
48
-
49
-
50
-
51
-
52
-
53
-
54
-
55
-
56
-
57
-
58
-
59
-
60
-
61
-
62
-
63
-
64
-
65
-
66
-
67
-
68
-
69
-
70
-
71
-
72
-
73
-
74
-
75
-
76
-
77
-
78
-
79
-
80
-
81
-
82
-
83
-
84
-
85
-
86
-
87
-
88
-
89
-
90
-
91
-
92
-
93
-
94
-
95
-
96
-
97
-
98
-
99
-
100
-
101
-
102
-
103
-
104
-
105
-
106
-
107
-
108
-
109
-
110
-
111
-
112
-
113
-
114
-
115
-
 116
116 -
 117
117 -
 118
118 -
 119
119 -
 120
120 -
 121
121 -
 122
122 -
 123
123 -
 124
124 -
 125
125 -
 126
126 -
127
-
128
-
129
-
130
-
131
-
132
-
133
-
134
-
135
-
136
-
137
-
138
-
139
-
140
-
141
-
142
-
143
-
144
-
145
-
146
-
147
-
148
-
149
-
150
-
151
-
152
-
153
-
154
-
155
-
156
-
157
-
158
-
159
-
160
-
161
-
162
-
163
-
164
-
165
-
166
-
167
-
168
 |
 |
