Casio CTK7000 User Guide - Page 122
Accompaniment Pattern and, Rhythm Operations
 |
View all Casio CTK7000 manuals
Add to My Manuals
Save this manual to your list of manuals |
Page 122 highlights
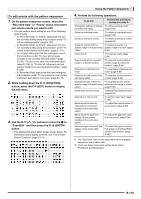
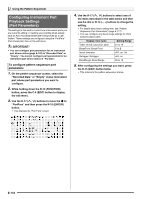
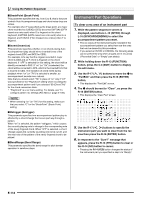
Using the Pattern Sequencer Accompaniment Pattern and Rhythm Operations To clear all instrument part rec areas included in an accompaniment pattern 1. While the pattern sequencer screen is displayed, hold down the R-13 (FUNCTION) button and press the C-4 (EDIT) button to display the edit menu. 2. Use the R-17 (t, y) buttons to move the 0 to "ElementEdit" and then press the R-16 (ENTER) button. • This displays the "ElementEdit" screen. 3. The 0 should be next to "Clear", so press the R-16 (ENTER) button. • This displays the "Clear Element" screen. 4. Use the R-17 (u, i) buttons to specify the accompaniment pattern you want to clear and then press the R-16 (ENTER) button. 5. In response to the "Sure?" message that appears, press the R-14 (YES) button to clear or the R-14 (NO) button to cancel. • Pressing the R-14 (YES) button changes the status of all the instrument parts of the accompaniment pattern you specified in step 4 to "Empty". To configure the accompaniment pattern number of measure and beat settings 2. Use the R-17 (t, y) buttons to move the 0 to "ElementEdit" and then press the R-16 (ENTER) button. • This displays the "ElementEdit" screen. 3. Use the R-17 (t, y) buttons to select one of the items described in the table below and then use the dial or R-14 (-, +) buttons to change the setting. Display: Item name Setting Range Measure: Number of measures Beat: Beat INTRO, ENDING:01 to 16 NORMAL, VARIATION:01 to 16 NORMAL FILL-IN, VARIATION FILL-IN:01 to 02 2/4 to 4/4 to 8/4, 2/8 to 16/8 4. After the settings are the way you want, press the R-15 (EXIT) button twice to return to the pattern sequencer screen. To clear all rec areas included in the currently selected rhythm 1. While the pattern sequencer screen is displayed, hold down the R-13 (FUNCTION) button and press the C-4 (EDIT) button to display the edit menu. 2. Use the R-17 (t, y) buttons to move the 0 to "AllEdit" and then press the R-16 (ENTER) button. • This displays the "All Edit" screen. 3. The 0 should be next to "Clear", so press the R-16 (ENTER) button. 4. In response to the "Sure?" message that appears, press the R-14 (YES) button to clear or the R-14 (NO) button to cancel. • Pressing the R-14 (YES) button changes the status of all the instrument parts of all the accompaniment patterns to "Empty". • This procedure can be performed only when the status of all of the instrument parts of the accompaniment pattern is "Empty". 1. While the pattern sequencer screen is displayed, hold down the R-13 (FUNCTION) button and press the C-4 (EDIT) button to display the edit menu. E-120
-
 1
1 -
2
-
3
-
4
-
5
-
6
-
7
-
8
-
9
-
10
-
11
-
12
-
13
-
14
-
15
-
16
-
17
-
18
-
19
-
20
-
21
-
22
-
23
-
24
-
25
-
26
-
27
-
28
-
29
-
30
-
31
-
32
-
33
-
34
-
35
-
36
-
37
-
38
-
39
-
40
-
41
-
42
-
43
-
44
-
45
-
46
-
47
-
48
-
49
-
50
-
51
-
52
-
53
-
54
-
55
-
56
-
57
-
58
-
59
-
60
-
61
-
62
-
63
-
64
-
65
-
66
-
67
-
68
-
69
-
70
-
71
-
72
-
73
-
74
-
75
-
76
-
77
-
78
-
79
-
80
-
81
-
82
-
83
-
84
-
85
-
86
-
87
-
88
-
89
-
90
-
91
-
92
-
93
-
94
-
95
-
96
-
97
-
98
-
99
-
100
-
101
-
102
-
103
-
104
-
105
-
106
-
107
-
108
-
109
-
110
-
111
-
112
-
113
-
114
-
115
-
116
-
 117
117 -
 118
118 -
 119
119 -
 120
120 -
 121
121 -
 122
122 -
 123
123 -
 124
124 -
 125
125 -
 126
126 -
 127
127 -
128
-
129
-
130
-
131
-
132
-
133
-
134
-
135
-
136
-
137
-
138
-
139
-
140
-
141
-
142
-
143
-
144
-
145
-
146
-
147
-
148
-
149
-
150
-
151
-
152
-
153
-
154
-
155
-
156
-
157
-
158
-
159
-
160
-
161
-
162
-
163
-
164
-
165
-
166
-
167
-
168
 |
 |
