Casio CTK7000 User Guide - Page 109
E-107, To edit an existing rhythm
 |
View all Casio CTK7000 manuals
Add to My Manuals
Save this manual to your list of manuals |
Page 109 highlights
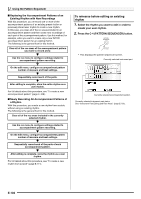
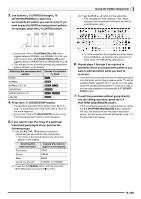
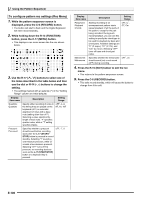
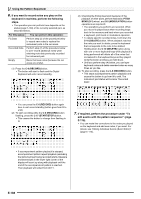
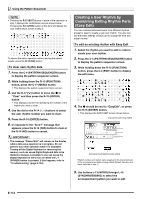
To edit an existing rhythm 1. Perform steps 1 through 6 under "To rehearse before editing an existing rhythm" (page E-104). 2. Perform the procedure under "To configure pattern rec settings (Rec Menu)" (page E-106). • This step is not necessary if you want to perform operations using initial default settings or if you want to use previous settings without changing them. 3. Press the L-14 (NORMAL/FILL-IN) or L-15 (VARIATION/FILL-IN) button to select the accompaniment pattern you want to edit. • You cannot edit the INTRO or ENDING accompaniment pattern of an existing rhythm. If you want to create a new accompaniment pattern (INTRO, ENDING, etc.) from this point, see "To create a new accompaniment pattern" (page E-109) or "To create a new rhythm from scratch" (page E-111). 4. Use the R-17 (u, i) buttons to select the instrument part you want to edit. Currently selected instrument part Currently selected accompaniment pattern Currently selected instrument part status See "Instrument Part Editing and Rec Areas" (page E-102). 5. Configure mixer settings for the selected instrument part. You can skip this step if you do not want to configure mixer settings. • Here you can press the L-17 (START/STOP) button to start playback of the accompaniment pattern and configure mixer settings as you monitor the effects of the settings on the notes being played. Using the Pattern Sequencer (1) Press the C-7 (MIXER) button to display the mixer screen. (2) Use the R-17 (t, y) buttons to select one of the items described in the table below and then use the dial or R-14 (-, +) buttons to change the setting. Display: Item name TONE: Part tone Part: Part On/Off Volume: Part Volume Pan: Part Pan Reverb: Part Reverb Send Chorus: Part Chorus Send Setting Specifies the instrument part tone. Toggles an instrument between sounding (on) and not sounding (oFF).*2 Specifies the instrument part volume. Specifies whether the sound of the part can be heard from the left side or right side. Specifies the level of reverb (page E-31) applied to the instrument part. Specifies the level of chorus (page E-31) applied to the instrument part. Setting Range *1 oFF, on 000 to 127 -64 to 00 to +63*3 000 to 127 000 to 127 *1 You can select any preset tone except for the drawbar organ tones. Only drum set sounds (tone numbers J:129 through J:146) can be selected for drum parts and percussion parts. Drum set sounds cannot be selected for the bass and the Chord 1 through Chord 5 parts. *2 You can temporarily sound the notes of individual parts, if you want. For details, see step 5 under "To rehearse before editing an existing rhythm" (page E-104). *3 A smaller value shifts the pan position to the left while a larger value shifts to the right. A value of zero specifies center. (3) To exit the mixer, press the C-7 (MIXER) button or the R-15 (EXIT) button. • This returns to the pattern sequencer screen. E-107
-
 1
1 -
2
-
3
-
4
-
5
-
6
-
7
-
8
-
9
-
10
-
11
-
12
-
13
-
14
-
15
-
16
-
17
-
18
-
19
-
20
-
21
-
22
-
23
-
24
-
25
-
26
-
27
-
28
-
29
-
30
-
31
-
32
-
33
-
34
-
35
-
36
-
37
-
38
-
39
-
40
-
41
-
42
-
43
-
44
-
45
-
46
-
47
-
48
-
49
-
50
-
51
-
52
-
53
-
54
-
55
-
56
-
57
-
58
-
59
-
60
-
61
-
62
-
63
-
64
-
65
-
66
-
67
-
68
-
69
-
70
-
71
-
72
-
73
-
74
-
75
-
76
-
77
-
78
-
79
-
80
-
81
-
82
-
83
-
84
-
85
-
86
-
87
-
88
-
89
-
90
-
91
-
92
-
93
-
94
-
95
-
96
-
97
-
98
-
99
-
100
-
101
-
102
-
103
-
 104
104 -
 105
105 -
 106
106 -
 107
107 -
 108
108 -
 109
109 -
 110
110 -
 111
111 -
 112
112 -
 113
113 -
 114
114 -
115
-
116
-
117
-
118
-
119
-
120
-
121
-
122
-
123
-
124
-
125
-
126
-
127
-
128
-
129
-
130
-
131
-
132
-
133
-
134
-
135
-
136
-
137
-
138
-
139
-
140
-
141
-
142
-
143
-
144
-
145
-
146
-
147
-
148
-
149
-
150
-
151
-
152
-
153
-
154
-
155
-
156
-
157
-
158
-
159
-
160
-
161
-
162
-
163
-
164
-
165
-
166
-
167
-
168
 |
 |
