Casio CTK7000 User Guide - Page 108
E-106, To con pattern rec settings Rec Menu
 |
View all Casio CTK7000 manuals
Add to My Manuals
Save this manual to your list of manuals |
Page 108 highlights
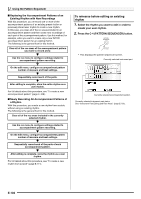
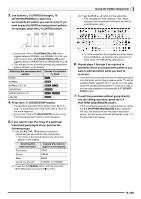
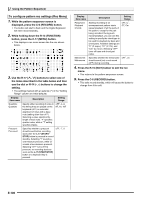
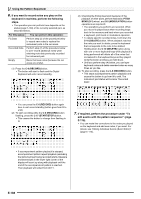
Using the Pattern Sequencer To configure pattern rec settings (Rec Menu) 1. While the pattern sequencer screen is displayed, press the C-6 (RECORD) button. • The button will start to flash and the Digital Keyboard will enter record standby. 2. While holding down the R-13 (FUNCTION) button, press the C-17 (MENU) button. • This displays a rec menu screen like the one shown below. 3. Use the R-17 (t, y) buttons to select one of the items described in the table below and then use the dial or R-14 (-, +) buttons to change the setting. • The settings marked with an asterisk (*) in the "Setting Range" column are initial defaults. Display: Item name Quantize: Quantize Precount: Pre-count Description Setting Range Specify either recording of notes in the timing they are played on the keyboard (oFF) or automatic alignment of notes with a base note (setting other than oFF). Selecting a value specifies the length of each note. "4" specifies quarter notes, while a "T" setting specifies triplets. oFF*, 4, 8, 8T, 16, 16T Specifies whether a precount should sound before recording starts after the L-17 (START/ STOP) button is pressed in record standby. Selecting "1" sounds a one-measure precount, while "2" sounds a two-measure precount. Selecting "oFF" turns off the precount, so recording starts as soon as the L-17 (START/STOP) button or a keyboard key is pressed. oFF, 1*, 2 Display: Item name PlayChord: Playback Chords Metronome: Metronome Description Setting Range Starting recording of an accompaniment pattern starts repeat playback of all the parts of the pattern, except for the part being recorded. During such repeat playback, you can use this setting to specify the chord type to be used for playback by bass and chord parts. Available settings are "C" (C major), "C7" (C 7th), and "Cm" (C minor). Selecting "oFF" turns off bass and chord part notes. oFF, C*, C7, Cm Specifies whether the metronome oFF*, on should sound (on) or not sound (oFF) during recording. 4. Press the R-15 (EXIT) button to exit the rec menu. • This returns to the pattern sequencer screen. 5. Press the C-6 (RECORD) button. • This exits record standby, which will cause the button to change from lit to unlit. E-106
-
 1
1 -
2
-
3
-
4
-
5
-
6
-
7
-
8
-
9
-
10
-
11
-
12
-
13
-
14
-
15
-
16
-
17
-
18
-
19
-
20
-
21
-
22
-
23
-
24
-
25
-
26
-
27
-
28
-
29
-
30
-
31
-
32
-
33
-
34
-
35
-
36
-
37
-
38
-
39
-
40
-
41
-
42
-
43
-
44
-
45
-
46
-
47
-
48
-
49
-
50
-
51
-
52
-
53
-
54
-
55
-
56
-
57
-
58
-
59
-
60
-
61
-
62
-
63
-
64
-
65
-
66
-
67
-
68
-
69
-
70
-
71
-
72
-
73
-
74
-
75
-
76
-
77
-
78
-
79
-
80
-
81
-
82
-
83
-
84
-
85
-
86
-
87
-
88
-
89
-
90
-
91
-
92
-
93
-
94
-
95
-
96
-
97
-
98
-
99
-
100
-
101
-
102
-
 103
103 -
 104
104 -
 105
105 -
 106
106 -
 107
107 -
 108
108 -
 109
109 -
 110
110 -
 111
111 -
 112
112 -
 113
113 -
114
-
115
-
116
-
117
-
118
-
119
-
120
-
121
-
122
-
123
-
124
-
125
-
126
-
127
-
128
-
129
-
130
-
131
-
132
-
133
-
134
-
135
-
136
-
137
-
138
-
139
-
140
-
141
-
142
-
143
-
144
-
145
-
146
-
147
-
148
-
149
-
150
-
151
-
152
-
153
-
154
-
155
-
156
-
157
-
158
-
159
-
160
-
161
-
162
-
163
-
164
-
165
-
166
-
167
-
168
 |
 |
