Casio EX P505 Owners Manual - Page 64
Recording Precautions, After making sure that the, image is focused properly
 |
UPC - 079767684006
View all Casio EX P505 manuals
Add to My Manuals
Save this manual to your list of manuals |
Page 64 highlights
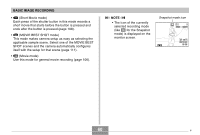
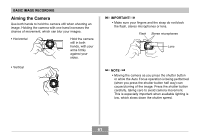
BASIC IMAGE RECORDING *1 The size of the opening (aperture) that allows light passing through the lens to reach the CCD. A larger aperture value indicates a smaller opening for light to pass through. *2 The amount of time the shutter remains open, allowing light passing through the lens to reach the CCD. A larger shutter speed value indicates that the shutter remains open longer, which means more light reaches the CCD. 6. After making sure that the image is focused properly, press the shutter button the rest of the way down to record. • The number of images you can record depends on the image size and the image quality setting you are using (pages 77, 79, 231). Shutter button I Recording Precautions • Never open the battery cover or unplug the AC adaptor while the operation lamp is flashing green. Doing so not only causes the current image to be lost, it can also corrupt images already stored in file memory and even lead to malfunction of the camera. • Never remove the memory card while an image is being recorded to the memory card. • Fluorescent lighting actually flickers at a frequency that cannot be detected by the human eye. When using the camera indoors under such lighting, you may experience some brightness or color problems with recorded images. • When "Auto" is selected for the ISO sensitivity setting (page 119), the camera automatically adjusts its sensitivity in accordance with the brightness of the subject. This can cause some digital noise (graininess) to appear in images of relatively dark subjects. • When recording a dimly lit subject while "Auto" is selected for the ISO sensitivity setting (page 119), the camera increases sensitivity and uses a faster shutter speed. Because of this, you need to guard against camera movement if you have flash turned off (page 69). • Bright light shining on the lens can cause images to appear "washed out". This tends to happen when recording images outdoors in bright sunlight. To protect against this, use your free hand to shade the lens from the light. 64 B
-
 1
1 -
2
-
3
-
4
-
5
-
6
-
7
-
8
-
9
-
10
-
11
-
12
-
13
-
14
-
15
-
16
-
17
-
18
-
19
-
20
-
21
-
22
-
23
-
24
-
25
-
26
-
27
-
28
-
29
-
30
-
31
-
32
-
33
-
34
-
35
-
36
-
37
-
38
-
39
-
40
-
41
-
42
-
43
-
44
-
45
-
46
-
47
-
48
-
49
-
50
-
51
-
52
-
53
-
54
-
55
-
56
-
57
-
58
-
 59
59 -
 60
60 -
 61
61 -
 62
62 -
 63
63 -
 64
64 -
 65
65 -
 66
66 -
 67
67 -
 68
68 -
 69
69 -
70
-
71
-
72
-
73
-
74
-
75
-
76
-
77
-
78
-
79
-
80
-
81
-
82
-
83
-
84
-
85
-
86
-
87
-
88
-
89
-
90
-
91
-
92
-
93
-
94
-
95
-
96
-
97
-
98
-
99
-
100
-
101
-
102
-
103
-
104
-
105
-
106
-
107
-
108
-
109
-
110
-
111
-
112
-
113
-
114
-
115
-
116
-
117
-
118
-
119
-
120
-
121
-
122
-
123
-
124
-
125
-
126
-
127
-
128
-
129
-
130
-
131
-
132
-
133
-
134
-
135
-
136
-
137
-
138
-
139
-
140
-
141
-
142
-
143
-
144
-
145
-
146
-
147
-
148
-
149
-
150
-
151
-
152
-
153
-
154
-
155
-
156
-
157
-
158
-
159
-
160
-
161
-
162
-
163
-
164
-
165
-
166
-
167
-
168
-
169
-
170
-
171
-
172
-
173
-
174
-
175
-
176
-
177
-
178
-
179
-
180
-
181
-
182
-
183
-
184
-
185
-
186
-
187
-
188
-
189
-
190
-
191
-
192
-
193
-
194
-
195
-
196
-
197
-
198
-
199
-
200
-
201
-
202
-
203
-
204
-
205
-
206
-
207
-
208
-
209
-
210
-
211
-
212
-
213
-
214
-
215
-
216
-
217
-
218
-
219
-
220
-
221
-
222
-
223
-
224
-
225
-
226
-
227
-
228
-
229
-
230
-
231
-
232
-
233
-
234
-
235
-
236
 |
 |
