Cisco AIR-LAP1131AG-E-K9 Hardware Installation Guide - Page 33
Mounting Plate
 |
View all Cisco AIR-LAP1131AG-E-K9 manuals
Add to My Manuals
Save this manual to your list of manuals |
Page 33 highlights
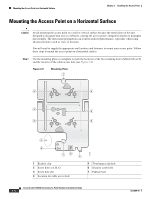
Chapter 2 Installing the Access Point Deploying the Access Points on the Wireless Network Mounting Plate The access point mounting plate is designed to accomodate multiple mounting methods. The mounting holes on the plate are marked so that you can easily identify the correct holes for a specific mounting method. You can use the mounting plate as a template to mark the locations for the cable hole and the mounting holes for your installation. Refer to Figure 2-2 to locate the various mounting holes for the method you intend to use. Figure 2-2 Mounting Plate 1 B 2 B 2 CC A A 3 X 5 B 2 B 2 CC A A 4 3 X 1 6 1 Keyhole clips 2 Screw holes (A, B, C) 3 Screw hole (X) 4 Location for cable access hole 121823 7 5 T-bar hanger clip hole 6 Security screw hole 7 Padlock hole OL-8369-05 Cisco Aironet 1130AG Series Access Point Hardware Installation Guide 2-7
-
 1
1 -
2
-
3
-
4
-
5
-
6
-
7
-
8
-
9
-
10
-
11
-
12
-
13
-
14
-
15
-
16
-
17
-
18
-
19
-
20
-
21
-
22
-
23
-
24
-
25
-
26
-
27
-
 28
28 -
 29
29 -
 30
30 -
 31
31 -
 32
32 -
 33
33 -
 34
34 -
 35
35 -
 36
36 -
 37
37 -
 38
38 -
39
-
40
-
41
-
42
-
43
-
44
-
45
-
46
-
47
-
48
-
49
-
50
-
51
-
52
-
53
-
54
-
55
-
56
-
57
-
58
-
59
-
60
-
61
-
62
-
63
-
64
-
65
-
66
-
67
-
68
-
69
-
70
-
71
-
72
-
73
-
74
-
75
-
76
-
77
-
78
-
79
-
80
-
81
-
82
-
83
-
84
-
85
-
86
-
87
-
88
-
89
-
90
-
91
-
92
-
93
-
94
-
95
-
96
-
97
-
98
-
99
-
100
-
101
-
102
-
103
-
104
-
105
-
106
-
107
-
108
-
109
-
110
-
111
-
112
-
113
-
114
-
115
-
116
-
117
-
118
-
119
-
120
-
121
-
122
-
123
-
124
-
125
-
126
 |
 |
