Cisco AIR-LAP1131AG-E-K9 Hardware Installation Guide - Page 39
Mounting the Access Point Below a Suspended Ceiling
 |
View all Cisco AIR-LAP1131AG-E-K9 manuals
Add to My Manuals
Save this manual to your list of manuals |
Page 39 highlights
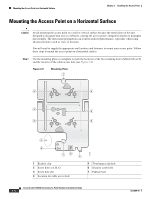
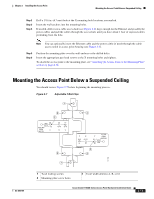
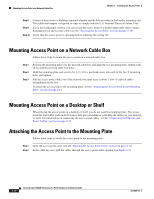
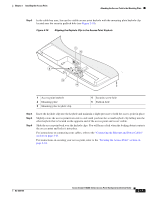
Chapter 2 Installing the Access Point Mounting the Access Point Below a Suspended Ceiling Step 2 Step 3 Step 4 Drill a 3/16 in. (4.7 mm) hole at the X mounting hole locations you marked. Insert the wall anchors into the mounting holes. If needed, drill or cut a cable access hole (see Figure 2-6) large enough for the Ethernet and possibly the power cables and pull the cables through the access hole until you have about 1 foot of exposed cables protruding from the hole. Note You can optionally insert the Ethernet cable and the power cable (if used) through the cable access notch in access point housing (see Figure 2-5). Step 5 Step 6 Position the mounting plate over the wall anchors or the drilled holes. Insert the appropriate pan head screws in the X mounting holes and tighten. To attach the access point to the mounting plate, see "Attaching the Access Point to the Mounting Plate" section on page 2-16. Mounting the Access Point Below a Suspended Ceiling You should review Figure 2-7 before beginning the mounting process. Figure 2-7 Adjustable T-Rail Clips 1 2 2 3 MM 38 INCH CEILING 1-1/2 GRID A WIDTH 24 15 15/16 9/16 B C WIDTH GRID A B C INCH CEILING 1-1/2 15/16 9/16 MM 38 24 15 OL-8369-05 2 1 3 2 121758 1 T-rail locking screws 2 Mounting plate screw holes 3 T-rail width detents (A, B, or C) Cisco Aironet 1130AG Series Access Point Hardware Installation Guide 2-13
-
 1
1 -
2
-
3
-
4
-
5
-
6
-
7
-
8
-
9
-
10
-
11
-
12
-
13
-
14
-
15
-
16
-
17
-
18
-
19
-
20
-
21
-
22
-
23
-
24
-
25
-
26
-
27
-
28
-
29
-
30
-
31
-
32
-
33
-
 34
34 -
 35
35 -
 36
36 -
 37
37 -
 38
38 -
 39
39 -
 40
40 -
 41
41 -
 42
42 -
 43
43 -
 44
44 -
45
-
46
-
47
-
48
-
49
-
50
-
51
-
52
-
53
-
54
-
55
-
56
-
57
-
58
-
59
-
60
-
61
-
62
-
63
-
64
-
65
-
66
-
67
-
68
-
69
-
70
-
71
-
72
-
73
-
74
-
75
-
76
-
77
-
78
-
79
-
80
-
81
-
82
-
83
-
84
-
85
-
86
-
87
-
88
-
89
-
90
-
91
-
92
-
93
-
94
-
95
-
96
-
97
-
98
-
99
-
100
-
101
-
102
-
103
-
104
-
105
-
106
-
107
-
108
-
109
-
110
-
111
-
112
-
113
-
114
-
115
-
116
-
117
-
118
-
119
-
120
-
121
-
122
-
123
-
124
-
125
-
126
 |
 |
