Cisco AIR-LAP1131AG-E-K9 Hardware Installation Guide - Page 38
Mounting the Access Point on a Horizontal Surface
 |
View all Cisco AIR-LAP1131AG-E-K9 manuals
Add to My Manuals
Save this manual to your list of manuals |
Page 38 highlights
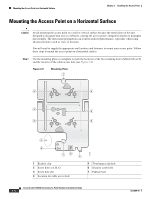
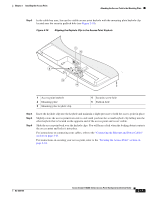
Mounting the Access Point on a Horizontal Surface Chapter 2 Installing the Access Point Mounting the Access Point on a Horizontal Surface Caution Avoid mounting the access point on a wall or vertical surface because the metal plate on the unit designed to dissapate heat acts as a reflector, causing the access point's integrated antenna to propagate directionally. The directional propagation can result in reduced performance, especially when using advanced features such as voice or location. You will need to supply the appropriate wall anchors and fasteners to mount your access point. Follow these steps to mount the access point on a horizontal surface: Step 1 Use the mounting plate as a template to mark the locations of the two mounting holes (labled with an X) and the location of the cable access hole (see Figure 2-6). Figure 2-6 Mounting Plate 1 B 2 B 2 CC A A 3 X 5 B 2 B 2 CC A A 4 3 X 1 6 1 Keyhole clip 2 Screw holes (A, B, C) 3 Screw hole (X) 4 Location for cable access hole 121823 7 5 T-bar hanger clip hole 6 Security screw hole 7 Padlock hole 2-12 Cisco Aironet 1130AG Series Access Point Hardware Installation Guide OL-8369-05
-
 1
1 -
2
-
3
-
4
-
5
-
6
-
7
-
8
-
9
-
10
-
11
-
12
-
13
-
14
-
15
-
16
-
17
-
18
-
19
-
20
-
21
-
22
-
23
-
24
-
25
-
26
-
27
-
28
-
29
-
30
-
31
-
32
-
 33
33 -
 34
34 -
 35
35 -
 36
36 -
 37
37 -
 38
38 -
 39
39 -
 40
40 -
 41
41 -
 42
42 -
 43
43 -
44
-
45
-
46
-
47
-
48
-
49
-
50
-
51
-
52
-
53
-
54
-
55
-
56
-
57
-
58
-
59
-
60
-
61
-
62
-
63
-
64
-
65
-
66
-
67
-
68
-
69
-
70
-
71
-
72
-
73
-
74
-
75
-
76
-
77
-
78
-
79
-
80
-
81
-
82
-
83
-
84
-
85
-
86
-
87
-
88
-
89
-
90
-
91
-
92
-
93
-
94
-
95
-
96
-
97
-
98
-
99
-
100
-
101
-
102
-
103
-
104
-
105
-
106
-
107
-
108
-
109
-
110
-
111
-
112
-
113
-
114
-
115
-
116
-
117
-
118
-
119
-
120
-
121
-
122
-
123
-
124
-
125
-
126
 |
 |
