Cisco WS-CE500-24TT Administration Guide - Page 168
Viewing the SSL VPN Client Portal, VPN> SSL VPN Client > SSL VPN Client
 |
UPC - 882658054068
View all Cisco WS-CE500-24TT manuals
Add to My Manuals
Save this manual to your list of manuals |
Page 168 highlights
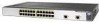
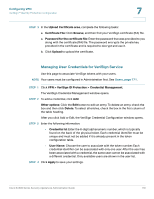
Configuring VPN Configuring SSL VPN for Browser-Based Remote Access 7 STEP 1 Click VPN > SSL VPN Client > Configured Client Routes. The Configured Client Routes window opens. Any configured routes are listed in the Configured Client Routes table. STEP 2 To add a configured client route, click Add. Other options: Click the Edit button to edit an entry. To delete an entry, check the box and then click Delete. To select all entries, check the box in the first column of the table heading. The SSL VPN Client Route Configuration window opens. STEP 3 Enter the following information: • Destination Network: Enter the destination subnet to which a route is added on the SSL VPN Client. • Subnet Mask: Enter the subnet mask for the destination network. STEP 4 Click Apply to save your settings. Viewing the SSL VPN Client Portal To view the SSL VPN Client Portal, click VPN> SSL VPN Client > SSL VPN Client Portal. NOTE Remote users will use the Portal URL to access the VPN portal. The client portal provides remote access to the corporate network through the following options in the navigation pane: • VPN Tunnel: After the user clicks the link in the navigation pane, the VPN Tunnel information window opens. The user can click the Launcher icon to connect to the remote network. • Port Forwarding: After the user clicks the link in the navigation pane, the Port Forwarding information window opens. The user can click the Launcher icon to connect to the remote servers. • Change Password: The user can click this link to change his or her password. Cisco SA500 Series Security Appliances Administration Guide 168
-
 1
1 -
2
-
3
-
4
-
5
-
6
-
7
-
8
-
9
-
10
-
11
-
12
-
13
-
14
-
15
-
16
-
17
-
18
-
19
-
20
-
21
-
22
-
23
-
24
-
25
-
26
-
27
-
28
-
29
-
30
-
31
-
32
-
33
-
34
-
35
-
36
-
37
-
38
-
39
-
40
-
41
-
42
-
43
-
44
-
45
-
46
-
47
-
48
-
49
-
50
-
51
-
52
-
53
-
54
-
55
-
56
-
57
-
58
-
59
-
60
-
61
-
62
-
63
-
64
-
65
-
66
-
67
-
68
-
69
-
70
-
71
-
72
-
73
-
74
-
75
-
76
-
77
-
78
-
79
-
80
-
81
-
82
-
83
-
84
-
85
-
86
-
87
-
88
-
89
-
90
-
91
-
92
-
93
-
94
-
95
-
96
-
97
-
98
-
99
-
100
-
101
-
102
-
103
-
104
-
105
-
106
-
107
-
108
-
109
-
110
-
111
-
112
-
113
-
114
-
115
-
116
-
117
-
118
-
119
-
120
-
121
-
122
-
123
-
124
-
125
-
126
-
127
-
128
-
129
-
130
-
131
-
132
-
133
-
134
-
135
-
136
-
137
-
138
-
139
-
140
-
141
-
142
-
143
-
144
-
145
-
146
-
147
-
148
-
149
-
150
-
151
-
152
-
153
-
154
-
155
-
156
-
157
-
158
-
159
-
160
-
161
-
162
-
 163
163 -
 164
164 -
 165
165 -
 166
166 -
 167
167 -
 168
168 -
 169
169 -
 170
170 -
 171
171 -
 172
172 -
 173
173 -
174
-
175
-
176
-
177
-
178
-
179
-
180
-
181
-
182
-
183
-
184
-
185
-
186
-
187
-
188
-
189
-
190
-
191
-
192
-
193
-
194
-
195
-
196
-
197
-
198
-
199
-
200
-
201
-
202
-
203
-
204
-
205
-
206
-
207
-
208
-
209
-
210
-
211
-
212
-
213
-
214
-
215
-
216
-
217
-
218
-
219
-
220
-
221
-
222
-
223
-
224
-
225
-
226
-
227
-
228
-
229
-
230
-
231
-
232
-
233
-
234
-
235
-
236
-
237
-
238
-
239
-
240
 |
 |
