Cisco WS-CE500-24TT Administration Guide - Page 61
Configuring a DMZ, Networking, Creating, Custom Services,
 |
UPC - 882658054068
View all Cisco WS-CE500-24TT manuals
Add to My Manuals
Save this manual to your list of manuals |
Page 61 highlights
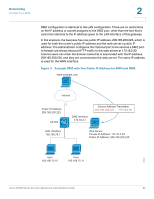
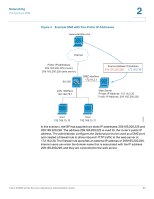
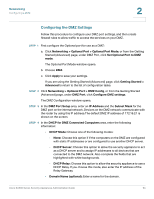
Networking Configuring a DMZ 2 Other options: Click Edit to edit an entry. To enable a protocol binding, click Enable. To disable a protocol binding, click Disable. To delete an entry, check the box, and then click Delete. To select all entries in the table, check the box at the left side of the heading row. After you click Add or Edit, the Protocol Bindings Configuration window opens. STEP 3 Enter the following information: • Service: Choose a service from the list. The security appliance is configured with a list of standard services. For information about adding your own custom services to the list, see Creating Custom Services, page 104. • Local Gateway: Choose the interface that you want to use: Dedicated WAN or Configured WAN. • Source Network: To identify the source network, choose Any, Single Address, or Address Range. If you choose Single Address, enter the address in the Start Address field. If you choose Address Range, enter the Start Address and the End Address to specify the range. • Destination Network: To identify the destination network, choose Any, Single Address, or Address Range. If you choose Single Address, enter the address in the Start Address field. If you choose Address Range, enter the Start Address and the End Address to specify the range. STEP 4 Click Apply to save your settings. STEP 5 When you are ready, enable the new protocol bindings that you added. A new protocol binding is disabled until you enable it. Configuring a DMZ A DMZ (Demarcation Zone or Demilitarized Zone) is a subnetwork that is behind the firewall but that is open to the public. By placing your public services on a DMZ, you can add an additional layer of security to the LAN. The public can connect to the services on the DMZ but cannot penetrate the LAN. You should configure your DMZ to include any hosts that must be exposed to the WAN (such as web or email servers). Cisco SA500 Series Security Appliances Administration Guide 61
-
 1
1 -
2
-
3
-
4
-
5
-
6
-
7
-
8
-
9
-
10
-
11
-
12
-
13
-
14
-
15
-
16
-
17
-
18
-
19
-
20
-
21
-
22
-
23
-
24
-
25
-
26
-
27
-
28
-
29
-
30
-
31
-
32
-
33
-
34
-
35
-
36
-
37
-
38
-
39
-
40
-
41
-
42
-
43
-
44
-
45
-
46
-
47
-
48
-
49
-
50
-
51
-
52
-
53
-
54
-
55
-
 56
56 -
 57
57 -
 58
58 -
 59
59 -
 60
60 -
 61
61 -
 62
62 -
 63
63 -
 64
64 -
 65
65 -
 66
66 -
67
-
68
-
69
-
70
-
71
-
72
-
73
-
74
-
75
-
76
-
77
-
78
-
79
-
80
-
81
-
82
-
83
-
84
-
85
-
86
-
87
-
88
-
89
-
90
-
91
-
92
-
93
-
94
-
95
-
96
-
97
-
98
-
99
-
100
-
101
-
102
-
103
-
104
-
105
-
106
-
107
-
108
-
109
-
110
-
111
-
112
-
113
-
114
-
115
-
116
-
117
-
118
-
119
-
120
-
121
-
122
-
123
-
124
-
125
-
126
-
127
-
128
-
129
-
130
-
131
-
132
-
133
-
134
-
135
-
136
-
137
-
138
-
139
-
140
-
141
-
142
-
143
-
144
-
145
-
146
-
147
-
148
-
149
-
150
-
151
-
152
-
153
-
154
-
155
-
156
-
157
-
158
-
159
-
160
-
161
-
162
-
163
-
164
-
165
-
166
-
167
-
168
-
169
-
170
-
171
-
172
-
173
-
174
-
175
-
176
-
177
-
178
-
179
-
180
-
181
-
182
-
183
-
184
-
185
-
186
-
187
-
188
-
189
-
190
-
191
-
192
-
193
-
194
-
195
-
196
-
197
-
198
-
199
-
200
-
201
-
202
-
203
-
204
-
205
-
206
-
207
-
208
-
209
-
210
-
211
-
212
-
213
-
214
-
215
-
216
-
217
-
218
-
219
-
220
-
221
-
222
-
223
-
224
-
225
-
226
-
227
-
228
-
229
-
230
-
231
-
232
-
233
-
234
-
235
-
236
-
237
-
238
-
239
-
240
 |
 |
