D-Link DAP-2590 Product Manual - Page 14
Configuration - configuration
 |
UPC - 790069316043
View all D-Link DAP-2590 manuals
Add to My Manuals
Save this manual to your list of manuals |
Page 14 highlights
Section 3 - Configuration After successfully logging into the DAP-2590 the following window will appear: When making changes on most of the configuration windows in this section, use either the Apply button or the Save button to save your configuration changes. Click the Apply button to configure changes. Click the Save button to configure changes. Alternatively, click the "Save and Activate" option on the Configuration drop-down menu at the top of each DAP-2590 window. This will cause the DAP-2590 to save and reboot. D-Link DAP-2590 User Manual 14
-
 1
1 -
2
-
3
-
4
-
5
-
6
-
7
-
8
-
 9
9 -
 10
10 -
 11
11 -
 12
12 -
 13
13 -
 14
14 -
 15
15 -
 16
16 -
 17
17 -
 18
18 -
 19
19 -
20
-
21
-
22
-
23
-
24
-
25
-
26
-
27
-
28
-
29
-
30
-
31
-
32
-
33
-
34
-
35
-
36
-
37
-
38
-
39
-
40
-
41
-
42
-
43
-
44
-
45
-
46
-
47
-
48
-
49
-
50
-
51
-
52
-
53
-
54
-
55
-
56
-
57
-
58
-
59
-
60
-
61
-
62
-
63
-
64
-
65
-
66
-
67
-
68
-
69
-
70
-
71
-
72
-
73
-
74
-
75
-
76
-
77
-
78
-
79
-
80
-
81
-
82
-
83
-
84
-
85
-
86
-
87
-
88
-
89
-
90
 |
 |

1³
D-Link DAP-±590 User Manual
Section ² - Configuration
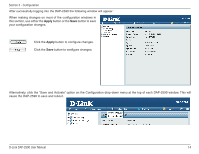
After successfully logging into the DAP-2590 the following window will appear:
When making changes on most of the configuration windows in
this section, use either the
Apply
button or the
Save
button to save
your configuration changes.
Click the
Apply
button to configure changes.
Alternatively, click the “Save and Activate” option on the Configuration drop-down menu at the top of each DAP-2590 window. This will
cause the DAP-2590 to save and reboot.
Click the
Save
button to configure changes.