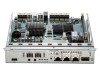
D-Link DSN-656 User Manual - Page 110
Snapshots, Take a Snapshot, Virtual Disks, > Set Snapshot Space, Snapshot Space GB, Snapshot Name
 |
View all D-Link DSN-656 manuals
Add to My Manuals
Save this manual to your list of manuals |
Page 110 highlights
D-Link Document - User Manual Snapshots Snapshot-on-the-box captures the instant state of data in the target volume in a logical sense. The underlying logic is Copy-on-Write, moving out the data which would be written to a certain location where a write action occurs since the time of data capture. The certain location, named as "Snapshot virtual disk", is essentially a new virtual disk which can be attached to a LUN provisioned to a host as a disk, like other ordinary virtual disks in the system. In case of data loss (e.g. virus attack, data corruption, human errors and so on), rollback can restore the data back any previous captured state. Snapshot virtual disk is allocated within the same RAID group in which the snapshot is taken, we suggest to reserve 20% of the RAID group size or more for snapshot space. Take a Snapshot Take an example of taking a snapshot. 1. Before taking a snapshot, the system must reserve some storage space for saving variant data. There are two methods to set snapshot space. In Virtual Disks tab, selects a virtual disk and then click ▼ -> Set Snapshot Space or in Snapshots tab, click Set Snapshot Space button. 2. Enter a Size which is reserved for the snapshot space, and then click the OK button. The minimum size suggested is 20% of the virtual disk size. Now there are two numbers in Snapshot Space (GB) column in Virtual Disks tab. They mean used snapshot space and total snapshot space. 3. There are two methods to take snapshot. In the Virtual Disks tab, select a virtual disk and then click ▼ -> Take a Snapshot or in Snapshots tab, click Take a Snapshot button. 4. Enter a Snapshot Name, and then click OK button. The snapshot is taken. Copyright@2014 D-Link System, Inc. All Rights Reserved. 110
-
 1
1 -
2
-
3
-
4
-
5
-
6
-
7
-
8
-
9
-
10
-
11
-
12
-
13
-
14
-
15
-
16
-
17
-
18
-
19
-
20
-
21
-
22
-
23
-
24
-
25
-
26
-
27
-
28
-
29
-
30
-
31
-
32
-
33
-
34
-
35
-
36
-
37
-
38
-
39
-
40
-
41
-
42
-
43
-
44
-
45
-
46
-
47
-
48
-
49
-
50
-
51
-
52
-
53
-
54
-
55
-
56
-
57
-
58
-
59
-
60
-
61
-
62
-
63
-
64
-
65
-
66
-
67
-
68
-
69
-
70
-
71
-
72
-
73
-
74
-
75
-
76
-
77
-
78
-
79
-
80
-
81
-
82
-
83
-
84
-
85
-
86
-
87
-
88
-
89
-
90
-
91
-
92
-
93
-
94
-
95
-
96
-
97
-
98
-
99
-
100
-
101
-
102
-
103
-
104
-
 105
105 -
 106
106 -
 107
107 -
 108
108 -
 109
109 -
 110
110 -
 111
111 -
 112
112 -
 113
113 -
 114
114 -
 115
115 -
116
-
117
-
118
-
119
-
120
-
121
-
122
-
123
-
124
-
125
-
126
-
127
-
128
-
129
-
130
-
131
-
132
-
133
-
134
-
135
-
136
-
137
-
138
-
139
-
140
-
141
-
142
-
143
-
144
-
145
-
146
-
147
-
148
-
149
-
150
-
151
-
152
-
153
-
154
-
155
 |
 |
