D-Link DWS-3024L User Manual - Page 3

Table of Contents - switch

Page 3 highlights

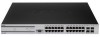
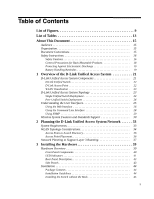
Table of Contents List of Figures 9 List of Tables 13 About This Document 15 Audience 15 Organization 15 Document Conventions 15 Safety Instructions 16 Safety Cautions 16 General Precautions for Rack-Mountable Products 18 Protecting Against Electrostatic Discharge 19 Battery Handling Reminder 19 1 Overview of the D-Link Unified Access System 21 D-Link Unified Access System Components 21 D-Link Unified Switch 22 D-Link Access Point 22 WLAN Visualization 23 D-Link Unified Access System Topology 23 Single Unified Switch Deployment 24 Peer Unified Switch Deployment 24 Understanding the User Interfaces 25 Using the Web Interface 26 Using the Command-Line Interface 28 Using SNMP 29 Wireless System Features and Standards Support 30 2 Planning the D-Link Unified Access System Network 33 System Requirements 33 WLAN Topology Considerations 34 Access Point-to-Switch Discovery 36 Access Point Placement 36 Network Planning to Support Layer 3 Roaming 37 3 Installing the Hardware 39 Hardware Overview 39 Front Panel Components 40 LED Indicators 41 Rear Panel Description 43 Side Panels 43 Installation 44 Package Contents 44 Installation Guidelines 44 Installing the Switch without the Rack 45 3

  • 1
  • 2
  • 3
  • 4
  • 5
  • 6
  • 7
  • 8
  • 9
  • 10
  • 11
  • 12
  • 13
  • 14
  • 15
  • 16
  • 17
  • 18
  • 19
  • 20
  • 21
  • 22
  • 23
  • 24
  • 25
  • 26
  • 27
  • 28
  • 29
  • 30
  • 31
  • 32
  • 33
  • 34
  • 35
  • 36
  • 37
  • 38
  • 39
  • 40
  • 41
  • 42
  • 43
  • 44
  • 45
  • 46
  • 47
  • 48
  • 49
  • 50
  • 51
  • 52
  • 53
  • 54
  • 55
  • 56
  • 57
  • 58
  • 59
  • 60
  • 61
  • 62
  • 63
  • 64
  • 65
  • 66
  • 67
  • 68
  • 69
  • 70
  • 71
  • 72
  • 73
  • 74
  • 75
  • 76
  • 77
  • 78
  • 79
  • 80
  • 81
  • 82
  • 83
  • 84
  • 85
  • 86
  • 87
  • 88
  • 89
  • 90
  • 91
  • 92
  • 93
  • 94
  • 95
  • 96
  • 97
  • 98
  • 99
  • 100
  • 101
  • 102
  • 103
  • 104
  • 105
  • 106
  • 107
  • 108
  • 109
  • 110
  • 111
  • 112
  • 113
  • 114
  • 115
  • 116
  • 117
  • 118
  • 119
  • 120
  • 121
  • 122
  • 123
  • 124
  • 125
  • 126
  • 127
  • 128
  • 129
  • 130
  • 131
  • 132
  • 133
  • 134
  • 135
  • 136
  • 137
  • 138
  • 139
  • 140
  • 141
  • 142
  • 143
  • 144
  • 145
  • 146
  • 147
  • 148
  • 149
  • 150
  • 151
  • 152
  • 153
  • 154
  • 155
  • 156
  • 157
  • 158
  • 159
  • 160
  • 161
  • 162
  • 163
  • 164
  • 165
  • 166
  • 167
  • 168
  • 169
  • 170
  • 171
  • 172
  • 173
  • 174
  • 175
  • 176
  • 177
  • 178
  • 179
  • 180
  • 181
  • 182
  • 183
  • 184
  • 185
  • 186
  • 187
  • 188
  • 189
  • 190
  • 191
  • 192
  • 193
  • 194
  • 195
  • 196
  • 197
  • 198
  • 199
  • 200
  • 201
  • 202
  • 203
  • 204
  • 205
  • 206
  • 207
  • 208
  • 209
  • 210
  • 211
  • 212
  • 213
  • 214
  • 215
  • 216
  • 217
  • 218
  • 219
  • 220
  • 221
  • 222
  • 223
  • 224
  • 225
  • 226
  • 227
  • 228
  • 229
  • 230
  • 231
  • 232
  • 233
  • 234
  • 235
  • 236
  • 237
  • 238
  • 239
  • 240
  • 241
  • 242
  • 243
  • 244
  • 245
  • 246
  • 247
  • 248
  • 249
  • 250
  • 251
  • 252
  • 253
  • 254
  • 255
  • 256
  • 257
  • 258
  • 259
  • 260
  • 261
  • 262
  • 263
  • 264
  • 265
  • 266
  • 267
  • 268

3
Table of Contents
List of Figures. . . . . . . . . . . . . . . . . . . . . . . . . . . . . . . . . . . . . . . . . . . 9
List of Tables . . . . . . . . . . . . . . . . . . . . . . . . . . . . . . . . . . . . . . . . . . 13
About This Document . . . . . . . . . . . . . . . . . . . . . . . . . . . . . . . . . . . 15
Audience . . . . . . . . . . . . . . . . . . . . . . . . . . . . . . . . . . . . . . . . . . . . . . . . . . .
15
Organization . . . . . . . . . . . . . . . . . . . . . . . . . . . . . . . . . . . . . . . . . . . . . . . .
15
Document Conventions . . . . . . . . . . . . . . . . . . . . . . . . . . . . . . . . . . . . . . . .
15
Safety Instructions. . . . . . . . . . . . . . . . . . . . . . . . . . . . . . . . . . . . . . . . . . . .
16
Safety Cautions . . . . . . . . . . . . . . . . . . . . . . . . . . . . . . . . . . . . . . . . . . . . . . . .
16
General Precautions for Rack-Mountable Products. . . . . . . . . . . . . . . . . . . .
18
Protecting Against Electrostatic Discharge . . . . . . . . . . . . . . . . . . . . . . . . . .
19
Battery Handling Reminder. . . . . . . . . . . . . . . . . . . . . . . . . . . . . . . . . . . . . . .
19
1
Overview of the D-Link Unified Access System . . . . . . . . . . . 21
D-Link Unified Access System Components . . . . . . . . . . . . . . . . . . . . . . . .
21
D-Link Unified Switch. . . . . . . . . . . . . . . . . . . . . . . . . . . . . . . . . . . . . . . . . . .
22
D-Link Access Point . . . . . . . . . . . . . . . . . . . . . . . . . . . . . . . . . . . . . . . . . . . .
22
WLAN Visualization . . . . . . . . . . . . . . . . . . . . . . . . . . . . . . . . . . . . . . . . . . . .
23
D-Link Unified Access System Topology . . . . . . . . . . . . . . . . . . . . . . . . . .
23
Single Unified Switch Deployment . . . . . . . . . . . . . . . . . . . . . . . . . . . . . . . . .
24
Peer Unified Switch Deployment . . . . . . . . . . . . . . . . . . . . . . . . . . . . . . . . . .
24
Understanding the User Interfaces. . . . . . . . . . . . . . . . . . . . . . . . . . . . . . .
25
Using the Web Interface . . . . . . . . . . . . . . . . . . . . . . . . . . . . . . . . . . . . . . . . .
26
Using the Command-Line Interface . . . . . . . . . . . . . . . . . . . . . . . . . . . . . . . .
28
Using SNMP . . . . . . . . . . . . . . . . . . . . . . . . . . . . . . . . . . . . . . . . . . . . . . . . . .
29
Wireless System Features and Standards Support . . . . . . . . . . . . . . . . . . .
30
2
Planning the D-Link Unified Access System Network . . . . . . 33
System Requirements. . . . . . . . . . . . . . . . . . . . . . . . . . . . . . . . . . . . . . . . . .
33
WLAN Topology Considerations. . . . . . . . . . . . . . . . . . . . . . . . . . . . . . . . .
34
Access Point-to-Switch Discovery. . . . . . . . . . . . . . . . . . . . . . . . . . . . . . . . . .
36
Access Point Placement. . . . . . . . . . . . . . . . . . . . . . . . . . . . . . . . . . . . . . . . . .
36
Network Planning to Support Layer 3 Roaming. . . . . . . . . . . . . . . . . . . . .
37
3
Installing the Hardware . . . . . . . . . . . . . . . . . . . . . . . . . . . . . . . 39
Hardware Overview . . . . . . . . . . . . . . . . . . . . . . . . . . . . . . . . . . . . . . . . . .
39
Front Panel Components. . . . . . . . . . . . . . . . . . . . . . . . . . . . . . . . . . . . . . . . .
40
LED Indicators . . . . . . . . . . . . . . . . . . . . . . . . . . . . . . . . . . . . . . . . . . . . . . . .
41
Rear Panel Description. . . . . . . . . . . . . . . . . . . . . . . . . . . . . . . . . . . . . . . . . .
43
Side Panels . . . . . . . . . . . . . . . . . . . . . . . . . . . . . . . . . . . . . . . . . . . . . . . . . . .
43
Installation . . . . . . . . . . . . . . . . . . . . . . . . . . . . . . . . . . . . . . . . . . . . . . . . .
44
Package Contents . . . . . . . . . . . . . . . . . . . . . . . . . . . . . . . . . . . . . . . . . . . . . .
44
Installation Guidelines . . . . . . . . . . . . . . . . . . . . . . . . . . . . . . . . . . . . . . . . . .
44
Installing the Switch without the Rack . . . . . . . . . . . . . . . . . . . . . . . . . . . . . .
45