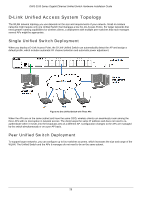
D-Link DWS-3160-24TC DWS-3160 Series Hardware Installation Guide - Page 33
Areas of the User Interface, AREA 1, Folder, Window, port activity Tools, Refresh Interval
 |
View all D-Link DWS-3160-24TC manuals
Add to My Manuals
Save this manual to your list of manuals |
Page 33 highlights
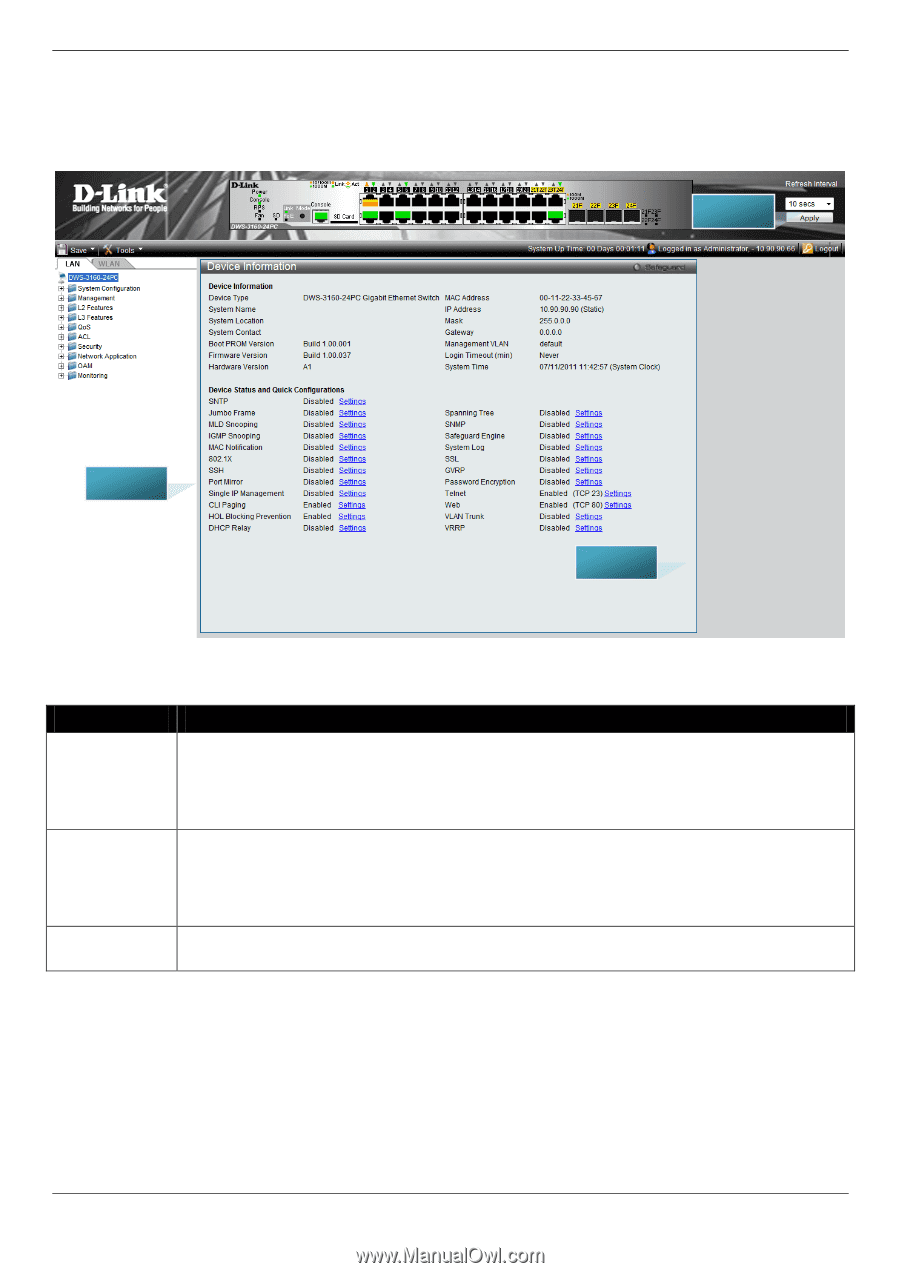
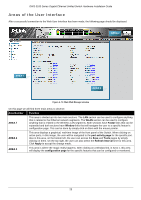
DWS-3160 Series Gigabit Ethernet Unified Switch Hardware Installation Guide Areas of the User Interface After a successful connection to the Web User Interface has been made, the following page should be displayed. AREA 2 AREA 1 AREA 3 Figure 4- 12. Main Web Manager window On this page we will find three main areas to observe. Area Number Function AREA 1 This area is divided up into two main sections. The LAN section can be used to configure anything that is related to the Ethernet network segments. The WLAN section can be used to configure anything that is related to the Wireless LAN segments. Both sections have Folder links that can be expanded and both sections have Window links that will navigate the user to a specific feature's configuration page. This can be done by simply click on them with the mouse pointer. AREA 2 This area displays a graphical, real-time image of the front panel of the Switch. When clicking on active ports, in this image, the user will be navigated to the port activity page for the specific port. Also in this area, on the bottom left, the user can access the Save and Tools pages by simply clicking on them. On the top right, the user can also select the Refresh Interval time for this area. Click Apply to accept the change made. AREA 3 This area is where the magic really happens. After clicking on a Window link, in Area 1, this area will display the configuration page for the specific features that can be configured or monitored. 25
-
 1
1 -
2
-
3
-
4
-
5
-
6
-
7
-
8
-
9
-
10
-
11
-
12
-
13
-
14
-
15
-
16
-
17
-
18
-
19
-
20
-
21
-
22
-
23
-
24
-
25
-
26
-
27
-
 28
28 -
 29
29 -
 30
30 -
 31
31 -
 32
32 -
 33
33 -
 34
34 -
 35
35 -
 36
36 -
 37
37 -
 38
38 -
39
-
40
-
41
-
42
-
43
-
44
-
45
-
46
-
47
-
48
-
49
-
50
-
51
-
52
-
53
-
54
-
55
-
56
-
57
-
58
-
59
-
60
-
61
-
62
-
63
-
64
-
65
-
66
-
67
 |
 |