Dymo LabelWriter® 450 Turbo High-Speed Postage and Label Printer for PC and - Page 29
For Sheet Label Users
 |
View all Dymo LabelWriter® 450 Turbo High-Speed Postage and Label Printer for PC and Mac® manuals
Add to My Manuals
Save this manual to your list of manuals |
Page 29 highlights
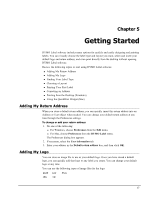
Chapter 6 For Sheet Label Users You can print labels from data that is formatted as a table in Microsoft Word using the DYMO Label Word Add-in. For example, an address list previously set up for printing on sheet labels is typically formatted as a table with each address contained in an individual cell in the table. When you print a group of table cells using the Word Add-in, each cell is treated as a separate address (or text block) and printed on a separate label. You can print all or some of the cells in a table. You can use the add-in to preview the labels and change the label properties before printing, or you can use Quick Print to print labels using the most recent settings. To print labels from a table 1. Do one of the following: l To print a label for all the data in the table, place the cursor anywhere inside the table. l To print a label for only some of the data in the table, select the cells you want to print. 2. Click Print Label in the toolbar. The DYMO Word Add-In dialog box appears. 3. Make any necessary changes to the text to be printed. You can make edits to the data in the text box; however, these edits will not be saved in the original data. 4. If you selected more than one table cell, click Next to review the data for each label. 5. (Optional) Click Address Fixer to verify and correct any addresses you selected. 6. Do the following to select the print options: a. Choose a label layout to use when printing from the Select label layout list. b. If necessary, choose a printer to print to from the Select printer list. c. (Twin Turbo Only) Choose the label roll to print to from the Select label roll list. You can also click Options to select a different printer and to visually choose the label type or layout. 7. Click Test Print to print a single label and verify that all settings are correct. 8. Click Print. A label prints for each table cell you selected. Click Quick Print to print labels using the most recent settings. 21
-
 1
1 -
2
-
3
-
4
-
5
-
6
-
7
-
8
-
9
-
10
-
11
-
12
-
13
-
14
-
15
-
16
-
17
-
18
-
19
-
20
-
21
-
22
-
23
-
 24
24 -
 25
25 -
 26
26 -
 27
27 -
 28
28 -
 29
29 -
 30
30 -
 31
31 -
 32
32 -
 33
33 -
 34
34 -
35
-
36
-
37
-
38
-
39
-
40
-
41
-
42
-
43
-
44
-
45
-
46
-
47
-
48
-
49
-
50
-
51
-
52
-
53
-
54
-
55
-
56
-
57
-
58
-
59
-
60
-
61
-
62
-
63
-
64
-
65
-
66
-
67
-
68
-
69
-
70
-
71
-
72
-
73
-
74
-
75
-
76
-
77
-
78
-
79
-
80
-
81
-
82
-
83
-
84
-
85
-
86
-
87
-
88
-
89
-
90
-
91
-
92
-
93
-
94
-
95
-
96
-
97
-
98
-
99
-
100
-
101
-
102
-
103
-
104
-
105
-
106
-
107
-
108
-
109
-
110
-
111
-
112
-
113
-
114
-
115
-
116
-
117
-
118
-
119
-
120
-
121
-
122
 |
 |
