Dymo LabelWriter® 450 Turbo High-Speed Postage and Label Printer for PC and - Page 81
Address Book Import Wizard, Next Record
 |
View all Dymo LabelWriter® 450 Turbo High-Speed Postage and Label Printer for PC and Mac® manuals
Add to My Manuals
Save this manual to your list of manuals |
Page 81 highlights
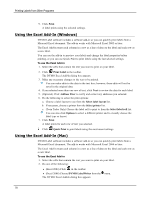
Importing Data to an Address Book When you import a list of addresses into the Address Book, you choose how you want to file the addresses. The Address Book Import Wizard includes a name rotation feature that automatically rotates the first and last name so that the last name appears first in the address list, followed by the first name. You can choose to file the addresses this way, or you can choose to file the addresses exactly as they appear in the file you are importing. To import data to an Address Book (Windows) 1. Create a new Address Book or open the Address Book you want to import data into. 2. Choose Import from the Address Book menu. The Address Book Import Wizard starts. 3. Follow the instructions in the Address Book Import Wizard. 4. When finished, click Import. The data is imported into the open Address Book and displayed in the address list. To import data to an Address Book (Mac) 1. Create a new Address Book or open the Address Book you want to import data into. 2. Choose Import from the Address Book menu. 3. Navigate to and select the file to import, and then click Open. The Address Book Import Wizard starts. 4. Choose one of the following methods to arrange the data fields: l To automatically arrange the data fields: a. Click Auto. The fields are automatically arranged and displayed in the Import Formats box. b. Add any desired spaces, punctuation, or line breaks in the Arrange fields into desired format box. l To manually arrange the data fields: a. Click Next Record until you find an entry that best represents the information contained in the list (for example, a record that uses all the address lines). b. Select the field you want to appear on the first line, and then click the right arrow button. You can also drag fields from the Select fields box to the Arrange fields box. c. Repeat this procedure until all the fields that you want to import are displayed in the correct order in the Arrange fields box. d. Add any desired spaces, punctuation, or line breaks in the Arrange fields box. Since all of the records in the file should be in the same format, you only need to arrange the fields for one record. All other records will be formatted in the same manner. 5. If the first line in your file contains field names or column headings, select the First line is header - Do not import check box. The first record is not imported. 6. From the File As list, choose how you want the records to be sorted in your Address Book. 7. Click Import. The data is imported into the current Address Book. 73
-
 1
1 -
2
-
3
-
4
-
5
-
6
-
7
-
8
-
9
-
10
-
11
-
12
-
13
-
14
-
15
-
16
-
17
-
18
-
19
-
20
-
21
-
22
-
23
-
24
-
25
-
26
-
27
-
28
-
29
-
30
-
31
-
32
-
33
-
34
-
35
-
36
-
37
-
38
-
39
-
40
-
41
-
42
-
43
-
44
-
45
-
46
-
47
-
48
-
49
-
50
-
51
-
52
-
53
-
54
-
55
-
56
-
57
-
58
-
59
-
60
-
61
-
62
-
63
-
64
-
65
-
66
-
67
-
68
-
69
-
70
-
71
-
72
-
73
-
74
-
75
-
 76
76 -
 77
77 -
 78
78 -
 79
79 -
 80
80 -
 81
81 -
 82
82 -
 83
83 -
 84
84 -
 85
85 -
 86
86 -
87
-
88
-
89
-
90
-
91
-
92
-
93
-
94
-
95
-
96
-
97
-
98
-
99
-
100
-
101
-
102
-
103
-
104
-
105
-
106
-
107
-
108
-
109
-
110
-
111
-
112
-
113
-
114
-
115
-
116
-
117
-
118
-
119
-
120
-
121
-
122
 |
 |
