Dymo LabelWriter® 450 Turbo High-Speed Postage and Label Printer for PC and - Page 71
Rotating Objects, Adding a Border to an Image, Layout, Border, Color
 |
View all Dymo LabelWriter® 450 Turbo High-Speed Postage and Label Printer for PC and Mac® manuals
Add to My Manuals
Save this manual to your list of manuals |
Page 71 highlights
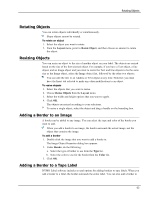
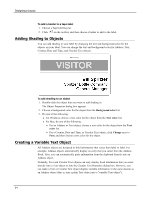
Rotating Objects Rotating Objects You can rotate objects individually or simultaneously. Shape objects cannot be rotated. To rotate an object 1. Select the object you want to rotate. 2. From the Layout menu, point to Rotate Object, and then choose an amount to rotate the object. Resizing Objects You can resize an object to the size of another object on your label. The objects are resized based on the size of the first selected object. For example, if you have a Text object, a line object, and an Image object and you want to resize the Text and line objects to be the same size as the Image object, select the Image object first, followed by the other two objects. You can edit the text in an Address or Text object at any time. However, you must have the Insert tab selected to make any other modifications to an object. To resize objects 1. Select the objects that you want to resize. 2. Choose Resize Objects from the Layout menu. 3. Select the width and height options that you want to apply. 4. Click OK. The objects are resized according to your selections. To resize a single object, select the object and drag a handle on the bounding box. Adding a Border to an Image A border can be added to any image. You can select the type and color of the border you want to add. When you add a border to an image, the border surrounds the actual image, not the object that contains the image. To add a border 1. Double-click the image that you want to add a border to. The Image Object Properties dialog box appears. 2. Under Border, do the following: a. Select the type of border to use from the Type list. b. Select the color to use for the border from the Color list. 3. Click OK. Adding a Border to a Tape Label DYMO Label software includes several options for adding borders to tape labels. When you add a border to a label, the border surrounds the entire label. You can also add a border to . 63
-
 1
1 -
2
-
3
-
4
-
5
-
6
-
7
-
8
-
9
-
10
-
11
-
12
-
13
-
14
-
15
-
16
-
17
-
18
-
19
-
20
-
21
-
22
-
23
-
24
-
25
-
26
-
27
-
28
-
29
-
30
-
31
-
32
-
33
-
34
-
35
-
36
-
37
-
38
-
39
-
40
-
41
-
42
-
43
-
44
-
45
-
46
-
47
-
48
-
49
-
50
-
51
-
52
-
53
-
54
-
55
-
56
-
57
-
58
-
59
-
60
-
61
-
62
-
63
-
64
-
65
-
 66
66 -
 67
67 -
 68
68 -
 69
69 -
 70
70 -
 71
71 -
 72
72 -
 73
73 -
 74
74 -
 75
75 -
 76
76 -
77
-
78
-
79
-
80
-
81
-
82
-
83
-
84
-
85
-
86
-
87
-
88
-
89
-
90
-
91
-
92
-
93
-
94
-
95
-
96
-
97
-
98
-
99
-
100
-
101
-
102
-
103
-
104
-
105
-
106
-
107
-
108
-
109
-
110
-
111
-
112
-
113
-
114
-
115
-
116
-
117
-
118
-
119
-
120
-
121
-
122
 |
 |
