Dymo LabelWriter® 450 Turbo High-Speed Postage and Label Printer for PC and - Page 68
Adding Clip Art to Your Label, Adding an Image to the Clip Art Library, Deleting an Image from
 |
View all Dymo LabelWriter® 450 Turbo High-Speed Postage and Label Printer for PC and Mac® manuals
Add to My Manuals
Save this manual to your list of manuals |
Page 68 highlights
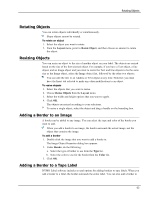
Designing a Layout it quick and easy to find the clip art image that you want to use. You can also customize the Clip Art library by adding or deleting images. Review the following topics for information about adding clip art to your labels and customizing the Clip Art library. n Adding Clip Art to Your Label n Adding an Image to the Clip Art Library n Deleting an Image from the Clip Art Library Adding Clip Art to Your Label DYMO Label software includes a variety of useful clip art images that you can quickly add to your labels. To add clip art 1. Select the Insert tab. 2. In the Clip Art library, double-click the image you want to add to your label. If you do not see the image you want to add, click the desired category title to display all images for that category. The selected image is added to your label. 3. Move and resize the object as necessary. To resize an object, select the object and drag a handle on the bounding box. Adding an Image to the Clip Art Library DYMO Label software includes a variety of useful clip art images that you can quickly add to your labels. You can also add your own images to the Clip Art library. You can add the following types of files to the Clip Art library: BMP, JPG, GIF, TIF, and PNG. To add custom clip art 1. Select the Insert tab. 2. In the Clip Art area, click . The Open dialog box appears. 3. Navigate to and select the image to add to the Clip Art library, and then click Open. The image is added to the My Clip Art section of the Clip Art library. Deleting an Image from the Clip Art Library You can delete an image from the Clip Art Library at any time. To delete clip art 1. Select the Insert tab. 2. In the Clip Art area, click . The image is deleted from the Clip Art library. 60
-
 1
1 -
2
-
3
-
4
-
5
-
6
-
7
-
8
-
9
-
10
-
11
-
12
-
13
-
14
-
15
-
16
-
17
-
18
-
19
-
20
-
21
-
22
-
23
-
24
-
25
-
26
-
27
-
28
-
29
-
30
-
31
-
32
-
33
-
34
-
35
-
36
-
37
-
38
-
39
-
40
-
41
-
42
-
43
-
44
-
45
-
46
-
47
-
48
-
49
-
50
-
51
-
52
-
53
-
54
-
55
-
56
-
57
-
58
-
59
-
60
-
61
-
62
-
 63
63 -
 64
64 -
 65
65 -
 66
66 -
 67
67 -
 68
68 -
 69
69 -
 70
70 -
 71
71 -
 72
72 -
 73
73 -
74
-
75
-
76
-
77
-
78
-
79
-
80
-
81
-
82
-
83
-
84
-
85
-
86
-
87
-
88
-
89
-
90
-
91
-
92
-
93
-
94
-
95
-
96
-
97
-
98
-
99
-
100
-
101
-
102
-
103
-
104
-
105
-
106
-
107
-
108
-
109
-
110
-
111
-
112
-
113
-
114
-
115
-
116
-
117
-
118
-
119
-
120
-
121
-
122
 |
 |
