Dynex DX-E401 User Guide (English)
Dynex DX-E401 - EN Broadband Router Manual
 |
UPC - 790069265495
View all Dynex DX-E401 manuals
Add to My Manuals
Save this manual to your list of manuals |
Dynex DX-E401 manual content summary:
- Dynex DX-E401 | User Guide (English) - Page 1
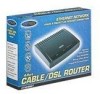
4-Port Cable/DSL Router Product Name [French] Product Name [Spanish] DX-E401 USER GUIDE • GUID E DE L'UTILISATEUR • GUÍA DEL US UARIO - Dynex DX-E401 | User Guide (English) - Page 2
Dynex 4-Port Cable/DSL Router Introduction This router enables you to quickly and easily share a high-speed Internet connection. The router also incorporates many advanced features traditionally found in more expensive routers. After completing the steps outlined in the Installation Guide - Dynex DX-E401 | User Guide (English) - Page 3
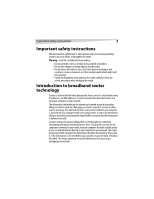
the Installation Guide and this User Guide carefully. Follow the correct procedures when setting up the router. Introduction to broadband router technology A router is a device that forwards data packets from a source to a destination using IP addresses, not MAC addresses. A router forwards data - Dynex DX-E401 | User Guide (English) - Page 4
a switch can determine the destination port for a specific piece of data. A switch minimizes network traffic overhead and speeds up communication over a network. Features BROADBAND MODEM AND IP SHARING Connects multiple computers to a broadband (cable or DSL) modem to share the Internet connection - Dynex DX-E401 | User Guide (English) - Page 5
(NAT)-Allows your networked computers to share a single IP address and protects you from outside intruders gaining access to your private network. DHCP SERVER SUPPORTED All networked computers can retrieve TCP/IP settings automatically from the router. WEB-BASED MANAGEMENT The router is configurable - Dynex DX-E401 | User Guide (English) - Page 6
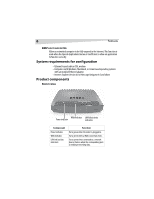
for configuration • Ethernet-based cable or DSL modem • Computers with Windows, Macintosh, or Linux-based operating systems with an installed Ethernet router is plugged in. Turns green when a WAN connection exists. Turns green when connected to a network device. Flashes when the corresponding port - Dynex DX-E401 | User Guide (English) - Page 7
and WAN) are Auto-MDIX. All ports auto-sense cable types to accommodate straight-through or crossover cable. Setting up the router Network settings To use the router, you must correctly configure the network settings of your computers. The default IP address of the router is 192.168.0.1, and the - Dynex DX-E401 | User Guide (English) - Page 8
) field, then press Enter. The default IP address of the router is 192.168.0.1 For example, type 192.168.0.1 After the connection is established, the logon screen opens. 2 To log in as an administrator, enter the user name of admin and leave the password field blank (default), then click OK. The Web - Dynex DX-E401 | User Guide (English) - Page 9
-step to quickly configure the router. To use the Setup Wizard: 1 Start the Web-based management utility. (For more information, see Start up and Log in on page 8.) The Web Management Home screen opens. 2 Click Run Wizard. The DX-E401 Setup Wizard starts. 3 Click Next. The Set Password screen opens - Dynex DX-E401 | User Guide (English) - Page 10
PPP over Ethernet (PPPoE)-(for example, DSL users) Select this option if your ISP requires the use of PPPoE to connect to their services. For more information, see Configuring PPPoE on page 16. 9 If you selected Dynamic IP Address, go to Step 10. If you selected Static IP Address, go to Step 13. If - Dynex DX-E401 | User Guide (English) - Page 11
router 11 10 If you selected Dynamic IP Address, the Set Dynamic IP Address screen opens. Note - This setup should be done on the computer that is registered with your ISP. 11 If your ISP requires you to enter a specific host name or specific MAC address, enter it here. Click Clone MAC Address - Dynex DX-E401 | User Guide (English) - Page 12
12 Setting up the router 13 If you selected Static IP Address, the Set Static IP Address screen opens. 14 Type the IP address information provided to you by your ISP, including: • WAN IP Address • WAN Subnet Mask • WAN Gateway Address • Primary DNS Address 15 Go to step 18. - Dynex DX-E401 | User Guide (English) - Page 13
Configuring the router 13 16 If you selected PPP over Ethernet (PPPoE), the Set PPPoE screen opens. Note - Make sure that you remove any existing PPPoE client software installed on your computers. 17 Type the Username and Password provided to you by your ISP, and type the Service Name if your ISP - Dynex DX-E401 | User Guide (English) - Page 14
numbers to use. This option is commonly used for cable modem services. To configure your router to obtain a dynamic IP address: 1 Access the Web-based configuration utility by following the instructions in To access the Web-based configuration utility: on page 13. 2 Click the WAN button. The WAN - Dynex DX-E401 | User Guide (English) - Page 15
Configuring the router 15 Field Description MAC Address The default MAC address is set to the WAN's physical interface MAC address on the broadband router. We do not recommend that you change the default MAC address unless required by your ISP. Clone MAC Address The default MAC address is set - Dynex DX-E401 | User Guide (English) - Page 16
, leave the default setting. CONFIGURING PPPOE Choose PPPoE (Point-to-Point Protocol over Ethernet) if your ISP uses a PPPoE connection. Your ISP provides you with a username and password. This option is typically used for DSL services. Select Dynamic PPPoE to obtain an IP address automatically for - Dynex DX-E401 | User Guide (English) - Page 17
Configuring the router 17 Make sure that you remove existing PPPoE client software installed on your computers. To configure PPPoE: 1 Access the Configuration menu by following the instructions in To access the Web-based configuration utility: on page 13. 2 Click the WAN button. The WAN Settings - Dynex DX-E401 | User Guide (English) - Page 18
DNS Address The static IP Address for the PPPoE connection. This option is only available for Static PPPoE. MTU Maximum Transmission Unit-1492 is the default setting. You may need to change the MTU for optimal performance with your specific ISP. Auto-reconnect If this is enabled, the router - Dynex DX-E401 | User Guide (English) - Page 19
Configuring the router 19 3 Click PPTP, then enter the following settings, as appropriate: Field Description My IP Address Your IP address. My Subnet Mask Tour subnet mask. Server IP Address The server IP address. PPTP Account The PPTP account name. PPTP Password Your PPTP password. - Dynex DX-E401 | User Guide (English) - Page 20
20 Configuring the router 3 Click BigPond Cable, then enter the following settings, as appropriate: Field Description User Name Password Login Server IP Renew IP forever The username for your BigPond account. The password for your BigPond account. The IP address of the Login Server, if - Dynex DX-E401 | User Guide (English) - Page 21
the router. The DHCP Server will automatically allocate an unused IP address from the IP address pool to the requesting computer. You must specify the starting and ending address of the IP address pool. To configure your DHCP server: 1 Access the Configuration menu by following the instructions in - Dynex DX-E401 | User Guide (English) - Page 22
Lease Time The length of time for the IP lease. The default setting is one hour. Advanced CONFIGURING A VIRTUAL SERVER The router can be configured as a virtual server so that remote users accessing Web or FTP services with a public IP address can automatically be redirected to local servers in - Dynex DX-E401 | User Guide (English) - Page 23
Virtual Server screen opens. 3 Click Enabled, then enter the following settings, as appropriate: Field Name Private IP Protocol Type Private Port Public Port Schedule Description The name referencing the virtual service. The IP address of the server computer in the LAN (Local Area Network) that - Dynex DX-E401 | User Guide (English) - Page 24
24 Configuring the router Example #1: If you have a Web server that you wanted Internet users to be able to access at all times, you would need to enable it. Web (HTTP) server is on LAN (Local Area Network) computer 192.168.0.25. HTTP uses port 80, TCP. Name: Web Server Private IP: 192.168.0.25 - Dynex DX-E401 | User Guide (English) - Page 25
Configuring the router 25 CONFIGURING SPECIAL APPLICATIONS Some applications require multiple connections, such as Internet gaming, video conferencing, and Internet telephony. These are applications that have difficulties working through NAT (Network Address Translation). Special Applications - Dynex DX-E401 | User Guide (English) - Page 26
from accessing the Internet. The router can be set up to deny access to internal computers by their IP or MAC addresses. The router can also block users from accessing restricted Web sites. To configure IP filters: 1 Access the Configuration menu by following the instructions in To access the Web - Dynex DX-E401 | User Guide (English) - Page 27
Configuring the router 27 3 Click IP Filters, then click Enabled. 4 Enter the following settings, as appropriate: Field Description IP The IP address of the LAN computer that will be denied access to the Internet. Port The single port or port range that will be denied access to the Internet. - Dynex DX-E401 | User Guide (English) - Page 28
the network, based on their MAC addresses. You can either manually add a MAC address or select the MAC address from the list of clients that are currently connected to the broadband router. To configure MAC filtering: 1 Access the Configuration menu by following the instructions in To access the Web - Dynex DX-E401 | User Guide (English) - Page 29
the router 29 4 Enter the following, as appropriate: Field Description Name The filter name. MAC Address The MAC address(es) you want affected by the selected filter. DHCP Client Select a DHCP client from the pull-down list, then click Clone to copy that MAC address. CONFIGURING DOMAIN - Dynex DX-E401 | User Guide (English) - Page 30
priority rules at the top and the lowest at the bottom. Note - The router MAC address filtering rules have precedence over the Firewall Rules. To configure Firewall Rules: 1 Access the Configuration menu by following the instructions in To access the Web-based configuration utility: on page 13. - Dynex DX-E401 | User Guide (English) - Page 31
Configuring the router 31 2 Click the Advanced tab, then the Firewall button. The Firewall Rules firewall. Allow or Deny access to the selected range of IP addresses. The IP address range. The IP address range, the protocol, and the port range. The time period when the firewall rules apply. Click - Dynex DX-E401 | User Guide (English) - Page 32
router CONFIGURING THE DMZ If you have a client PC that cannot run Internet applications correctly from behind the router, then you can set the client up for unrestricted Internet access. Unrestricted access allows a computer to be exposed to the Internet (useful for gaming). Enter the IP address - Dynex DX-E401 | User Guide (English) - Page 33
can access the router's Web management interface are admin and user. Admin has read/ write access, while user has read-only access. A user can only view the settings but cannot make any changes. To configure administrator settings: 1 Access the Configuration menu by following the instructions in To - Dynex DX-E401 | User Guide (English) - Page 34
the router to be configured from the Internet by a Web browser. A username and password are IP address of the router and 8080 is the port used for the Web management interface. CONFIGURING THE SYSTEM TIME The system time is the time used by the router for scheduling services. You can manually set - Dynex DX-E401 | User Guide (English) - Page 35
drive and locate the system file to be used, then click Load to load the file. - OR - Click Restore to reset the router to factory settings. To configure the system settings: 1 Access the Configuration menu by following the instructions in To access the Web-based configuration utility: on page 13. - Dynex DX-E401 | User Guide (English) - Page 36
to your router. Default Settings UPGRADING THE FIRMWARE You can upgrade the firmware of the router. To make sure the firmware you want to use is on the local hard drive: • Click Browse to browse your local hard drive and locate the firmware to be used for the update. Check the Dynex Web site - Dynex DX-E401 | User Guide (English) - Page 37
is an updated firmware; if so, download the new firmware to your hard drive. After you have downloaded the new firmware, click Browse in this window to locate the firmware update on your hard drive, then click Apply to complete the firmware upgrade. CONFIGURING MISCELLANEOUS SETTINGS To configure - Dynex DX-E401 | User Guide (English) - Page 38
router 2 Click the Tools tab, then the Misc. button. The Miscellaneous Settings screen opens. 3 Enter the following, as appropriate: Field Ping Test Restart Device Block WAN Ping Description The ping test is used to send ping packets to test if a computer is on the Internet. Enter the IP address - Dynex DX-E401 | User Guide (English) - Page 39
as opens, shorts, swaps, and impedance mismatch. The Cable Test feature significantly reduces service calls and returns by allowing you to easily troubleshoot your own cable connections. To use the cable tester: 1 Access the Configuration menu by following the instructions in To access the Web-based - Dynex DX-E401 | User Guide (English) - Page 40
information about the cable link status. Click Refresh to run the cable test. Allow the router a few seconds to complete the test. Status REVIEWING DEVICE INFORMATION This page displays the current information for the router, including: • LAN information • WAN information • MAC address information - Dynex DX-E401 | User Guide (English) - Page 41
LAN WAN Description The firmware version installed in the router. IP Address: LAN/private IP address of the router Subnet Mask: LAN/private subnet mask of the DX-401 IP Address: WAN/public IP address Subnet Mask: WAN/public subnet mask Gateway: WAN/public gateway IP address Domain Name Server: WAN - Dynex DX-E401 | User Guide (English) - Page 42
Brings up the page to configure the log. CONFIGURING THE LOG Not only does the router display the logs of activities and events, it can be set up to send these logs to a specific e-mail address. To configure the log: 1 Access the Configuration menu by following the instructions in To access the Web - Dynex DX-E401 | User Guide (English) - Page 43
the number of packets that pass through the router on both the WAN and the LAN ports. The traffic counter will reset if the router is rebooted. To view traffic statistics: 1 Access the Configuration menu by following the instructions in To access the Web-based configuration utility: on page 13. - Dynex DX-E401 | User Guide (English) - Page 44
tab in the Configuration menu. To use help: 1 Access the Configuration menu by following the instructions in To access the Web-based configuration utility: on page 13. 2 Click the Help tab. The Help screen opens. Reset To reset the system settings to factory defaults: 1 Leave the router turned on - Dynex DX-E401 | User Guide (English) - Page 45
your computers 45 Configuring your computers Using the Network Setup Wizard in Windows XP This section shows you the Network Setup Wizard in Windows XP: 1 From the Windows Desktop, click Start, Control Panel, then Network Connections. The Windows Network Setup Wizard opens. 2 Click Set up a - Dynex DX-E401 | User Guide (English) - Page 46
46 Configuring your computers 3 If you have completed the steps outlined, click Next to continue. The Select a connection method screen opens. 4 Select a connection method that best describes your situation, then click Next. The Give the computer a description and name screen opens. - Dynex DX-E401 | User Guide (English) - Page 47
configures your computer. 8 On the next screen, click the option that applies to your situation, then follow the on-screen prompts. 9 When the Network Setup Wizard is done, click Finish to complete the process. You will be prompted to restart your computer. 10 For the new settings to take effect - Dynex DX-E401 | User Guide (English) - Page 48
48 Configuring your computers 2 Click Properties, then click the Computer Name tab. The Computer Name dialog box opens. - Dynex DX-E401 | User Guide (English) - Page 49
Configuring your computers 49 3 Enter a Computer Description (optional) if you want, then click Change to rename of your computer. The Computer Name Changes dialog box opens. 4 - Dynex DX-E401 | User Guide (English) - Page 50
50 Configuring your computers Checking your computer's IP address The wireless adapter-equipped computers in your network must be in the same IP address range (for additional information, see Network Settings on page 7.) This section shows you how to check your computer's IP address using - Dynex DX-E401 | User Guide (English) - Page 51
2000 Residential gateways and broadband routers automatically assign IP addresses to the computers on their networks using DHCP (Dynamic Host Configuration Protocol) technology. If you are not using a DHCP-capable gateway or router, or if you need to assign a static IP address, follow the steps - Dynex DX-E401 | User Guide (English) - Page 52
be the same for all the computers on your network.) 5 Enter your DNS server addresses (if you are entering a DNS server, you must enter the IP address of the Default Gateway). The DNS server information is be supplied by your ISP (Internet Service Provider). 6 Click OK to save your changes and exit. - Dynex DX-E401 | User Guide (English) - Page 53
Residential gateways and broadband routers automatically assign IP addresses to the computers on their networks using DHCP (Dynamic Host Configuration Protocol) technology. If you are using a DHCP-capable gateway or router you will not need to assign static IP addresses. To configure your computer - Dynex DX-E401 | User Guide (English) - Page 54
54 Configuring your computers 3 Click Internet Protocol (TCP/IP), then click Properties. The Internet Protocol (TCP/IP) Properties screen opens. 4 Click Obtain an IP address automatically and Obtain a DNS server address automatically. 5 Click OK to save your changes and exit. Assigning a static IP - Dynex DX-E401 | User Guide (English) - Page 55
55 3 Click Manually on the Configure list, then enter the static IP address, the subnet mask, and the router IP address in the appropriate fields. 4 Click Apply Now to save your settings and exit. Selecting a dynamic IP address with Macintosh OS X To select a dynamic IP address with Macintosh OS - Dynex DX-E401 | User Guide (English) - Page 56
is the IP address of the router. A good wireless connection shows four replies from the router. Troubleshooting This section provides solutions to problems that can occur during the installation and operation of the DX-E401 Cable/DSL Router. It covers various aspects of the network setup, including - Dynex DX-E401 | User Guide (English) - Page 57
, the press Enter. Your computer's IP information will appear on the screen. OBTAINING A DYNAMIC IP ADDRESS Residential gateways and broadband routers will automatically assign IP addresses to the computers on the network, using DHCP (Dynamic Host Configuration Protocol) technology. If you are using - Dynex DX-E401 | User Guide (English) - Page 58
year Technical Support You can find software updates and user documentation on the Dynex Web site. Dynex provides free technical support for support, provide the following information: · Serial number of the router · Model number or product name · Software type and version number Warranty Dynex - Dynex DX-E401 | User Guide (English) - Page 59
com Dynex support service at 1-800-305-2204 Legal notices © 2005 Dynex. DYNEX and the DYNEX logo are trademarks of Best Buy Enterprise Services, warranties, merchantability or fitness for any particular purpose. Any software described in this manual is sold or licensed "as is." Should the programs - Dynex DX-E401 | User Guide (English) - Page 60
installation. This equipment generates, uses, and can radiate radio frequency energy and, if not installed and used in accordance with the instructions the dealer or an experienced radio / TV technician help. FCC WARNING Changes or modification not expressly approved by the party responsible - Dynex DX-E401 | User Guide (English) - Page 61
-
 1
1 -
 2
2 -
 3
3 -
 4
4 -
 5
5 -
 6
6 -
 7
7 -
8
-
9
-
10
-
11
-
12
-
13
-
14
-
15
-
16
-
17
-
18
-
19
-
20
-
21
-
22
-
23
-
24
-
25
-
26
-
27
-
28
-
29
-
30
-
31
-
32
-
33
-
34
-
35
-
36
-
37
-
38
-
39
-
40
-
41
-
42
-
43
-
44
-
45
-
46
-
47
-
48
-
49
-
50
-
51
-
52
-
53
-
54
-
55
-
56
-
57
-
58
-
59
-
60
-
61
 |
 |

USER GUIDE
• GUIDE DE L’UTILISATEUR • GUÍA DEL USUARIO
4-Port Cable/DSL Router
Product Name [French]
Product Name [Spanish]
DX-E401