Edimax IC-3110P Manual - Page 13
Camera Installation
 |
View all Edimax IC-3110P manuals
Add to My Manuals
Save this manual to your list of manuals |
Page 13 highlights
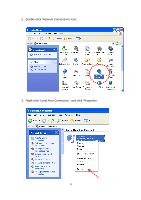
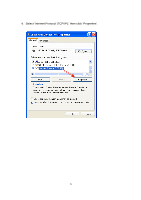
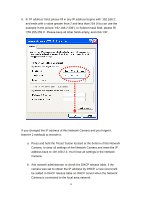
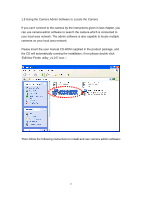
1.6 Camera Installation Please follow the following instructions to set your Network Camera up. 1. Unpack the product package and check if anything's missing. 2. Connect the Ethernet cable to your local area network, and connect the other end to the LAN jack of this Network Camera. NOTE: You can skip this step if you plan to use wireless LAN only. 3. Plug the power adapter to wall socket, and connect the power connector to the power jack located at the bottom of the Network Camera. 4. Connect two antennas to the antenna bases, which is located at the back of this Network Camera. 5. Place the camera at a secure place, and point the camera to the place you wish to monitor. If you wish to hang the camera on the ceiling or wall, please use the tripod connector (located at the bottom of the camera) to secure the camera. 6. Launch Internet Explorer on your computer, and following the instructions given in next section to set the Network Camera. 12
-
 1
1 -
2
-
3
-
4
-
5
-
6
-
7
-
 8
8 -
 9
9 -
 10
10 -
 11
11 -
 12
12 -
 13
13 -
 14
14 -
 15
15 -
 16
16 -
 17
17 -
 18
18 -
19
-
20
-
21
-
22
-
23
-
24
-
25
-
26
-
27
-
28
-
29
-
30
-
31
-
32
-
33
-
34
-
35
-
36
-
37
-
38
-
39
-
40
-
41
-
42
-
43
-
44
-
45
-
46
-
47
-
48
-
49
-
50
-
51
-
52
-
53
-
54
-
55
-
56
-
57
-
58
-
59
-
60
-
61
-
62
-
63
-
64
-
65
-
66
-
67
-
68
-
69
-
70
-
71
-
72
-
73
-
74
-
75
-
76
-
77
-
78
-
79
-
80
-
81
-
82
-
83
-
84
-
85
-
86
-
87
-
88
-
89
-
90
-
91
-
92
-
93
-
94
-
95
-
96
-
97
-
98
-
99
-
100
-
101
-
102
-
103
-
104
-
105
-
106
-
107
-
108
-
109
-
110
-
111
-
112
-
113
-
114
-
115
-
116
-
117
-
118
-
119
-
120
-
121
-
122
-
123
-
124
-
125
-
126
-
127
-
128
-
129
-
130
-
131
-
132
-
133
-
134
-
135
-
136
-
137
-
138
-
139
-
140
-
141
-
142
-
143
-
144
-
145
-
146
-
147
-
148
 |
 |