Epson PowerLite Pro Cinema 7500 UB User's Guide - Page 43
Creating Memory Settings, Deleting Saved Memory Settings
 |
View all Epson PowerLite Pro Cinema 7500 UB manuals
Add to My Manuals
Save this manual to your list of manuals |
Page 43 highlights
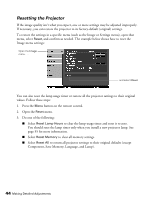
Creating Memory Settings Memory settings store the Brightness and Contrast settings, Color Mode, Auto Iris, Brightness Control, Sharpness, and other color settings described on page 39. 1. Press the Memory button on the remote control. 2. Select Save Memory. 3. Select the memory name you want to use, then press the Enter button to save your settings. Note: Saved settings are indicated by a green highlight next to the memory name. If you select a name that is already in use, the existing settings will be erased and new ones saved in their place. Renaming Memory Settings You can rename memory settings so that they are easier for you to recognize. 1. Press the Memory button on the remote control. 2. Select Rename Memory. 3. Select the memory name you want to change, then press the Enter button. The name selection screen is displayed. 4. Do one of the following: ■ To select a name from the displayed preset names, select the desired name and press the Enter button. ■ To create your own name, select Customized and use the keyboard screen to enter the name. Use the arrow buttons to select a character, then press the Enter button. When you have selected all of the characters in your name, select Finish and press the Enter button. Deleting Saved Memory Settings You can clear all your memory settings at once. 1. Press the Menu button on the remote control. 2. Open the Reset menu, then select Reset Memory. 3. Select Yes, then press the Enter button to delete the memory settings. Note: You can delete memory settings one at a time with the Erase Memory setting under the Memory menu. Making Detailed Adjustments 43
-
 1
1 -
2
-
3
-
4
-
5
-
6
-
7
-
8
-
9
-
10
-
11
-
12
-
13
-
14
-
15
-
16
-
17
-
18
-
19
-
20
-
21
-
22
-
23
-
24
-
25
-
26
-
27
-
28
-
29
-
30
-
31
-
32
-
33
-
34
-
35
-
36
-
37
-
 38
38 -
 39
39 -
 40
40 -
 41
41 -
 42
42 -
 43
43 -
 44
44 -
 45
45 -
 46
46 -
 47
47 -
 48
48 -
49
-
50
-
51
-
52
-
53
-
54
-
55
-
56
-
57
-
58
-
59
-
60
-
61
-
62
-
63
-
64
-
65
-
66
-
67
-
68
-
69
-
70
-
71
-
72
-
73
-
74
-
75
-
76
-
77
-
78
-
79
-
80
 |
 |
