Epson PowerLite Pro Cinema 7500 UB User's Guide - Page 55
Resetting the Lamp Usage Timer, Checking the Projector Status
 |
View all Epson PowerLite Pro Cinema 7500 UB manuals
Add to My Manuals
Save this manual to your list of manuals |
Page 55 highlights
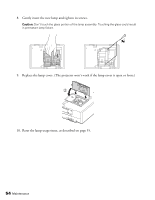
Resetting the Lamp Usage Timer After replacing the lamp, plug the projector back in, turn on the power switch on the back, and press the PPower button. Then follow these steps to reset the lamp usage timer: 1. Press the Menu button on the projector or remote control. 2. Use the menu navigation buttons to open the Reset menu, then select Reset Lamp Hours. 3. When you see a confirmation prompt, highlight Yes and press the Enter button. 4. When you're finished, press the Menu button to exit. The lamp usage timer shows 0H until you've used the lamp for at least 10 hours. Checking the Projector Status You can use the Info menu to view information about the current display settings and how long the projection lamp has been in use. To access the Info menu: 1. Press the Menu button on the projector or remote control. 2. Use the menu navigation buttons to open the Info menu. The following information appears: ■ Lamp Hours ■ Source ■ Input Signal ■ Resolution ■ Scan Mode ■ Refresh Rate ■ Sync Info ■ Video Signal ■ Deep Color (color depth) ■ Status (error information) Note: The information displayed depends on the currently selected image source. The Lamp Hours shows 0H until you've used the lamp for at least 10 hours. The resolution indicates the total number of scan lines in the source signal. The number of visible scan lines depends on the signal format standard and selected display settings (see page 67). Maintenance 55
-
 1
1 -
2
-
3
-
4
-
5
-
6
-
7
-
8
-
9
-
10
-
11
-
12
-
13
-
14
-
15
-
16
-
17
-
18
-
19
-
20
-
21
-
22
-
23
-
24
-
25
-
26
-
27
-
28
-
29
-
30
-
31
-
32
-
33
-
34
-
35
-
36
-
37
-
38
-
39
-
40
-
41
-
42
-
43
-
44
-
45
-
46
-
47
-
48
-
49
-
 50
50 -
 51
51 -
 52
52 -
 53
53 -
 54
54 -
 55
55 -
 56
56 -
 57
57 -
 58
58 -
 59
59 -
 60
60 -
61
-
62
-
63
-
64
-
65
-
66
-
67
-
68
-
69
-
70
-
71
-
72
-
73
-
74
-
75
-
76
-
77
-
78
-
79
-
80
 |
 |