Epson Stylus Pro User Setup Information - Mac - Page 26
Flip up the rear edge guide and slide it toward you as far
 |
View all Epson Stylus Pro manuals
Add to My Manuals
Save this manual to your list of manuals |
Page 26 highlights
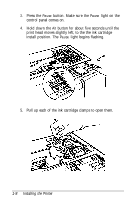
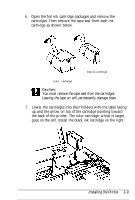
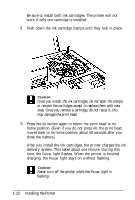
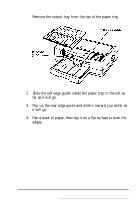
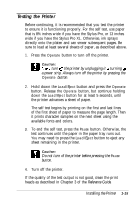
1. Remove the output tray from the top of the paper tray. 2. Slide the left edge guide inside the paper tray to the left as far as it will go. 3. Flip up the rear edge guide and slide it toward you as far as it will go. 4. Fan a stack of paper; then tap it on a flat surface to even the edges. Installing the Printer l-13
-
 1
1 -
2
-
3
-
4
-
5
-
6
-
7
-
8
-
9
-
10
-
11
-
12
-
13
-
14
-
15
-
16
-
17
-
18
-
19
-
20
-
 21
21 -
 22
22 -
 23
23 -
 24
24 -
 25
25 -
 26
26 -
 27
27 -
 28
28 -
 29
29 -
 30
30 -
 31
31 -
32
-
33
-
34
-
35
-
36
-
37
-
38
-
39
-
40
-
41
-
42
-
43
-
44
-
45
-
46
-
47
-
48
-
49
-
50
-
51
-
52
 |
 |

1.
Remove the output tray from the top of the paper tray.
2.
Slide the left edge guide inside the paper tray to the left as
far as it will go.
3.
Flip up the rear edge guide and slide it toward you as far as
it will go.
4.
Fan a stack of paper; then tap it on a flat surface to even the
edges.
Installing the Printer
l-13