Epson Stylus Pro User Setup Information - Mac - Page 40
is best for photographic images. It creates, colors by randomly distributing dots, making edges
 |
View all Epson Stylus Pro manuals
Add to My Manuals
Save this manual to your list of manuals |
Page 40 highlights
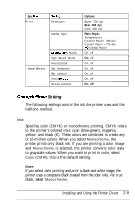
Method Select Automatic halftone setting, No Halftoning, or one of three halftone methods. For the best results, select Automatic so your printer driver can analyze the data on each page of your document and adjust the halftone settings automatically. If you prefer to set the halftone method manually, follow these guidelines: 0 Use No Halftoning to speed printing for text or monochrome line art. Do not use it when printing in color. 0 Dithering A and Dithering B arrange dots in orderly patterns. Printing dithered images is relatively fast and is best suited for printing charts, graphs, and other images that require precise, solid areas of bright colors. Use Dithering A for images with limited detail and shading. Select Dithering B for images with significant detail but limited shading. 0 Error Diffusion is best for photographic images. It creates colors by randomly distributing dots, making edges and colors softer. Printing these images takes longer, but it produces the best print quality for photographs. Light/Dark slider Controls how much ink is applied to the paper. The slider has five settings that allow you to apply more or less ink. The more ink, the darker the colors. Move the slider to the right for more ink and darker colors; slide it to the left for less ink and lighter colors. (Increasing the amount of ink means it takes longer for the ink to dry.) Note: The slider is not accessible if Monochrome ink is selected. 2-10 Installing and Using the Printer Driver
-
 1
1 -
2
-
3
-
4
-
5
-
6
-
7
-
8
-
9
-
10
-
11
-
12
-
13
-
14
-
15
-
16
-
17
-
18
-
19
-
20
-
21
-
22
-
23
-
24
-
25
-
26
-
27
-
28
-
29
-
30
-
31
-
32
-
33
-
34
-
 35
35 -
 36
36 -
 37
37 -
 38
38 -
 39
39 -
 40
40 -
 41
41 -
 42
42 -
 43
43 -
 44
44 -
 45
45 -
46
-
47
-
48
-
49
-
50
-
51
-
52
 |
 |