Epson WorkForce 40 Network Installation Guide
Epson WorkForce 40 - Ink Jet Printer Manual
 |
View all Epson WorkForce 40 manuals
Add to My Manuals
Save this manual to your list of manuals |
Epson WorkForce 40 manual content summary:
- Epson WorkForce 40 | Network Installation Guide - Page 1
Network Installation Guide - Epson WorkForce 40 | Network Installation Guide - Page 2
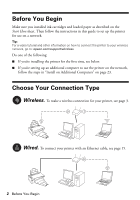
you installed ink cartridges and loaded paper as described on the Start Here sheet. Then follow the instructions in this guide to set up the printer for use on a network. Tip: For a video tutorial and other information on how to connect the printer to your wireless network, go to: epson.com/support - Epson WorkForce 40 | Network Installation Guide - Page 3
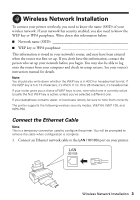
Wireless Network Installation To connect your printer wirelessly, you need to know the name (SSID) of your wireless check its setup screens. See your router's instruction manual for details. Note: You should also note them correctly. The printer supports the following wireless security modes: WEP 64 - Epson WorkForce 40 | Network Installation Guide - Page 4
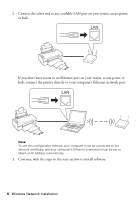
port. Note: To use this configuration method, your computer must be connected to the network wirelessly, and your computer's Ethernet connection must be set to obtain an IP address automatically. 3. Continue with the steps in the next section to install software. 4 Wireless Network Installation - Epson WorkForce 40 | Network Installation Guide - Page 5
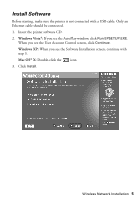
printer software CD. 2. Windows Vista®: If you see the AutoPlay window, click Run EPSETUP.EXE. When you see the User Account Control screen, click Continue. Windows XP: When you see the Software Installation screen, continue with step 3. Mac OS® X: Double-click the icon. 3. Click Install. Wireless - Epson WorkForce 40 | Network Installation Guide - Page 6
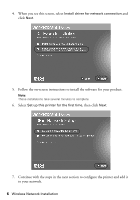
4. When you see this screen, select Install driver for network connection and click Next. 5. Follow the on-screen instructions to install the software for your product. Note: These installations take several minutes to complete. 6. Select Set up this printer for the first time, then click Next. 7. - Epson WorkForce 40 | Network Installation Guide - Page 7
Configure Network Settings 1. Make sure that the printer is turned on. 2. When you see the FireWall Warning screen, click Next. 3. Make sure you connected the Ethernet cable as described on page 3. Wireless Network Installation 7 - Epson WorkForce 40 | Network Installation Guide - Page 8
computer's wireless network connection. (You'll turn it back on later.) Important: Do not select Method 3: Connect with WPS or SES (NOT SUPPORTED). 5. Click Next. 6. If you see a firewall alert message, click Unblock or Allow to let Epson EasyInstall continue. Do not - Epson WorkForce 40 | Network Installation Guide - Page 9
: Make sure that you allow network access for Epson EasyInstall. In Windows, verify that the publisher is SEIKO EPSON, then click Unblock. In Mac OS X, configure your firewall software to allow network access for Epson EasyInstall. 7. Select the printer you want to configure, then click Next. Note - Epson WorkForce 40 | Network Installation Guide - Page 10
, then click Next. Note: If your router or access point doesn't broadcast its network name (SSID), select Manually Enter Network Name (SSID) and enter the network name. Click Next. On the next screen, select your wireless network security type, then click Next. 10 Wireless Network Installation - Epson WorkForce 40 | Network Installation Guide - Page 11
11. If your wireless network doesn't have security enabled, continue with step 12. If your wireless network has security enabled, do one of the following: ■ If you see the WEP contains upper- or lowercase letters, be sure to enter them correctly. Then click Next. Wireless Network Installation 11 - Epson WorkForce 40 | Network Installation Guide - Page 12
manually (advanced), and click Next. Enter the IP address, subnet mask, and default gateway, then click Next. 13. When you see the Confirm Settings screen, verify that the settings are correct, then click Next. Wait while the network settings are sent to the printer. 12 Wireless Network Installation - Epson WorkForce 40 | Network Installation Guide - Page 13
14. When you see the Switch to Wireless Connection screen, disconnect the Ethernet network cable from your printer. 15. Click Next. Wireless Network Installation 13 - Epson WorkForce 40 | Network Installation Guide - Page 14
incorrectly. See page 34 to reset the printer's network settings and click Start Again. If the network connection fails a second time, your router/access point may have MAC address filtering enabled. See page 34 to print a network status sheet to obtain the printer's MAC address.Then see your router - Epson WorkForce 40 | Network Installation Guide - Page 15
. Connect the Ethernet Cable 1. Connect an Ethernet network cable to the LAN (10/100) port on your printer. 2. Connect the other end to any available LAN port on your router, access point, or hub. 3. Continue with the steps in the next section to install software. Wired (Ethernet) Installation 15 - Epson WorkForce 40 | Network Installation Guide - Page 16
be connected. 1. Insert the printer software CD. 2. Windows Vista: If you see the AutoPlay window, click Run Epsetup.exe. When you see the User Account Control screen, click Continue. Windows XP: When you see the Software installation screen, continue with step 3. Mac OS X: Double-click the icon - Epson WorkForce 40 | Network Installation Guide - Page 17
4. When you see this screen, select Install driver for network connection and click Next. 5. Follow the instructions on the screen to install the software for your product. Note: These installations take several minutes to complete. 6. Select Set up this printer for the first time, then click Next. - Epson WorkForce 40 | Network Installation Guide - Page 18
Configure Network Settings 1. Make sure that the printer is turned on. 2. When you see the FireWall Warning screen, click Next. 3. Make sure you connected the Ethernet cable as described on page 15. 18 Wired (Ethernet) Installation - Epson WorkForce 40 | Network Installation Guide - Page 19
Allow to let Epson EasyInstall continue. Do not select Ask Me Later, Keep Blocking, or Block. Note: Make sure that you allow network access for Epson EasyInstall. In Windows, verify that the publisher is SEIKO EPSON, then click Unblock. In Mac OS X, configure your firewall software to allow network - Epson WorkForce 40 | Network Installation Guide - Page 20
't appear in the list after 90 seconds, make sure that the printer is turned on and the Ethernet cable is connected as described on page 15. Then click the refresh button. 7. Select Wired (leave Ethernet cable connected) as the network communication type, then click Next. 20 Wired (Ethernet - Epson WorkForce 40 | Network Installation Guide - Page 21
address manually (advanced), and click Next. Enter the IP address, subnet mask, and default gateway, then click Next. 9. When you see the Confirm Settings screen, verify that the settings are correct, then click Next. Wait while the printer connects to your network. Wired (Ethernet) Installation 21 - Epson WorkForce 40 | Network Installation Guide - Page 22
10. When you see the Network Connection Successful screen, click Next. Note: Do not disconnect the Ethernet cable from the printer or router/access point. 11. Now go to page 27 to finish the installation. 22 Wired (Ethernet) Installation - Epson WorkForce 40 | Network Installation Guide - Page 23
to use the printer from. Install Software 1. Insert the printer software CD. 2. Windows Vista: If you see the AutoPlay window, click Run EPSETUP.EXE. When you see the User Account Control screen, click Continue. Windows XP: When you see the Software installation screen, continue with step 3. Mac OS - Epson WorkForce 40 | Network Installation Guide - Page 24
see this screen, select Install driver for network connection and click Next. 5. Follow the instructions on the screen to install the software for your product. Note: These installations take several minutes to complete. 6. Select Set up an additional computer to use this printer, then click Next - Epson WorkForce 40 | Network Installation Guide - Page 25
, Keep Blocking, or Block. Note: Make sure that you allow network access for Epson EasyInstall. In Windows, verify that the publisher is SEIKO EPSON, then click Unblock. In Mac OS X, configure your firewall software to allow network access for Epson EasyInstall. Install on Additional Computers 25 - Epson WorkForce 40 | Network Installation Guide - Page 26
computer to find the printer on the network. If your printer doesn't appear in the list after 90 seconds, make sure that the printer is turned on and connected to the network. Then click the refresh button. 11. Now go to page 27 to finish the installation. 26 Install on Additional Computers - Epson WorkForce 40 | Network Installation Guide - Page 27
as default to make the printer your default printer (optional) 3. Click Next and follow the on-screen instructions to finish installing software and print a test page. When installation is complete, you're ready to print. See your Quick Guide or on-screen Epson Information Center for details. Finish - Epson WorkForce 40 | Network Installation Guide - Page 28
Mac OS X 1. Follow the on-screen instructions. After making a successful network connection, click Next. When you see this screen, click Finish. 2. When you see a screen like this, click Add Printer. 3. Follow the steps on the right side of the screen to add your EPSON TCP/IP printer. Note: It may - Epson WorkForce 40 | Network Installation Guide - Page 29
4. Click Next. 5. Follow the on-screen instructions to finish installing software and print a test page. When installation is complete, you're ready to print. See your Quick Guide or on-screen Epson Information Center for details. Finish the Installation 29 - Epson WorkForce 40 | Network Installation Guide - Page 30
(see page 34). Setup Problems Software installation failed Reset the printer's network settings (see page 34) and perform a first-time installation of the printer software. Follow the instructions for your connection type (see page 2). Cannot connect to or find my wireless router or access point - Epson WorkForce 40 | Network Installation Guide - Page 31
mask). Also, if a gateway value is set, use the same value as the IP address for your wireless router or access point. The printer does not appear in the Add Printer window (Mac OS X) Make sure the printer driver was installed correctly and your computer's TCP/IP settings are configured correctly - Epson WorkForce 40 | Network Installation Guide - Page 32
is turned on and that the settings are correct for your wireless network. ■ Reset the printer's network settings (see page 34) and perform a first-time installation of the printer software. (See page 3 for wireless or page 15 for wired installations.) Printing is slow or your printout is cut off - Epson WorkForce 40 | Network Installation Guide - Page 33
) (right light on) (left light on, right light flashing) (left light off, right light flashing) (lights flash alternately) Meaning Disconnected Connected (wired) Connected (wireless) Connecting (wired) Connecting (wireless) Printer initializing or wireless auto setup in progress Troubleshooting 33 - Epson WorkForce 40 | Network Installation Guide - Page 34
a wireless network error To clear a wireless network error (indicated by error status lights on the control panel), press and release the WiFi button. ■ Initialize network settings To initialize the printer's network settings, press and hold the WiFi button for about 10 seconds. ■ Print a network - Epson WorkForce 40 | Network Installation Guide - Page 35
for a list of open-source software and software license terms applied to this printer. Trademarks Epson is a registered trademark and Epson Exceed Your Vision is a registered logomark of Seiko Epson Corporation. WorkForce is a trademark of Epson America, Inc. General Notice: Other product names used - Epson WorkForce 40 | Network Installation Guide - Page 36
CPD-25742R1 Printed in XXXXXX
-
 1
1 -
 2
2 -
 3
3 -
 4
4 -
 5
5 -
 6
6 -
 7
7 -
8
-
9
-
10
-
11
-
12
-
13
-
14
-
15
-
16
-
17
-
18
-
19
-
20
-
21
-
22
-
23
-
24
-
25
-
26
-
27
-
28
-
29
-
30
-
31
-
32
-
33
-
34
-
35
-
36
 |
 |
Network Installation Guide