Epson WorkForce 40 Network Installation Guide - Page 8
also need to temporarily turn off or disable your computer's wireless - support
 |
View all Epson WorkForce 40 manuals
Add to My Manuals
Save this manual to your list of manuals |
Page 8 highlights
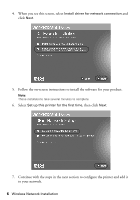
4. Do one of the following: ■ If the printer is connected to your router, access point, or hub, select Method 1: Connect via a router/access point (RECOMMENDED). ■ If the printer is connected directly to your computer, select Method 2: Connect directly to the computer (ADVANCED). You'll also need to temporarily turn off or disable your computer's wireless network connection. (You'll turn it back on later.) Important: Do not select Method 3: Connect with WPS or SES (NOT SUPPORTED). 5. Click Next. 6. If you see a firewall alert message, click Unblock or Allow to let Epson EasyInstall continue. Do not select Ask Me Later, Keep Blocking, or Block. 8 Wireless Network Installation
-
 1
1 -
2
-
 3
3 -
 4
4 -
 5
5 -
 6
6 -
 7
7 -
 8
8 -
 9
9 -
 10
10 -
 11
11 -
 12
12 -
 13
13 -
14
-
15
-
16
-
17
-
18
-
19
-
20
-
21
-
22
-
23
-
24
-
25
-
26
-
27
-
28
-
29
-
30
-
31
-
32
-
33
-
34
-
35
-
36
 |
 |

8
Wireless Network Installation
4.
Do one of the following:
■
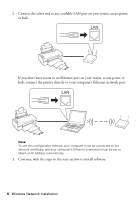
If the printer is connected to your router, access point, or hub, select
Method 1: Connect via a router/access point (RECOMMENDED)
.
■
If the printer is connected directly to your computer, select
Method 2: Connect directly to the computer (ADVANCED
)
. You’ll
also need to temporarily turn off or disable your computer’s wireless
network connection. (You’ll turn it back on later.)
Important:
Do not select
Method 3: Connect with WPS or SES (NOT SUPPORTED)
.
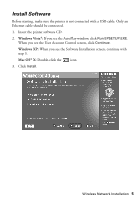
5.
Click
Next
.
6.
If you see a firewall alert message, click
Unblock
or
Allow
to let Epson
EasyInstall continue. Do not select
Ask Me Later
,
Keep Blocking
, or
Block
.