Foxconn M61PMV English Manual. - Page 80
RAID Enable in BIOS, 3 Select a RAID Array for Use
 |
View all Foxconn M61PMV manuals
Add to My Manuals
Save this manual to your list of manuals |
Page 80 highlights
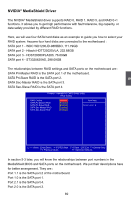
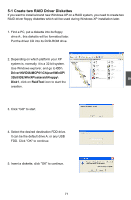
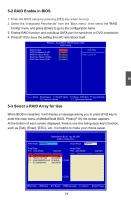
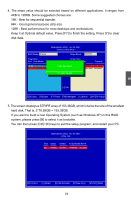
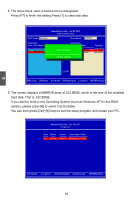
5-2 RAID Enable in BIOS 1. Enter the BIOS setup by pressing [DEL] key when boot up. 2. Select the "Integrated Peripherals" from the "Main menu", then select the "RAID Config" menu and press [Enter] to go to the configuration items. 3. Enable RAID function and individual SATA port for hard drive or DVD connection. 4. Press [F10] to save the setting then PC will reboot itself. Phoenix - AwardBIOS CMOS Setup Utility RAID Config RAID Enable SATA Pri-Master RAID SATA Pri-Slave RAID SATA Sec-Master RAID SATA Sec-Slave RAID [EnabIlDedE] Item Help [Enabled] [Enabled] Menu Level ► [Enabled] [Enabled] 5 Move Enter:Select +/-/PU/PD:Value F10:Save ESC:Exit F1:General Help F5: Previous Values F7: Optimized Defaults 5-3 Select a RAID Array for Use When BIOS is restarted, it will display a message asking you to press [F10] key to enter the main menu of MediaShield BIOS. Press [F10], the screen appears. At the bottom of each screen displayed, there is one line listing each key's function, such as [Tab], [Enter], [ESC]...etc. It is helpful to make your choice easier. MediaShield BIOS Apr 26 2007 - Define a New Array - RAID Mode: Mirroriendg Stripe Block: Optimal Free Disks Port Disk Model Capacity Array Disks Port Disk Model Capacity 01..00 WWDDCC WWDD11220000JJDD--99 111111..7799GGBB 1.1 Hitachi HDT725 232.88GB 2.0 HDS 72808 0PLA3 8 76.69GB 2.1 ST3320620AS 298.09GB [-›] Add [‹-] Del [ESC] Quit [F6] Back [F7] Finish [TAB] Navigate [↑↓] Select [Enter] Popup 73
-
 1
1 -
2
-
3
-
4
-
5
-
6
-
7
-
8
-
9
-
10
-
11
-
12
-
13
-
14
-
15
-
16
-
17
-
18
-
19
-
20
-
21
-
22
-
23
-
24
-
25
-
26
-
27
-
28
-
29
-
30
-
31
-
32
-
33
-
34
-
35
-
36
-
37
-
38
-
39
-
40
-
41
-
42
-
43
-
44
-
45
-
46
-
47
-
48
-
49
-
50
-
51
-
52
-
53
-
54
-
55
-
56
-
57
-
58
-
59
-
60
-
61
-
62
-
63
-
64
-
65
-
66
-
67
-
68
-
69
-
70
-
71
-
72
-
73
-
74
-
 75
75 -
 76
76 -
 77
77 -
 78
78 -
 79
79 -
 80
80 -
 81
81 -
 82
82 -
 83
83 -
 84
84 -
 85
85 -
86
-
87
-
88
-
89
-
90
-
91
-
92
-
93
-
94
-
95
-
96
-
97
-
98
-
99
-
100
-
101
-
102
-
103
-
104
-
105
-
106
-
107
-
108
 |
 |
