Garmin zumo Owners Manual - Page 13
Viewing Your Garmin Explore, Points of, Interest, Location Search Results, Changing the Search Area
 |
View all Garmin zumo manuals
Add to My Manuals
Save this manual to your list of manuals |
Page 13 highlights
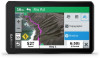
Navigating to Points of Interest Within a Venue NOTE: This feature may not be available in all areas or for all product models. You can create a route to a point of interest (POI) within a larger venue, such as a store in a shopping mall or a specific terminal in an airport. 1 Select Where To? > Search. 2 Select an option: • To search for the venue, enter the name or address of the venue, select , and go to step 3. • To search for the POI, enter the name of the POI, select , and go to step 5. 3 Select the venue. A list of categories appears below the venue, such as restaurants, car rentals, or terminals. 4 Select a category. 5 Select the POI, and select Go!. The device creates a route to the parking area or venue entrance closest to the POI. When you arrive at the destination, a checkered flag indicates the recommended parking area. A labeled point indicates the location of the POI within the venue. Exploring a Venue NOTE: This feature may not be available in all areas or for all product models. You can view a list of all points of interest located within each venue. 1 Select a venue. 2 Select > Explore this Venue. Select a location to view the option menu. Select to view detailed information about the selected location. Select to find parking areas near the location. Select to view alternate routes to the locations. Select to start navigating to the location using Garmin Adventurous Routing. Go! Select to start navigating to the location using the recommended route. Select to view the search results on the map. Location Search Results on the Map You can view the results of a location search on the map instead of in a list. From the location search results, select . The nearest location appears at the center of the map, and basic information about the selected location appears at the bottom of the map. Viewing Your Garmin Explore™ Points of Interest 1 Select Where To? > Explore. 2 Select a data type. 3 Select an item to view the details. Synchronizing Garmin Explore Account Data Before you can synchronize account data, you must connect to the Garmin Drive app and enable Garmin Explore. You can synchronize data, such as tracks, with your Garmin Explore account. This can be helpful to keep your data available on each of your compatible devices. Your device periodically synchronizes data with your account automatically. You can also synchronize data manually at any time. 1 Select Where To? > Explore. 2 Select > Sync. Drag the map to view additional search results. Additional search results. Select to view another location. Selected location summary. Select to view detailed information about the selected location. Go! Select to start navigating to the location using the recommended route. Select to view the search results in a list. Changing the Search Area By default, the device searches near your current location. You can also search other areas, such as near your destination, near another city, or along your active route. 1 Select Where To?. 2 Select . 3 Select an option. Location Search Results By default, the location search results appear in a list, with the nearest location at the top. You can scroll down to view more results. Parking Your zūmo device includes detailed parking data, which can help you find nearby parking based on the likelihood of available parking spots, type of parking area, price, or accepted payment methods. NOTE: Detailed parking data is not available in all areas or for all parking locations. Finding Parking Near Your Current Location 1 Select Where To? > Categories > Parking. 2 Select Filter Parking, and select one or more categories to filter parking by availability, type, price, or payment methods (optional). NOTE: Detailed parking data is not available in all areas or for all parking locations. 3 Select a parking location. 4 Select Go!. Finding and Saving Locations 9
-
 1
1 -
2
-
3
-
4
-
5
-
6
-
7
-
 8
8 -
 9
9 -
 10
10 -
 11
11 -
 12
12 -
 13
13 -
 14
14 -
 15
15 -
 16
16 -
 17
17 -
 18
18 -
19
-
20
-
21
-
22
-
23
-
24
-
25
-
26
-
27
-
28
-
29
-
30
 |
 |
