Garmin zumo Owners Manual - Page 6
Using the Large Button Keyboard, Mounting Your Device in a Motorcycle
 |
View all Garmin zumo manuals
Add to My Manuals
Save this manual to your list of manuals |
Page 6 highlights
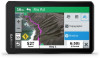
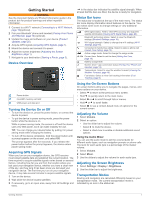
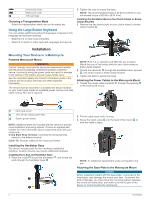
Automobile mode Motorcycle mode Off-road mode Choosing a Transportation Mode Select the transportation mode icon on the status bar. Using the Large Button Keyboard You can enable additional keyboard languages or layouts in the language and keyboard settings . • Select or to view more characters. • Select to switch to other keyboard languages and layouts. 2 Tighten the nuts to secure the base. NOTE: The recommended torque is 50 lbf-in (5.65 N-m). Do not exceed torque of 80 lbf-in (9.04 N-m). Installing the Handlebar Base to the Clutch-Clamp or BrakeClamp Brackets 1 Remove the two factory bolts on your clutch-clamp or brake- clamp bracket . Installation Mounting Your Device in a Motorcycle Powered Motorcycle Mount WARNING Garmin® strongly recommends having an experienced installer with the proper knowledge of electrical systems install the device. Incorrectly wiring the power cable can result in damage to the vehicle or the battery and can cause bodily injury. See the Important Safety and Product Information guide in the product box for product warnings and other important information. The device must be mounted in a suitable and secure location on your motorcycle, based on available power sources and safe cable routing. No fuse is required. NOTE: Both 1/4 in. standard and M6 bolts are included. Match the size of the factory bolts on your clutch-clamp or brake-clamp bracket. 2 Thread the new bolts through the handlebar base, spacers , and clutch-clamp or brake-clamp bracket. 3 Tighten the bolts to secure the base. Attaching the Power Cables to the Motorcycle Mount 1 Thread the power cable connector through the opening in the motorcycle mount. Motorcycle mount 10 to 30 Vdc system power (red) System ground (black) NOTE: Additional parts are included with the device to provide more installation and wiring options. Contact an experienced installer for more information about using these parts with your motorcycle. Crimp Style Ring Terminal: Connects the wiring harness directly to the battery terminal. Cable Tie: Secures cables to the motorcycle frame. Installing the Handlebar Base The device includes parts for two handlebar installation solutions. Custom mounts may require additional hardware. Installing the U-bolt and Handlebar Base 1 Place the U-bolt around the handlebar , and thread the ends through the handlebar base . 2 Pull the cable back until it is snug. 3 Screw the black screw into the back of the mount to hold the cable in place. NOTE: An additional replacement screw is included in the box. Attaching the Base Plate to the Motorcycle Mount NOTICE Direct, sustained contact with the base plate, or any part of the motorcycle, may damage the mount over time. To prevent this kind of damage, you must place the mounting spacers between the mount and base plate, and make sure that no part of the device or mount touches the motorcycle. 2 Installation
-
 1
1 -
 2
2 -
 3
3 -
 4
4 -
 5
5 -
 6
6 -
 7
7 -
 8
8 -
 9
9 -
 10
10 -
 11
11 -
 12
12 -
13
-
14
-
15
-
16
-
17
-
18
-
19
-
20
-
21
-
22
-
23
-
24
-
25
-
26
-
27
-
28
-
29
-
30
 |
 |
