Garmin zumo Owners Manual - Page 5
Turning the Device On or Off
 |
View all Garmin zumo manuals
Add to My Manuals
Save this manual to your list of manuals |
Page 5 highlights
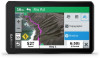
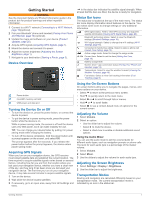
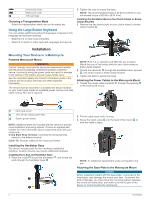
Getting Started WARNING See the Important Safety and Product Information guide in the product box for product warnings and other important information. 1 Connect to a Wi‑Fi® network (Connecting to a Wi‑Fi Network, page 19)(optional). 2 Pair your Bluetooth® phone and headset (Pairing Your Phone and Headset, page 13) (optional). 3 Update the maps and software on your device (Product Updates, page 20). 4 Acquire GPS signals (Acquiring GPS Signals, page 1). 5 Mount the device and connect it to power. 6 Adjust the screen brightness (Adjusting the Screen Brightness, page 1). 7 Navigate to your destination (Starting a Route, page 5). Device Overview in the status bar indicates the satellite signal strength. When at least half the bars are filled, the device is ready for navigation. Status Bar Icons The status bar is located at the top of the main menu. The status bar icons display information about features on the device. You can select some icons to change settings or view additional information. GPS signal status. Hold to view GPS accuracy and acquired satellite information (Viewing GPS Signal Status, page 23). Bluetooth technology status. Select to view the Bluetooth settings (Bluetooth Settings, page 18). Wi-fi signal strength. Select to change the wi-fi settings (Wi‑Fi Settings, page 18). Connected to hands-free calling. Select to place a phone call (Hands-Free Calling, page 14). Active usage mode. Select to change the usage mode. Current time. Select to set the time (Setting the Time, page 18). Battery charge level. Garmin Drive™ app connection status (Pairing Your Phone and Headset, page 13). Temperature. Select to view the weather forecast (Viewing the Weather Forecast, page 16). Fuel status. Select to view fuel tracking information (Fuel Tracking, page 8). Power button microSD® memory card slot USB power and data port Turning the Device On or Off • To turn the device on, press the power button, or connect the device to power. • To put the device in power saving mode, press the power button while the device is on. While in power saving mode, the screen is off and the device uses very little power, but it can wake instantly for use. TIP: You can charge your device faster by putting it in power saving mode while charging the battery. • To turn off the device completely, hold the power button until a prompt appears on the screen, and select Off. The prompt appears after five seconds. If you release the power button before the prompt appears, the device enters power saving mode. Acquiring GPS Signals When you turn on your navigation device, the GPS receiver must collect satellite data and establish the current location. The time required to acquire satellite signals varies based on several factors, including how far you are from the location where you last used your navigation device, whether you have a clear view of the sky, and how long it has been since you last used your navigation device. The first time you turn on your navigation device, it may take several minutes to acquire satellite signals. 1 Turn on the device. 2 Wait while the device locates satellites. 3 If necessary, go to an open area, away from tall buildings and trees. Using the On-Screen Buttons On-screen buttons allow you to navigate the pages, menus, and menu options on your device. • Select to return to the previous menu screen. • Hold to quickly return to the main menu. • Select or to scroll through lists or menus. • Hold or to scroll faster. • Select to see a context-based menu of options for the current screen. Adjusting the Volume 1 Select Volume. 2 Select an option: • Use the slider bar to adjust the volume. • Select to mute the device. • Select a check box to enable or disable additional sound options. Using the Audio Mixer You can use the audio mixer to set the volume levels for different audio types, such as navigation prompts or phone calls. The level for each audio type is a percentage of the master volume. 1 Select Volume. 2 Select Mixer. 3 Use the sliders to adjust the volume for each audio type. Adjusting the Screen Brightness 1 Select Settings > Display > Brightness. 2 Use the slider bar to adjust the brightness. Transportation Modes Routing and navigation are calculated differently based on your transportation mode. The current transportation mode is indicated by an icon in the status bar. Getting Started 1
-
 1
1 -
 2
2 -
 3
3 -
 4
4 -
 5
5 -
 6
6 -
 7
7 -
 8
8 -
 9
9 -
 10
10 -
 11
11 -
12
-
13
-
14
-
15
-
16
-
17
-
18
-
19
-
20
-
21
-
22
-
23
-
24
-
25
-
26
-
27
-
28
-
29
-
30
 |
 |
