Garmin zumo Owners Manual - Page 7
Removing Your Device from the Motorcycle, Mount, Mounting Your Device in an Automobile
 |
View all Garmin zumo manuals
Add to My Manuals
Save this manual to your list of manuals |
Page 7 highlights
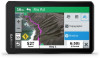
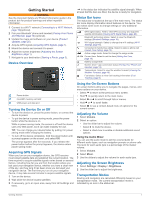
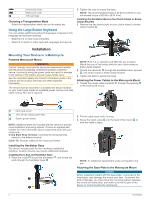
1 Thread the M4 x 20 mm panhead screws through the washers , cradle, spacers , and base plate . 2 Tighten the nuts to secure the base plate. Attaching the Base Plate to the Handlebar Base 1 Align the ball of the handlebar base and the ball of the base plate with each end of the double-socket arm . battery exposure to extreme heat, store the device out of direct sunlight. Do not use the suction cup mount on a motorcycle. See the Important Safety and Product Information guide in the product box for product warnings and other important information. NOTE: The automobile mount is not included with all device models. Go to garmin.com to purchase optional accessories. 1 Plug the automotive power cable into the port on the device. 2 Insert each ball into the double-socket arm. 3 Tighten the knob slightly. 4 Adjust for optimal viewing and operation. 5 Tighten the knob to secure the mount. Installing Your Device in the Motorcycle Mount 1 Fit the bottom of your device into the cradle. 2 Push the top of the device forward until it snaps into place. The latch on the mount stays up after you insert the device. Removing Your Device from the Motorcycle Mount 1 Press the release button on the top of the mount. 2 Lift out the device. Mounting Your Device in an Automobile NOTICE Before mounting the device, check the local laws pertaining to windshield mounting. WARNING This product contains a lithium-ion battery. To prevent the possibility of personal injury or product damage caused by 2 Remove the clear plastic from the suction cup . 3 Clean and dry your windshield and the suction cup with a lint- free cloth. 4 Press the suction cup to the windshield, and flip the lever back toward the windshield. 5 Snap the cradle onto the suction cup arm. 6 Fit the bottom of your device into the cradle. 7 Press the device into the cradle until it snaps into place. 8 Plug the other end of the automotive power cable into a power outlet. Rider Awareness Features and Alerts NOTICE The rider alerts and speed limit features are for information only and do not replace your responsibility to abide by all posted speed limit signs and to use safe driving judgment at all times. Garmin is not responsible for any traffic fines or citations you receive for failing to follow all applicable traffic laws and signs. Your device provides features that can help encourage safer riding, even when you are riding in a familiar area. The device plays an audible tone or message and displays information for each alert. You can enable or disable the audible tone or message for each type of alert. Not all alerts are available in all areas. School zone or nearby school: The device plays a tone and displays the distance to and speed limit (if available) for an upcoming school or school zone. Speed limit reduction: The device plays a tone and displays the upcoming reduced speed limit so you can be prepared to reduce your speed. Speeding alert: The device plays a tone and displays a red border on the speed limit icon when you exceed the posted speed limit for the current road. Railroad crossing: The device plays a tone and displays the distance to an upcoming railroad crossing. Animal crossing: The device plays a tone and displays the distance to an upcoming animal crossing area. Curve: The device plays a tone and displays the distance to a curve in the road. Rider Awareness Features and Alerts 3
-
 1
1 -
 2
2 -
 3
3 -
 4
4 -
 5
5 -
 6
6 -
 7
7 -
 8
8 -
 9
9 -
 10
10 -
 11
11 -
 12
12 -
13
-
14
-
15
-
16
-
17
-
18
-
19
-
20
-
21
-
22
-
23
-
24
-
25
-
26
-
27
-
28
-
29
-
30
 |
 |
