Gateway M255 Gateway Notebook Reference Guide (for Windows Vista) - Page 102
Replacing the hard drive kit
 |
View all Gateway M255 manuals
Add to My Manuals
Save this manual to your list of manuals |
Page 102 highlights
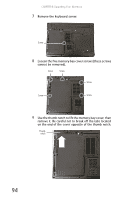
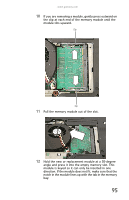
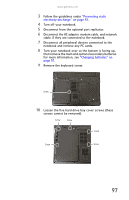
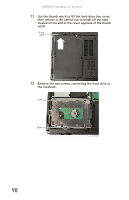
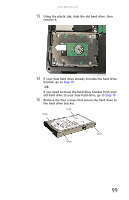
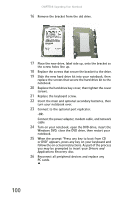
CHAPTER 8: Upgrading Your Notebook 13 Replace the memory bay cover, then tighten the cover screws. 14 Replace the keyboard screw. 15 Insert the main and optional secondary batteries, then turn your notebook over. 16 Connect to the optional port replicator. -ORConnect the power adapter, modem cable, and network cable. 17 Reconnect all peripheral devices and replace any PC cards. Replacing the hard drive kit Tools You need a small Phillips screwdriver to replace the hard drive kit. If you would like more hard drive capacity, you can replace your original drive with a higher-capacity drive. Hard drive bay Online Support: Tech Support Phone: Hours: Model: S/No: To replace the hard drive kit: 1 Create a Drivers and Applications Recovery disc using the Gateway Recovery Center. For more information, see "Recovering pre-installed software and drivers" on page 79. 2 Back up any data you want to transfer to the new hard drive. For more information, see "Backing up files" in your online User Guide. 96
-
 1
1 -
2
-
3
-
4
-
5
-
6
-
7
-
8
-
9
-
10
-
11
-
12
-
13
-
14
-
15
-
16
-
17
-
18
-
19
-
20
-
21
-
22
-
23
-
24
-
25
-
26
-
27
-
28
-
29
-
30
-
31
-
32
-
33
-
34
-
35
-
36
-
37
-
38
-
39
-
40
-
41
-
42
-
43
-
44
-
45
-
46
-
47
-
48
-
49
-
50
-
51
-
52
-
53
-
54
-
55
-
56
-
57
-
58
-
59
-
60
-
61
-
62
-
63
-
64
-
65
-
66
-
67
-
68
-
69
-
70
-
71
-
72
-
73
-
74
-
75
-
76
-
77
-
78
-
79
-
80
-
81
-
82
-
83
-
84
-
85
-
86
-
87
-
88
-
89
-
90
-
91
-
92
-
93
-
94
-
95
-
96
-
 97
97 -
 98
98 -
 99
99 -
 100
100 -
 101
101 -
 102
102 -
 103
103 -
 104
104 -
 105
105 -
 106
106 -
 107
107 -
108
-
109
-
110
-
111
-
112
-
113
-
114
-
115
-
116
-
117
-
118
-
119
-
120
-
121
-
122
-
123
-
124
-
125
-
126
-
127
-
128
-
129
-
130
-
131
-
132
-
133
-
134
-
135
-
136
-
137
-
138
-
139
-
140
-
141
-
142
-
143
-
144
-
145
-
146
-
147
-
148
-
149
-
150
-
151
-
152
-
153
-
154
-
155
-
156
 |
 |
