GE PGS908SEPSS Use and Care Manual - Page 27
After a Clean Cycle, How to Delay the Start of Cleaning
 |
UPC - 084691199786
View all GE PGS908SEPSS manuals
Add to My Manuals
Save this manual to your list of manuals |
Page 27 highlights
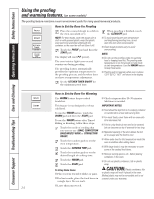
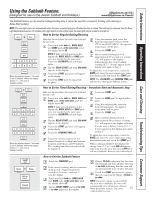
Safety Instructions Operating Instructions Care and Cleaning Troubleshooting Tips Consumer Support GEAppliances.com (U.S.) www.GEAppliances.ca (Canada) The oven door must be closed and all controls must be set correctly for the cycle to work properly. How to Delay the Start of Cleaning NOTE: The surface burners must be turned off prior to the self-clean start time. Touch the SELF CLEAN STD/LOW or SELF CLEAN LOW/STD pad once for a 4-hour (3-hour on some models) clean time or twice for a 3-hour (4-hour on some models) clean time. A 3-hour self-clean time is recommended for use when cleaning small, contained spills. A self-clean time of 4 hours or longer is recommended for a dirtier oven. If a time other than 4 hours or 3 hours is needed, use the number pads and enter the desired clean time. You can change the clean time to any time between 3 hours (21⁄2 hours on some models) and 5 hours, depending on how dirty your oven is. Touch the DELAY START pad. Using the number pads, enter the time of day you want the clean cycle to start. Touch the START pad. The door locks automatically. The display will show the start time. It will not be possible to open the oven door until the temperature drops below the lock temperature and the LOCKED light goes off. When the LOCKED light goes off, you will be able to open the door. On models with Range Lock-Out, touch and hold the RANGE LOCKOUT pad for 3 seconds to turn it off. After a Clean Cycle You may notice some white ash in the oven. Wipe it up with a damp cloth after the oven cools. If white spots remain, remove them with a soapfilled or plastic scouring pad and rinse thoroughly with a vinegar and water mixture. These deposits are usually a salt residue that cannot be removed by the clean cycle. If the oven is not clean after one clean cycle, repeat the cycle. ■ You cannot set the oven for cooking until the oven is cool enough for the door to unlock. ■ While the oven is self-cleaning, you can touch the CLOCK pad to display the time of day. To return to the clean countdown, touch the SELF CLEAN STD/LOW or SELF CLEAN LOW/STD pad. ■ If the racks become hard to slide, apply a small amount of cooking oil to a paper towel and wipe the edges of the oven racks with the paper towel. NOTE: On models with Range Lock-Out, touch and hold the RANGE LOCK-OUT pad for 3 seconds to turn it off. 27
-
 1
1 -
2
-
3
-
4
-
5
-
6
-
7
-
8
-
9
-
10
-
11
-
12
-
13
-
14
-
15
-
16
-
17
-
18
-
19
-
20
-
21
-
 22
22 -
 23
23 -
 24
24 -
 25
25 -
 26
26 -
 27
27 -
 28
28 -
 29
29 -
 30
30 -
 31
31 -
 32
32 -
33
-
34
-
35
-
36
-
37
-
38
-
39
-
40
-
41
-
42
-
43
-
44
-
45
-
46
-
47
-
48
-
49
-
50
-
51
-
52
-
53
-
54
-
55
-
56
-
57
-
58
-
59
-
60
-
61
-
62
-
63
-
64
-
65
-
66
-
67
-
68
-
69
-
70
-
71
-
72
-
73
-
74
-
75
-
76
-
77
-
78
-
79
-
80
-
81
-
82
-
83
-
84
-
85
-
86
-
87
-
88
-
89
-
90
-
91
-
92
-
93
-
94
-
95
-
96
-
97
-
98
-
99
-
100
-
101
-
102
-
103
-
104
-
105
-
106
-
107
-
108
-
109
-
110
-
111
-
112
-
113
-
114
-
115
-
116
-
117
-
118
-
119
-
120
-
121
-
122
-
123
-
124
-
125
-
126
-
127
-
128
-
129
-
130
-
131
-
132
-
133
-
134
-
135
-
136
 |
 |